CSV
Any references to third-party products or services do not constitute Boost.space Product Documentation nor do they create any contractual obligations. This material is for informational purposes only and is subject to change without notice.
Boost.space does not warrant the availability, accuracy, reliability, completeness, or usefulness of any information regarding the subject of third-party services or systems.
Getting started with CSV
The CSV aggregator and CSV transformer lets you create csv files and parse csv text from a received text value or a file.
Aggregators
Create CSV
Merges selected text items and return them in the CSV format.
TheCreate CSV aggregator lets you create csv text from received text values.
Source Module
Select the app module you are using to aggregate the fields you need.
Aggregate fields
Select the fields you want to aggregate from the list of available fields.
Include headers in the first row
When selected, includes the headers in the result.
Delimiter
Select the delimiter character to separate the values. If you select Other, a Delimiter character field will populate below where you can specify the character.
Delimiter character
Specify which delimiter character is used to separate the values if you selected Other. It must be only one character.
Newline
Select the newline that is used to indicate the end of a line of text.
Group by
Enter the filter to group the results. For example, a date.
Stop processing after an empty aggregation
When selected, the scenario stops when there are no results.
Example – Export Google Contacts to a CSV File
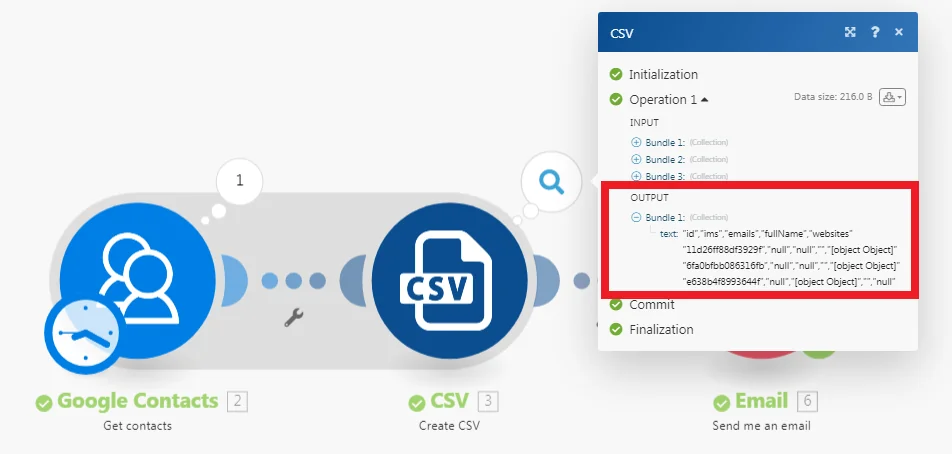
The Create CSV module provides you with a list of options as checkboxes. If you are selecting Contact’s ID and Full Name, then the results are returned in a text format.
Create CSV (advanced)
Merges selected text items and return them in the CSV format. Employs Data Structure to define CSV columns in the resulting CSV file.
The Create CSV (advanced) aggregator lets you create a csv text from received text values. It employs a Data structure that defines the CSV columns in the resulting CSV file. Once defined, the columns appear as fields in the CSV module setup, available for mapping.
Source Module
Select the app module you are using to aggregate the fields you need.
Data Structure
Select the data structure to aggregate the fields in the way you want. See Adding a Data Structure.
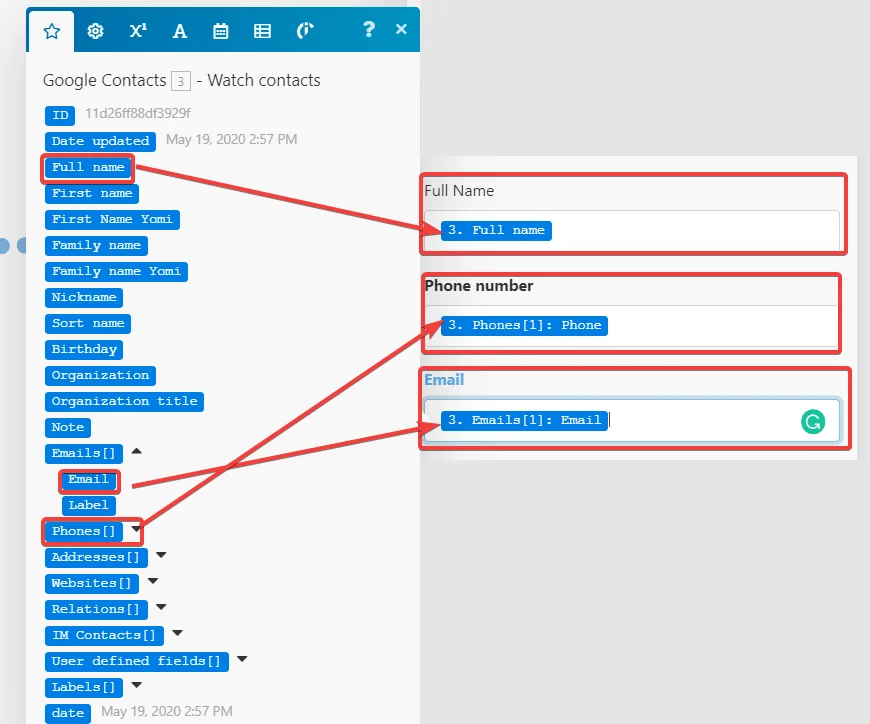
After defining the data structure, you can map the items to the corresponding fields.
Aggregate Fields
Provides a list of fields you want to aggregate.
Include headers in the first row
When selected, includes headings in the first row.
Delimiter
Select the delimiter character to separate the values. If you select Other, a Delimiter character field will populate below where you can specify the character.
Delimiter character
Specify which delimiter character is used to separate the values if you selected Other. It must be only one character.
Newline
Select the newline that is used to indicate the end of a line of text.
Group by
Enter the filter to group the results. For example, a date.
Stop processing after an empty aggregation
When selected, the scenario stops when there are no results.
Example – Export Google Contacts to a CSV File
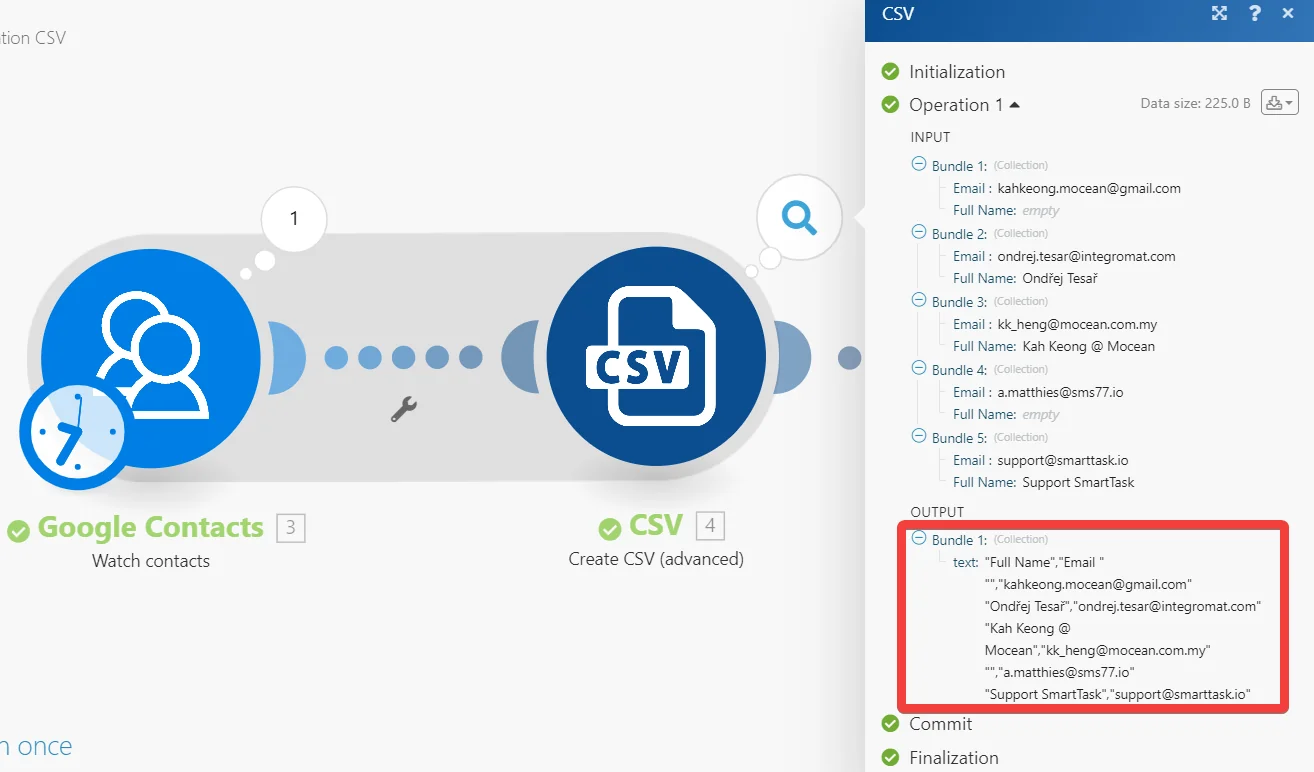
The **Create CSV (advanced)**module provides you with the option to create a data structure with the aggregating fields you needed. If you are defining a data structure with Full Name and Email then the results are returned in a text format.
Transformers
Parse CSV
Parses a CSV file.
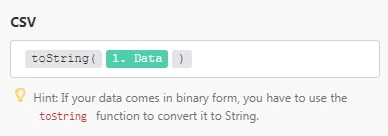
The Parse CSV transformer lets you parse a csv text from a received text value or a file. If your data comes in binary form (typically from a file), you have to use the toString() function to convert the binary data to String:
Transforming complex data to CSV
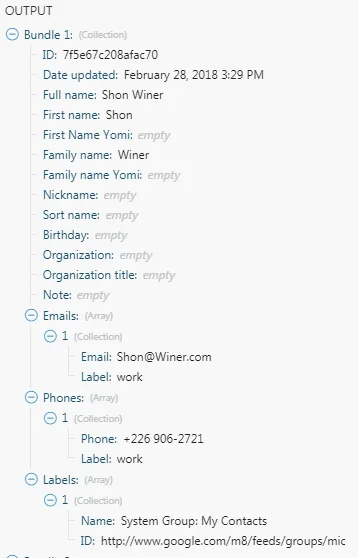
For example, you would like to export your Google contacts to a CSV file with two columns “Full Name” and “Email”. The output bundle from the Google Contacts > Get contacts from a group module has the following structure (see on the right). The email addresses are stored inside the Emails[] item, which is an array of collections, each collection containing two items: Label and Email.
If you employ the simple Create CSV module, you are offered a list of checkboxes corresponding to a bundle’s top-level items. If you attempt to tick Full name and Emails items, the Create CSV module will produce the following output, which is probably not what you wished for:
"emails","fullName" "[object Object]","Shon Winer" "[object Object]","Lizeth Fulmore" "[object Object]","Hilario Gullatt" "[object Object]","Abby Eisenbarth"
Since the item Full Name is of simple type text it is exported just fine. But the item Emails, which is of a complex type array of collections, is exported as [object Object]. That is how Collections and Arrays are transformed to text by default.
To export content of the Email item of the first collection of the Emails[] array instead, it is necessary to employ the Create CSV (advanced) module. The module will enable you to define individual columns of your CSV file and map items to them, including the nested ones.
1. Insert the module Create CSV (advanced) in a scenario and open its configuration.
2. Click the Add button next to the Data structure field to create a new Data structure.
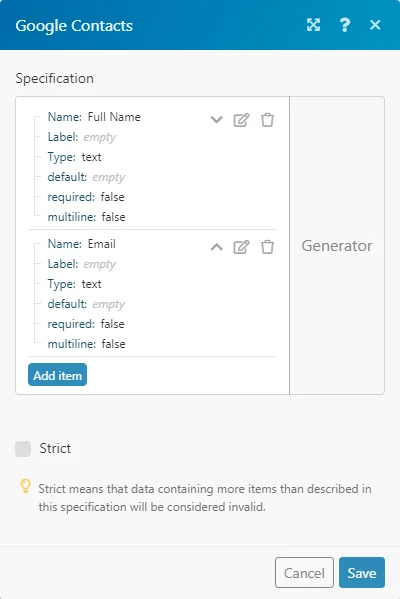
3. Input a name for the Data structure and click the Add item button to add the individual columns. If you wish to export two columns: “Full Name” and “Email”, the resulting Data structure would look like this:
4. Once you have successfully defined the Data structure, fields corresponding to each individual column should appear in the configuration of the Create CSV (advanced) module so you can map the items. Take the first item from the Emails[] array and map its item Email to the field/column Email:
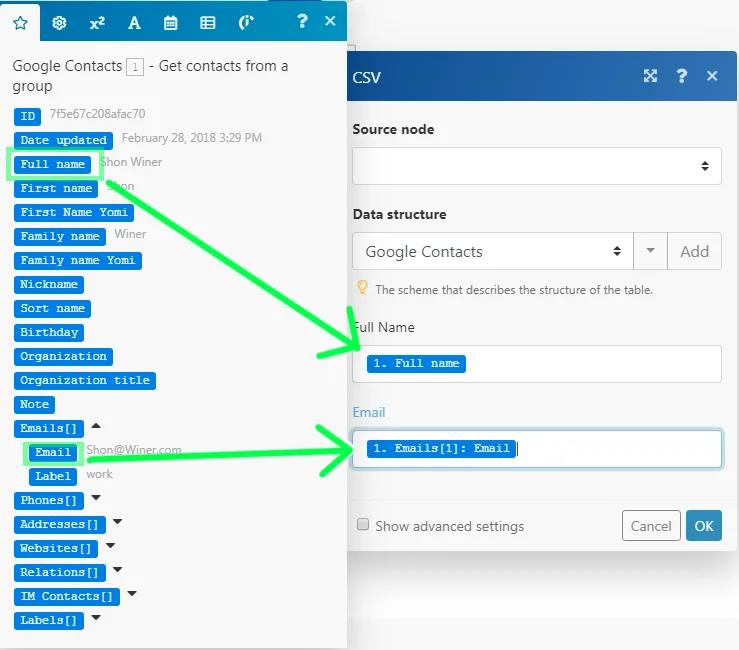
5. Execute the scenario. Since the item Emails[1]: Email mapped to column Email is of simple type text, it will be exported correctly now:
"Full Name","Email" "Shon Winer","Shon@Winer.com" "Lizeth Fulmore","Lizeth@Fulmore.com" "Hilario Gullatt","Hilario@Gullatt.com" "Abby Eisenbarth","Abby@Eisenbarth.com"
Adding a Data Structure
You can add the data structures by clicking Add item in the Specification field.
One item represents one column.
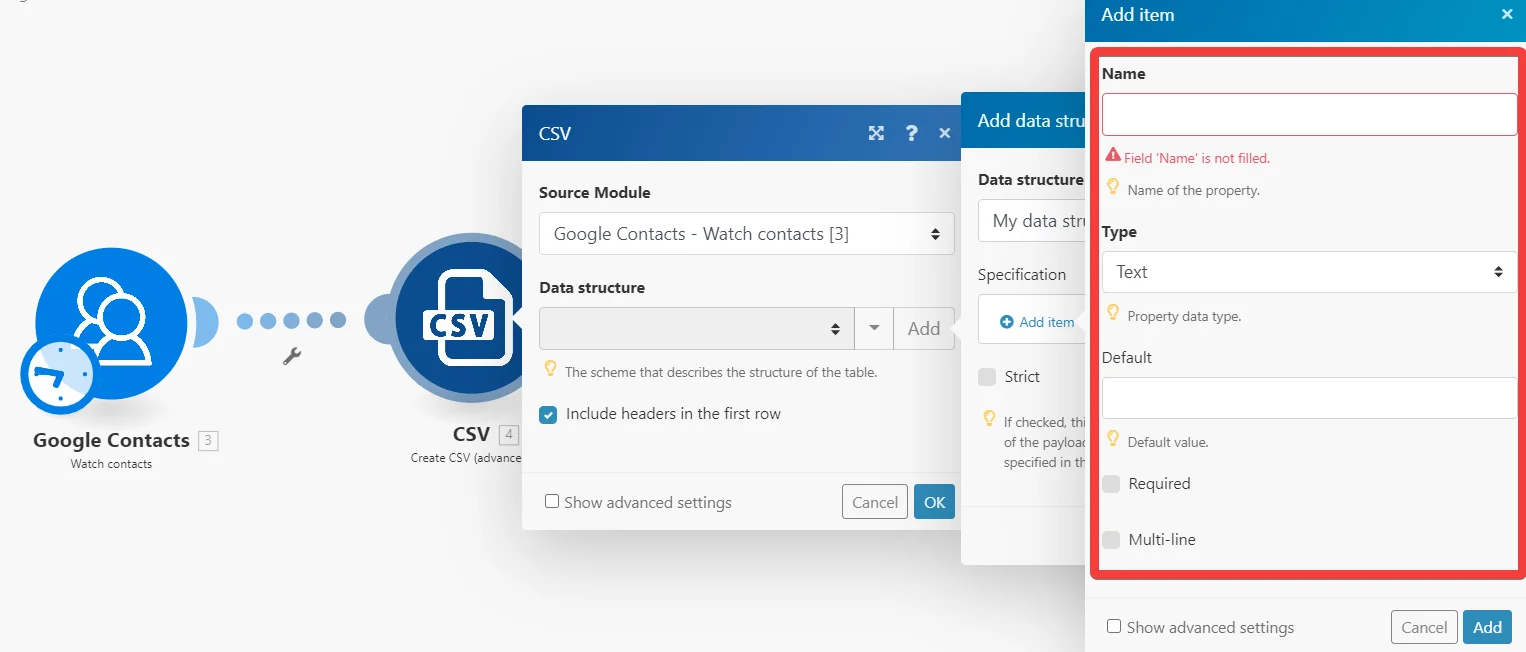
Fill the details in the Add item dialog.
Name
Enter the name of the property for the data structure. For example, Full Name.
Label
Enter a label for the data structure.
Type
Select the data type:
-
Array
-
Collection
-
Date
-
Text
-
Number
-
Boolean
-
Binary Data
Default
Enter a default value for the property.
Required
When selected, indicates that the value is required.
Multi-line
When selected,
Sample items after filling the data.
Legacy article, imported from the original Boost.space knowledge base (/knowledge-base/applications/built-in-apps/csv/).

