KashFlow
The KashFlow modules enable you to monitor, publish or update posts, photos, and videos in your KashFlow account.
Getting Started with KashFlow
Prerequisites
- A KashFlow account — you can create one at www.kashflow.com.
Connecting KashFlow to Boost.space Integrator
To connect your KashFlow account to Boost.space Integrator follow these steps:
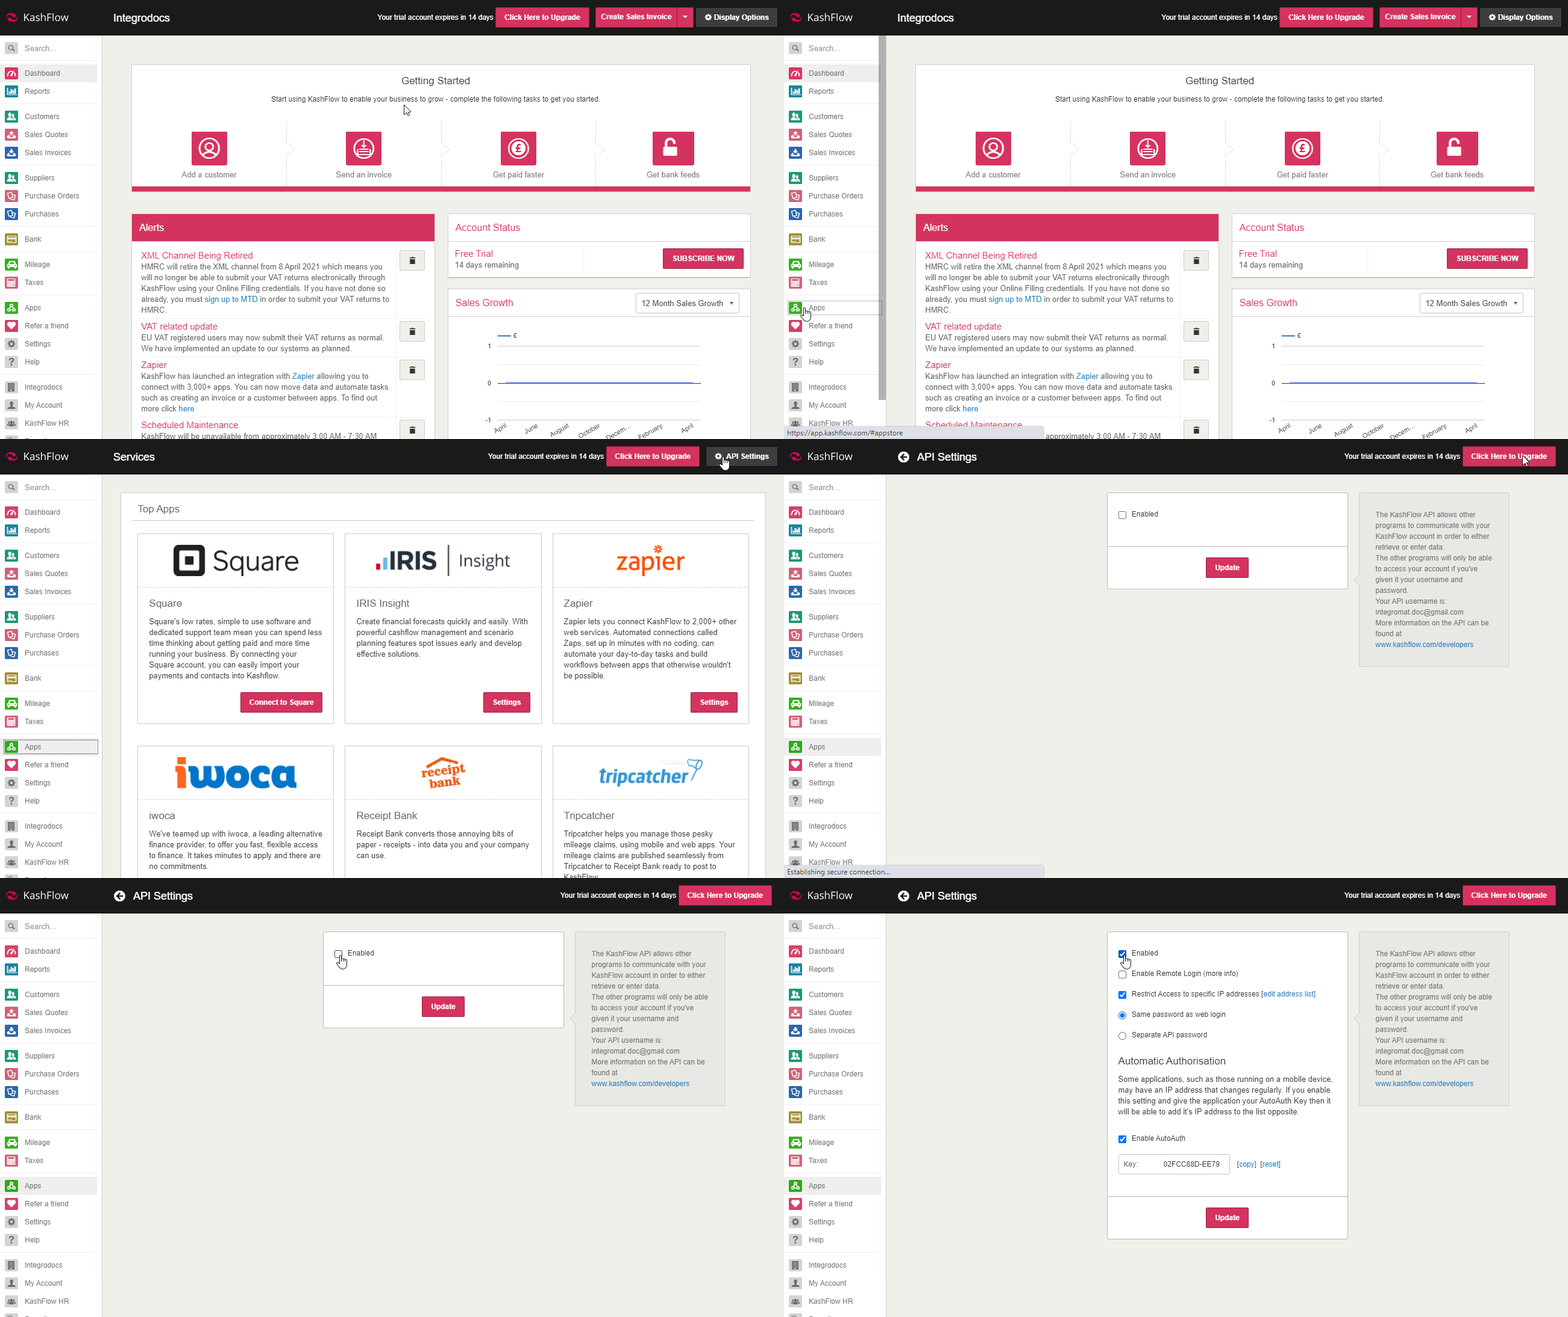
1. Log in to your KashFlow account.
2. Navigate to Apps > API Settings. Activate the Enabled checkbox, disable the Restrict Access to specific IP addresses option and click Update.
3. Go to Boost.space Integrator and open the KashFlow module’s Create a connection dialog.
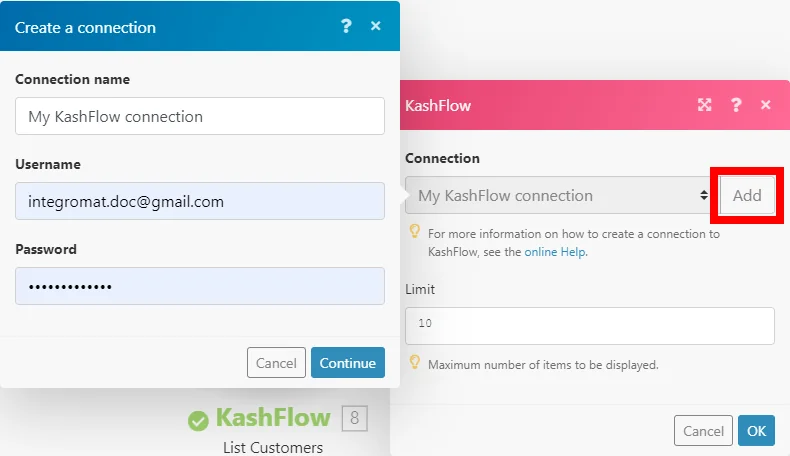
4. Enter your KashFlow credentials to the respective fields and click the Continue button to establish the connection.
The connection has been established. You can proceed with setting up the module.
Customers
List Customers
Retrieves all customers in your account.
Connection
Establish a connection to your KashFlow account.
Limit
Set the maximum number of customers Boost.space Integrator will return during one execution cycle.
Get a Customer
Retrieves customer details.
Connection
Establish a connection to your KashFlow account.
Customer ID
Enter (map) or select the ID of the customer you want to retrieve details for.
Create a Customer
Creates a new customer.
Connection
Establish a connection to your KashFlow account.
Name
Enter (map) or select the ID of the customer you want to retrieve details for.
Contact
Enter the full contact name of the customer.
Telephone
Enter the customer’s telephone number.
Mobile
Enter the customer’s mobile number.
Fax
Enter the customer’s fax number.
Enter the customer’s email address(es).
Address
Enter the customer’s billing address lines.
Country Name
Enter the customer’s billing address country name.
Country Code
Enter the customer’s billing address country code in the ISO 3166-1 alpha-2 standard (except for Greece which is recorded as ‘EL’).
Postcode
Enter the customer’s billing address postcode.
Website
Enter the customer website URI.
EC
Select the Yes option if the customer is VAT Registered in another EC Member.
Outside EC
Select the Yes option if the customer is VAT registered outside of the EC.
Notes
Enter the additional free-text.
Source
Enter the ID for the source assigned to the customer.
Discount
Enter the discount percentage for this customer.
Show Discount
Enable this option if the customer is specified to receive a discount.
Payment Terms
Enter the number of days used to define the Due Date on Invoices from the Issue Date.
Currency ID
Enter the ID for the customer’s default currency.
Contact Title
Enter the customer contact’s title.
Contact First Name
Enter the customer contact’s first name.
Contact Last Name
Enter the customer contact’s last name.
Customer Has Delivery Address
Select the Yes option if the customer is specified as having a delivery address separate from their billing address.
Delivery Address
Fill in the customer delivery address lines.
Delivery Country Name
Enter the customer delivery address country name.
Delivery Country Code
Enter the customer delivery address country code in the ISO 3166-1 alpha-2 standard (except for Greece which is recorded as ‘EL’)
Delivery Postcode
Enter the customer delivery address postal code.
VAT Number
Enter the customer’s VAT number.
Extra Fields
Add the custom fields values.
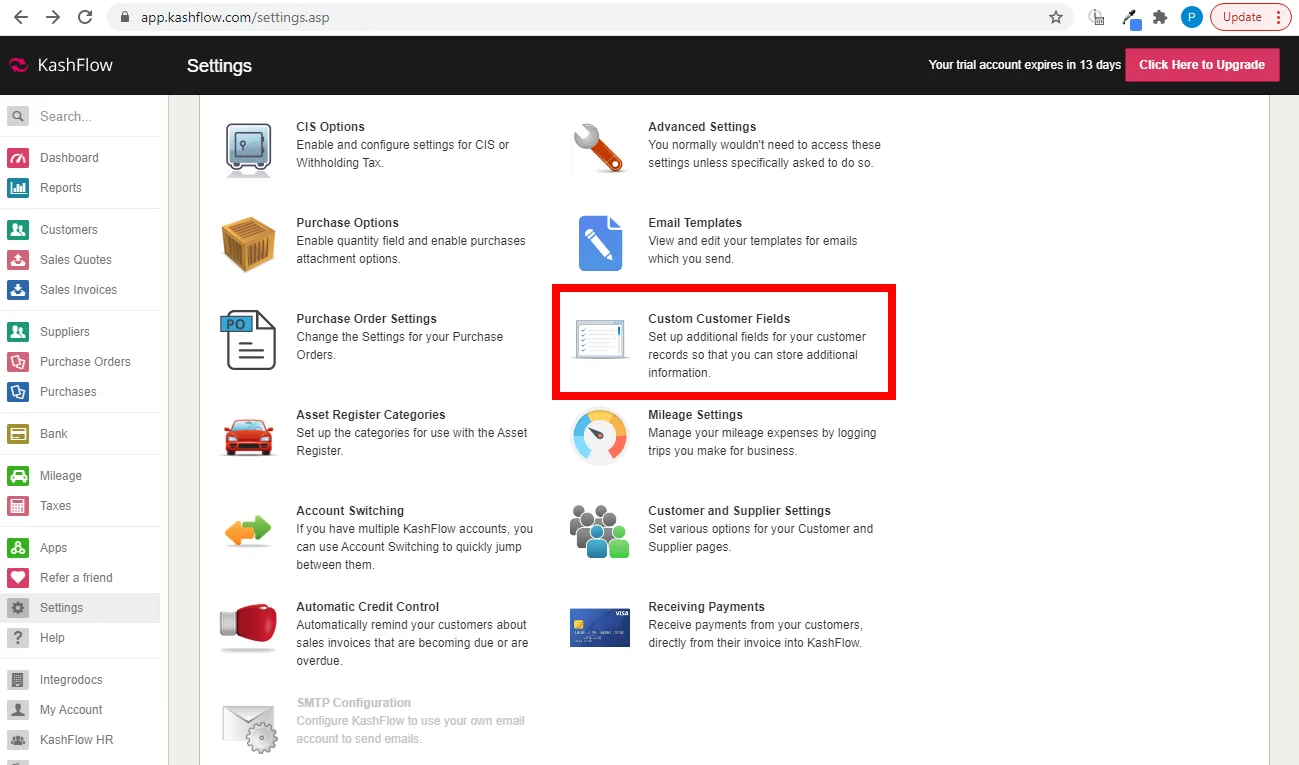
Each item will be used as a value to a custom customer text field in the order they are set up your account. You may find custom fields settings at your account: Settings -> Custom Customer Fields.
Extra Checkboxes
Add the custom checkbox values.
Each item will be used as a value to a custom customer checkbox in the order they are set up at your account. You may find custom fields settings at your account: Settings -> Custom Customer Fields.
Update a Customer
Updates an existing customer.
Connection
Establish a connection to your KashFlow account.
Customer ID
Enter (map) or select the ID of the customer you want to update.
Name
Enter (map) the name of the customer you want to update.
Please find the descriptions of the fields in the Create a Customer section above.
Delete a Customer
Deletes a customer.
Connection
Establish a connection to your KashFlow account.
Customer ID
Enter (map) or select the ID of the customer you want to delete.
Invoices
List Invoices
Retrieves all customer’s invoices.
Connection
Establish a connection to your KashFlow account.
Customer ID
Enter (map) or select the ID of the customer you want to list invoices for.
Limit
Set the maximum number of invoices Boost.space Integrator will return during one execution cycle.
Get an Invoice
Retrieves customer’s invoice details.
Connection
Establish a connection to your KashFlow account.
Customer ID
Enter (map) or select the ID of the customer you want to list invoices for.
Invoice ID
Enter (map) the ID of the invoice you want to retrieve details for.
Create an Invoice
Creates a new invoice.
Connection
Establish a connection to your KashFlow account.
Customer ID
Enter (map) or select the ID of the customer you want to list invoices for.
Invoice Date
Enter the date when the invoice is issued. See the list of supported date and time formats.
Due Date
Enter the invoice due date. See the list of supported date and time formats.
Paid
Select the Yes option if the document is an Invoice or Receipt and is completely paid.
Customer Reference
Enter the customer reference number.
Project ID
Enter the ID or select the project associated with the document
Currency Code
Enter the currency code in the ISO 4217 standard.
Exchange Rate
Enter the exchange rate for the specified currency.
Lines
Specify the invoice lines.
Delivery Address
Enter the information about the delivery address.
Use Custom Delivery Address
If the document is a Quote or Invoice and a Delivery Address is defined to be used.
Update an Invoice
Updates an existing invoice.
Connection
Establish a connection to your KashFlow account.
Customer ID
Enter (map) or select the ID of the customer you want to update the invoice for.
Invoice ID
Enter (map) the ID of the invoice you want to update.
Please find the descriptions of the fields in the Create an Invoice section above.
Delete an Invoice
Deletes an invoice.
Connection
Establish a connection to your KashFlow account.
Customer ID
Enter (map) or select the ID of the customer you want to delete the invoice for.
Invoice ID
Enter (map) the ID of the invoice you want to delete.
Make an API Call
Allows you to perform a custom API call.
Connection
Establish a connection to your KashFlow account.
API Method
Select the action you want to perform.
For the descriptions of available endpoints, refer to the KashFlow API Documentation.
Body
Enter the body content for your API call in JSON format. You can use the J_SON > Create JSON_ module to define names and values.
Legacy article, imported from the original Boost.space knowledge base (/knowledge-base/applications/commerce/kashflow/).

