Paymo
The Paymo modules allow you to watch, create, update, list, delete, and retrieve the task, tasklist, projects, invoices, clients, and time entries in your Paymo account.
Getting Started with Paymo
Prerequisites
- A Paymo account – create an account at paymoapp.com/.
Connecting Paymo to Boost.space Integrator
To connect your Paymo account to Boost.space Integrator you need to obtain the API Key from your Paymo account and insert it in the Create a connection dialog in the Boost.space Integrator module.
1. Login to your Paymo account.

2. Click Your Profile Icon > My Settings > API Keys > _Generate New API_button.
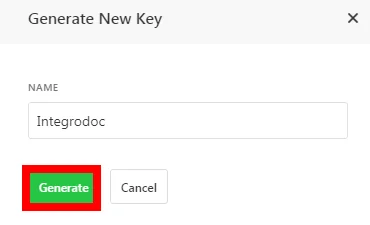
3. Enter a name for the API Key, click Generate, and copy the API key to your clipboard.
4. Go toBoost.space Integrator and open the Paymo module’s Create a connection dialog.
5. In the Connection name field, enter a name for the connection.
6. In the API Key field, enter the API key copied in step 3.
7. In the Password field, enter your account password, and click Continue.
The connection has been established.
Task

Watch New Tasks
Triggers when a new task hs been created.
You do not have to add the webhooks in the Paymo as it is automatically done for you once you add and save an instant trigger module to your scenario.
Webhook
Enter a name for the webhook.
Connection
Establish a connection to your Paymo account.
List Tasks
Returns a list of tasks.
Connection
Establish a connection to your Paymo account.
Project ID
Select the Project ID whose tasks you want to list.
Tasklist ID
Select the TaskList ID of the project whose tasks you want to list.
User ID
Select the User ID to list only those tasks related to the user.
Completed
Select whether you want to list the completed tasks:
-
Yes
-
No
-
Not defined
Assigned to
Select the assignee to list only those tasks assigned to the specified user.
Include
Select the options whose details you want to include in the task.
Limit
Set the maximum number of tasks Boost.space Integrator should return during one scenario execution cycle.
Get a Task
Returns information about a specified task.
Connection
Establish a connection to your Paymo account.
Task ID
Select the Task ID whose details you want to retrieve.
Include
Select the options you want to include in the details.
Create a Task
Creates a task.
Connection
Establish a connection to your Paymo account.
Task Name
Enter the name of the task.
Tasklist ID
Select the Tasklist ID for the task.
User ID
Select the User ID to whom you want to assign the task.
Complete
Select whether this is completed:
-
Yes
-
No
-
Not defined
Status ID
Select the status of the task:
-
Backlog
-
To Do
-
In Progress
-
Complete
Billable
Select whether the task is billable:
-
Yes
-
No
-
Not defined
Flat Billing
Select whether this task is flat billable:
-
Yes
-
No
-
Not defined
This option applies only for the Time & Materials projects.
Position of the Task
Enter the position of the task in the Tasklist.
Description
Enter the details of the project.
Due Date
Enter the date by when the task must be completed.
Budget Hours
Enter the hours allocated for the task.
Users
Select the users whom you want to notify about the task.
Priority
Select the priority of the task. If no priority is selected, the task priority is set as normal.
-
Low
-
Normal
-
High
-
Critical
Update a Task
Updates the information of a specified task.
Connection
Establish a connection to your Paymo account.
Task ID
Select the Task ID whose details you want to update.
Task Name
Enter the name of the task.
Tasklist ID
Select the Tasklist ID for the task.
User ID
Select the User ID to whom you want to assign the task.
Complete
Select whether this is completed:
-
Yes
-
No
-
Not defined
Status ID
Select the status of the task:
-
Backlog
-
To Do
-
In Progress
-
Complete
Billable
Select whether the task is billable:
-
Yes
-
No
-
Not defined
Flat Billing
Select whether this task is flat billable:
-
Yes
-
No
-
Not defined
This option applies only for the Time & Materials projects.
Position of the Task
Enter the position of the task in the Tasklist.
Description
Enter the details of the project.
Due Date
Enter the date by when the task must be completed.
Budget Hours
Enter the hours allocated for the task.
Users
Select the users whom you want to notify about the task.
Priority
Select the priority of the task. If no priority is selected, the task priority is set as normal.
-
Low
-
Normal
-
High
-
Critical
Delete a Task
Deletes a specified task.
Connection
Establish a connection to your Paymo account.
Task ID
Select the Task ID you want to delete.
Task List
Watch New Task Lists
Triggers when a new task list has been created.
You do not have to add the webhooks in the Paymo as it is automatically done for you once you add and save an instant trigger module to your scenario.
Connection
Establish a connection to your Paymo account.
Task ID
Select the Task ID whose details you want to update.
List Task Lists
Returns a list of task lists.
Connection
Establish a connection to your Paymo account.
Search By
Select the option to search the task lists:
-
Project
-
Milestone
Project ID
Select the Project ID whose task lists you want to list.
Milestone ID
Select the Milestone ID whose task lists you want to list.
Include
Select the options whose details you want to include in the task list.
Limit
Set the maximum number of task lists Boost.space Integrator should return during one scenario execution cycle.
Get a Task List
Returns information about a specified task list.
Connection
Establish a connection to your Paymo account.
Task List ID
Select the Task List ID whose details you want to retrieve.
Include
Select the options whose details you want to include in the task list details.
Create a Task List
Create a new task list.
Connection
Establish a connection to your Paymo account.
Task List Name
Enter the task list name.
Project ID
Select the Project ID associated with the task list.
Position of the Task List
Enter the task list position in the project.
Milestone ID
Select the Milestone ID for the task list. If you are linking a task list with a milestone, all tasks from the task list should be completed by the milestone due date.
Update a Task List
Updates the information of a specified task list.
Connection
Establish a connection to your Paymo account.
Tasklist ID
Select the Tasklist ID whose details you want to update.
Task List Name
Enter the task list name.
Project ID
Select the Project ID associated with the task list.
Position of the Task List
Enter the task list position in the project.
Milestone ID
Select the Milestone ID for the task list. If you are linking a task list with a milestone, all tasks from the task list should be completed by the milestone due date.
Delete a Task List
Deletes a specified task list.
Connection
Establish a connection to your Paymo account.
Task List ID
Select the Task List ID you want to delete.
Invoice
Watch New Invoices
Triggers when a new invoice has been created.
You do not have to add the webhooks in the Paymo as it is automatically done for you once you add and save an instant trigger module to your scenario.
Webhook
Enter a name for the webhook.
Connection
Establish a connection to your Paymo account.
List Invoices
Returns a list of invoices.
Connection
Establish a connection to your Paymo account.
Client ID
Select the Client ID whose invoices you want to list.
Status
Select the status of the invoices:
-
Draft
-
Sent
-
Viewed
-
Paid
-
Void
Total
Enter the invoice amount to list invoices with the specified amount. For example, >100.
Include
Select the options whose details you want to include in the invoice.
Limit
Set the maximum number of invoices Boost.space Integrator should return during one scenario execution cycle.
Get an Invoice
Returns information about a specified invoice.
Connection
Establish a connection to your Paymo account.
Invoice ID
Select the Invoice ID whose details you want to retrieve.
Include
Select the options whose details you want to include in the invoice.
Create an Invoice
Creates a new invoice.
Connection
Establish a connection to your Paymo account.
Client ID
Select the Client ID whose invoice you want to create.
Currency
Select the applicable currency for the invoice.
Date
Enter the date when the invoice is created.
Due Date
Enter the date when the invoice is due.
Template ID
Select the Template ID for the invoice.
Tax
Enter the tax on the invoice amount in percentage.
Second Tax
Enter the tax on the invoice amount in percentage.
Number
Enter the invoice number.
Title
Enter the invoice name.
Delivery Date
Enter the date when the items in the invoice must be delivered.
Footer
Enter the text that should appear at the footer of the invoice.
Discount
Enter the discount applied to the invoice in percentage.
Discount Text
Enter the discount details.
Tax on Tax
Select whether tax is applicable on the tax amount mentioned in the invoice:
-
Yes
-
No
-
Not defined
Bill To
Enter the customer information that should appear in the invoice.
Company Info
Enter the company information that should appear in the invoice.
Notes
Enter any additional information about the invoice which you want to mention.
Items
Add the items in the invoice:
Item
Enter the name of the item.
Description
Enter the details of the item.
Price Unit
Enter the price of the item.
Quantity
Enter the number of items in the invoice.
Expense ID
Select the Expense ID applicable for the item.
Apply Tax
Select whether the tax is applicable on the item:
-
Yes
-
No
-
Not defined
Position on Invoice Item
Select the item position in the invoice.
Update an Invoice
Updates the information of a specified invoice.
Connection
Establish a connection to your Paymo account.
Invoice ID
Select the Invoice ID whose details you want to update.
Client ID
Select the Client ID whose invoice you want to create.
Currency
Select the applicable currency for the invoice.
Date
Enter the date when the invoice is created.
Due Date
Enter the date when the invoice is due.
Template ID
Select the Template ID for the invoice.
Tax
Enter the tax on the invoice amount in percentage.
Second Tax
Enter the tax on the invoice amount in percentage.
Number
Enter the invoice number.
Title
Enter the invoice name.
Delivery Date
Enter the date when the items in the invoice must be delivered.
Footer
Enter the text that should appear at the footer of the invoice.
Discount
Enter the discount applied to the invoice in percentage.
Discount Text
Enter the discount details.
Tax on Tax
Select whether tax is applicable on the tax amount mentioned in the invoice:
-
Yes
-
No
-
Not defined
Bill To
Enter the customer information that should appear in the invoice.
Company Info
Enter the company information that should appear in the invoice.
Notes
Enter any additional information about the invoice which you want to mention.
Items
Add the items in the invoice:
Item
Enter the name of the item.
Description
Enter the details of the item.
Price Unit
Enter the price of the item.
Quantity
Enter the number of items in the invoice.
Expense ID
Select the Expense ID applicable for the item.
Apply Tax
Select whether the tax is applicable on the item:
-
Yes
-
No
-
Not defined
Position on Invoice Item
Select the item position in the invoice.
Delete an Invoice
Deletes a specified invoice.
Connection
Establish a connection to your Paymo account.
Invoice ID
Select the Invoice ID you want to delete.
Project
Watch New Projects
Triggers when a new project has been created.
You do not have to add the webhooks in the Paymo as it is automatically done for you once you add and save an instant trigger module to your scenario.
Webhook
Enter a name for the webhook.
Connection
Establish a connection to your Paymo account.
List Projects
Returns all projects.
Connection
Establish a connection to your Paymo account.
Client ID
Select the Client ID whose projects you want to list.
Manager ID
Select the Manager ID(s) whose associated projects you want to list.
User ID
Select the User ID (s) whose assigned projects you want to list.
Active
Select whether you want to list the active projects:
-
Yes
-
No
-
Not defined
Include
Select the options whose details you want to include in the projects.
Limit
Set the maximum number of projects Boost.space Integrator should return during one scenario execution cycle.
Get a Project
Returns information about a specified project.
Connection
Establish a connection to your Paymo account.
Project ID
Select the Project ID whose details you want to retrieve.
Include
Select the options whose details you want to include in the project.
Create a Project
Creates a new project.
Connection
Establish a connection to your Paymo account.
Project Name
Enter the project name.
Code
Enter the project code which is used as a prefix in the task code. The project code can only contain alphanumeric (A-Z, numbers 0-9).
Description
Enter the details of the project.
Client ID
Select the Client ID for whom you are creating the project.
Workflow ID
Select the Workflow ID applicable for the project.
Status ID
Select the Status ID of the project:
-
On-hold
-
Canceled
-
Completed
-
Archived
-
Active
-
Proposal
Active
Select whether the project is active:
-
Yes
-
No
-
Not defined
Adjustable Hours
Select whether the project hours are adjustable:
-
Yes
-
No
-
Not defined
Users
Add the users to whom you want to assign the project.
Managers
Add the managers for the project.
Billable
Select whether the project is billable:
-
Yes
-
No
-
Not defined
Budget Hours
Enter the number of hours you want to allocate for the project. If no hours mentioned then the project will have unlimited budget hours.
Price Per Hour
Enter the project’s hourly price details. Applicable only for time & materials project.
Update a Project
Updates the information of a specified project.
Connection
Establish a connection to your Paymo account.
Project ID
Select the Project ID whose details you want to update.
Project Name
Enter the project name.
Code
Enter the project code which is used as a prefix in the task code. The project code can only contain alphanumeric (A-Z, numbers 0-9).
Description
Enter the details of the project.
Client ID
Select the Client ID for whom you are creating the project.
Workflow ID
Select the Workflow ID applicable for the project.
Status ID
Select the Status ID of the project:
-
On-hold
-
Canceled
-
Completed
-
Archived
-
Active
-
Proposal
Active
Select whether the project is active:
-
Yes
-
No
-
Not defined
Adjustable Hours
Select whether the project hours are adjustable:
-
Yes
-
No
-
Not defined
Users
Add the users to whom you want to assign the project.
Managers
Add the managers for the project.
Billable
Select whether the project is billable:
-
Yes
-
No
-
Not defined
Budget Hours
Enter the number of hours you want to allocate for the project. If no hours mentioned then the project will have unlimited budget hours.
Price Per Hour
Enter the project’s hourly price details. Applicable only for time & materials project.
Delete a Project
Deletes a specified project.
Connection
Establish a connection to your Paymo account.
Project ID
Select the Project ID you want to delete.
Client
Watch New Clients
Triggers when a new client has been created.
You do not have to add the webhooks in the Paymo as it is automatically done for you once you add and save an instant trigger module to your scenario.
Webhook
Enter a name for the webhook.
Connection
Establish a connection to your Paymo account.
List Clients
Returns a list of clients.
Connection
Establish a connection to your Paymo account.
Active
Select whether to list active clients:
-
Yes
-
No
-
Not defined
Include
Select the options whose details you want to include in the clients.
Limit
Set the maximum number of clients Boost.space Integrator should return during one scenario execution cycle.
Get a Client
Returns information about a specified client.
Connection
Establish a connection to your Paymo account.
Client ID
Select the Client ID whose details you want to retrieve.
Include
Select the options whose details you want to include in the clients.
Create a Client
Creates a new client.
Connection
Establish a connection to your Paymo account.
Name
Enter the name of the client.
Street Address
Enter the street address of the client.
City Name
Enter the city name.
State or Region
Enter the client’s state or region name.
Postal Code
Enter the client’s area postal code.
Country
Enter the country name.
Phone Number
Enter the phone number of the client.
Fax Number
Enter the fax number of the client.
Email Address
Enter the email address of the client.
Website Address
Enter the client’s website URL address.
Fiscal Information
Enter the Fiscal information of the client which is used in the client’s invoice.
Client Logo Image URL
Enter the client’s logo image URL address.
Update a Client
Updates the information of a specified client.
Connection
Establish a connection to your Paymo account.
Client ID
Select the Client ID whose details you want to update.
Name
Enter the name of the client.
Street Address
Enter the street address of the client.
City Name
Enter the client’s city name.
State or Region
Enter the client’s state or region name.
Postal Code
Enter the client’s area postal code.
Country
Enter the country name.
Phone Number
Enter the phone number of the client.
Fax Number
Enter the fax number of the client.
Email Address
Enter the email address of the client.
Website Address
Enter the client’s website URL address.
Fiscal Information
Enter the Fiscal information of the client which is used in the client’s invoice.
Client Logo Image URL
Enter the client’s logo image URL address.
Delete a Client
Deletes a specified client.
Connection
Establish a connection to your Paymo account.
Client ID
Select the Client ID you want to delete.
Time Entry
Watch New time Entries
Triggers when a new time entry has been created.
You do not have to add the webhooks in the Paymo as it is automatically done for you once you add and save an instant trigger module to your scenario.
Webhook
Enter a name for the webhook.
Connection
Establish a connection to your Paymo account.
List Time Entries
Returns a list of time entries.
Connection
Establish a connection to your Paymo account.
Search By
Select the option to search the time entries:
-
Project
-
Task
-
Client
-
User
-
Time Interval
Project ID
Select the Project ID whose time entries you want to search.
Client ID
Select the Client ID whose time entries you want to search.
User ID
Select the User ID whose time entries you want to search.
Task ID
Select the Task ID whose time entries you want to search.
From
Enter the date to search time entries created on or after the specified date.
To
Enter the date to search time entries created on or before the specified date.
Include
Select the options whose details you want to include in the time entries.
Limit
Set the maximum number of clients Boost.space Integrator should return during one scenario execution cycle.
Get a Time Entry
Returns information about a specified time entry.
Connection
Establish a connection to your Paymo account.
Time Entry ID
Select the Time Entry ID whose details you want to retrieve.
Include
Select the options you want to include in the details.
Create a Time Entry
Creates a new time entry.
Connection
Establish a connection to your Paymo account.
Task ID
Select a Task ID whose time entry you want to create.
Choose Timing
Select an option for entering the time:
-
Date and Duration
-
Start and End Time
From
Enter the date to search time entries created on or after the specified date.
To
Enter the date to search time entries created on or before the specified date.
Start Time
Enter the start time.
End Time
Enter the end time
User ID
Select the User ID whose time entry you are creating.
Description
Enter the details of the time entry.
Invoice ID
Select the Invoice ID related to the time entry.
Billed
Select whether the time entry is billed:
-
Yes
-
No
-
Not defined
Update a Time Entry
Updates the information of a specified time entry.
Connection
Establish a connection to your Paymo account.
Time Entry ID
Select the Time Entry ID whose details you want to update.
Task ID
Select a Task ID whose time entry you want to create.
Choose Timing
Select an option for entering the time:
-
Date and Duration
-
Start and End Time
From
Enter the date to search time entries created on or after the specified date.
To
Enter the date to search time entries created on or before the specified date.
Start Time
Enter the start time.
End Time
Enter the end time
User ID
Select the User ID whose time entry you are creating.
Description
Enter the details of the time entry.
Invoice ID
Select the Invoice ID related to the time entry.
Billed
Select whether the time entry is billed:
-
Yes
-
No
-
Not defined
Delete a Time Entry
Deletes a time entry.
Connection
Establish a connection to your Paymo account.
Time Entry ID
Select the Time Entry ID you want to delete.
Other
Make an API Call
Performs an arbitrary authorized API call.
Connection
Establish a connection to your Paymo account.
URL
Enter a path relative to https://api.paymoapp.com/. For example: /clients
For the list of available endpoints, refer to the Paymo API Documentation.
Method
Select the HTTP method you want to use:
GET to retrieve information for an entry.
POST to create a new entry.
PUT to update/replace an existing entry.
PATCH to make a partial entry update.
DELETE to delete an entry.
Headers
Enter the desired request headers. You don’t have to add authorization headers; we already did that for you.
Query String
Enter the request query string.
Body
Enter the body content for your API call.
Example of Use – List Projects
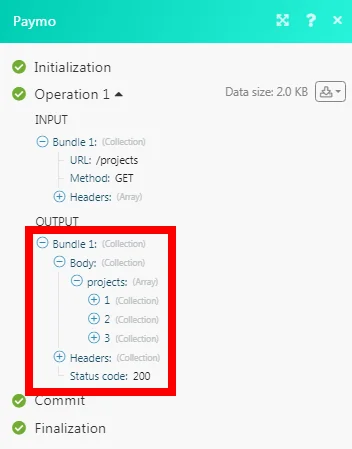
The following API call returns all the projects from your Paymo account:
URL: /projects
Method: GET
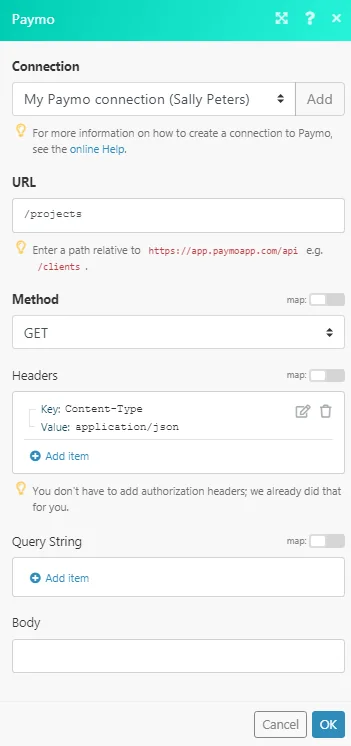
Matches of the search can be found in the module’s Output under Bundle > _Body > projects._In our example, 3 projects were returned:
Legacy article, imported from the original Boost.space knowledge base (/knowledge-base/applications/commerce/paymo/).

