Infobip
The Infobip modules allow you to send and retrieve the SMS in your Infobip account.
Getting Started with Infobip
Prerequisites
- An Infobipe account – create an account at infobip.com/.
The module dialog fields that are displayed in bold (in the Boost.space Integrator scenario, not in this documentation article) are mandatory!
Connecting Infobip to Boost.space Integrator
To connect your Infobip account to Boost.space Integrator you need to obtain the Email address and API Key from your Infobip account and insert them in the Create a connection dialog in the Boost.space Integrator module.
1. Log in to your Infobip account.
2. From the Dashboard, copy the API Key to your clipboard.
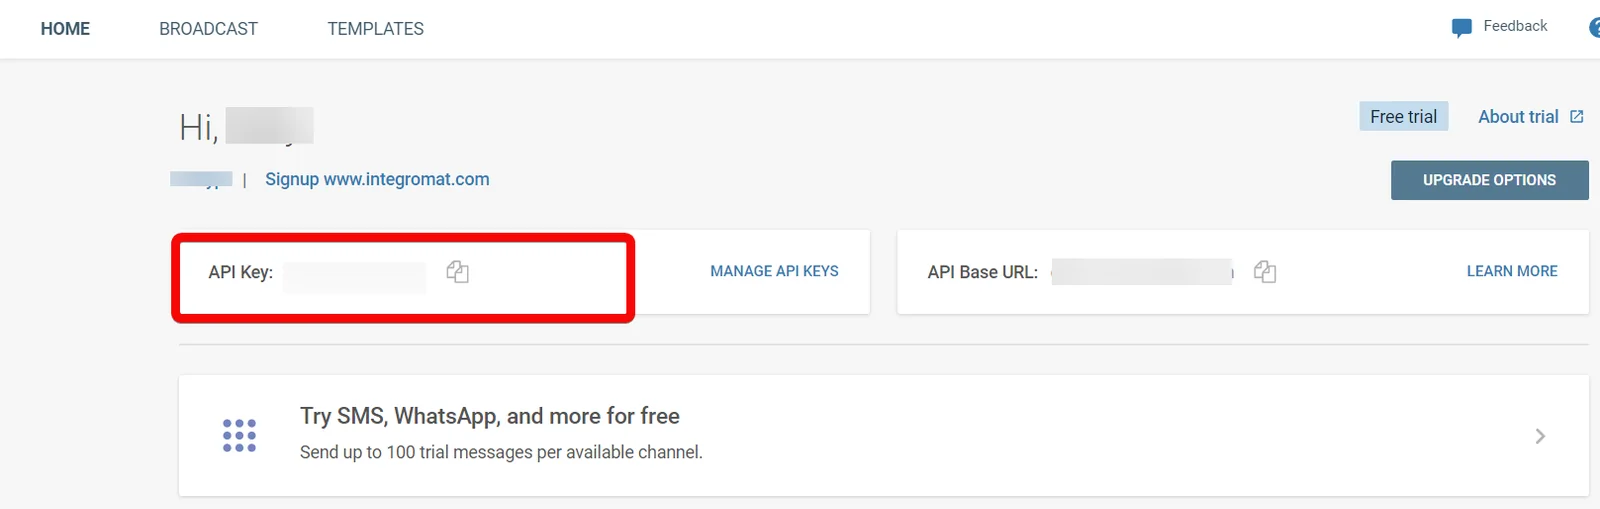
3. Log in to your Boost.space Integrator account and add a scenario from Infobip app into an Boost.space Integrator scenario.
4. Click Add next to the Connection field.

5. In the Connection name field, enter a name for the connection.
6. In the API Key field, enter the API key copied in step 2.
7. In the Domain field, enter your Infobip account domain name. For example, if your account URL address is https://xyz.infobip.com, then your domain is xyz.
8. Click Continue.
The connection has been established.
Triggers
Watch SMS
Triggers when a new SMS is sent.
Connection
Establish a connection to your Infobip account.
Limit
Set the maximum number of SMS Boost.space Integrator should receive during one execution cycle.
Actions
Send an SMS
Sends an SMS message.
Connection
Establish a connection to your Infobip account.
Messages
Add the messages you want to send:
Destination
Add the details of the recipient to send the message:ToEnter (map) the recipient’s email address.Message IDEnter (map) the Message-ID you want to send to the recipient.
Text
Enter (map) the message text you want to send.
Transliteration
Enter (map) the transliteration of your sent message from one script to another.Transliteration is used to replace characters that are not recognized as part of your defaulted alphabet.
Intermediate Report
Select whether you want to send the message immediately.
Flash
Select whether you want to send hte message as a flash to the recipient that displays on the lock screen.
Validity Report
Enter (map) the message validity in minutes.
From
Enter (map) the sender details who is sending the message. You can enter a maximum of three characters.
Send At
Enter (map) the date and time when you want to send the message. See the list of supported date and time formats.
Language Code
Select or map the language in which the message is to be sent:
-
Turkish
-
Greek
-
Cyrillic
-
Central European
-
Non-Unicode
Notify URL
Enter (map) the URL on your call back server to which a delivery report will be sent. For more information, see the Delivery report format.
Notify Content-Type
Select or map the preferred content type for the notification:
-
JSON
-
XML
Notify
Select whether you want to receive the notification for the message.
Callback Data
Enter (map) the additional client’s data that will be sent on the Notify URL.
Binary
Add the binary items such as ESM class, Hex, and Data Coding details for the message.
Delivery Time Window
Select or map the specific scheduling options to send a message within daily or hourly intervals. For example, Monday, Tuesday, etc.,
To
HourEnter (map) the Hour the time window opens when used in from property or closes when used into the property.MinuteEnter (map) the minute the time window opens when used in from property or closes when used into the property.
From
HourEnter (map) the hour the time window opens when used in from property or closes when used into the property.MinuteEnter (map) the minute the time window opens when used in from property or closes when used into the property.
Regional
Add the regional distributor ledger technology (DLT) information:Content Template IDEnter (map) the Registered DTL Content Template ID that matches the message you are sending.Principal Entity IDEnter (map) your assigned DTL Principal Entity ID.
Bulk ID
Enter (map) the Bulk ID assigned to the request if you are messaging multiple recipients or sending multiple messages via a single API request. If not provided, it will be auto-generated and returned in the API response. This Bulk ID is used to fetch delivery reports and message logs.
Tracking
Add the tracking details:
Type
Enter (map) the tracking type. For example, one-time PIN or social invites.
Track
Select or map the option to track the message for conversion rates:
-
SMS
-
URL
Process Key
Enter (map) the process key which identifies the conversion tracking.
Sending Speed Limit
Add the SMS send limit:AmountEnter (map) the number of messages to send per time unit.**Note:**Boosting this parameter will not result in faster sending speeds beyond infrastructure capabilities.Time UnitSelect or map the time unit to send the SMS:
-
Day
-
Hour
-
Minute
Make an API Call
Performs an arbitrary authorized API call.
Connection
Establish a connection to your Infobip account.
URL
Enter a path relative to https://<domain>.api.infobip.com For example,/people/2/tagsFor the list of available endpoints, refer to the Infobip API Documentation.
Method
Select the HTTP method you want to use:
GET to retrieve information for an entry**.**
POST to create a new entry.
PUT to update/replace an existing entry.
PATCH to make a partial entry update.
DELETE to delete an entry.
Headers
Enter the desired request headers. You don’t have to add authorization headers; we already did that for you.
Query String
Enter the request query string.
Body
Enter the body content for your API call.
Example of Use – Get Tags
The following API call returns all the tags from your Infobip account:
URL: /people/2/tags
Method: GET
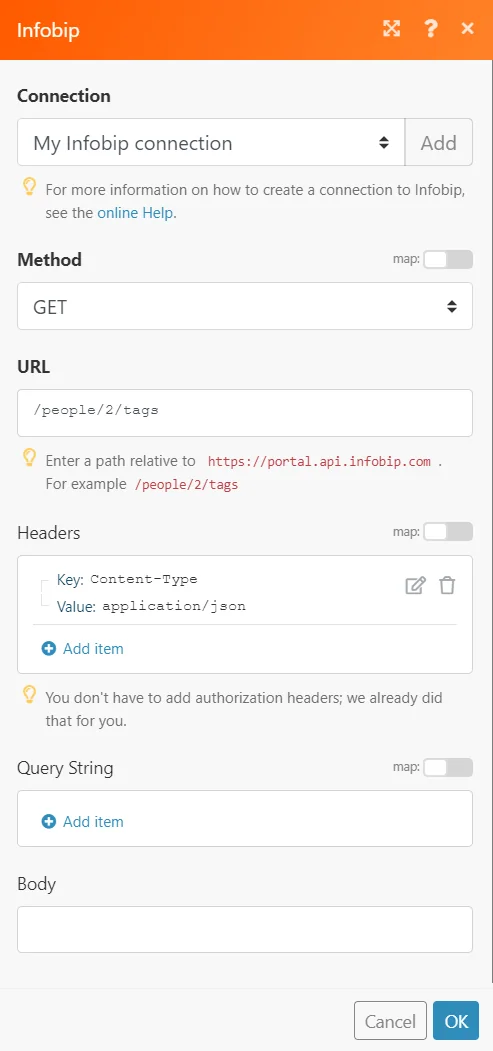
Matches of the search can be found in the module’s Output under Bundle > _Body > tags._In our example, 3 tags were returned:
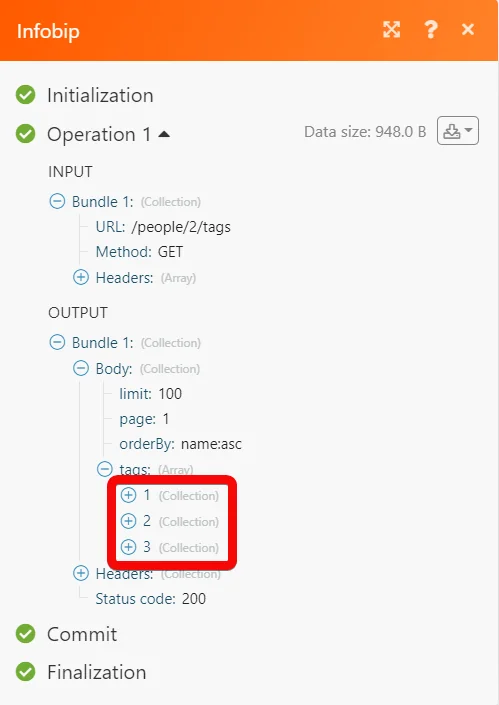
Legacy article, imported from the original Boost.space knowledge base (/knowledge-base/applications/communication/infobip/).

