Microsoft Dynamics 365 CRM
With Microsoft Dynamics 365 CRM app modules in Boost.space Integrator, you can search, create, update, retrieve, and delete records.
Getting Started with Microsoft Dynamics 365
Prerequisites:
-
A Microsoft account — you can create one at account.microsoft.com/account
-
Azure Active Directory account — you can create one at azure.microsoft.com/en-us/free
-
Azure Active Directory Tenant – see How to get an Azure Active Directory Tenant
-
A Microsoft Dynamics 365 F&O apps subscription – see MS Dynamics 365 pricing
-
A Microsoft Dynamics 365 CRM apps subscription. See Microsoft Dynamics 365 pricing.
Connect Microsoft Dynamics 365 to Boost.space Integrator
To connect your Microsoft Dynamics 365 app, you must obtain the client credentials and Tenant ID from the MS Azure Portal and insert them into Create a connection dialog with your Host URL.
-
Log in to MS Azure Portal.
-
Navigate to the Azure Active Directory service (
 ).
).
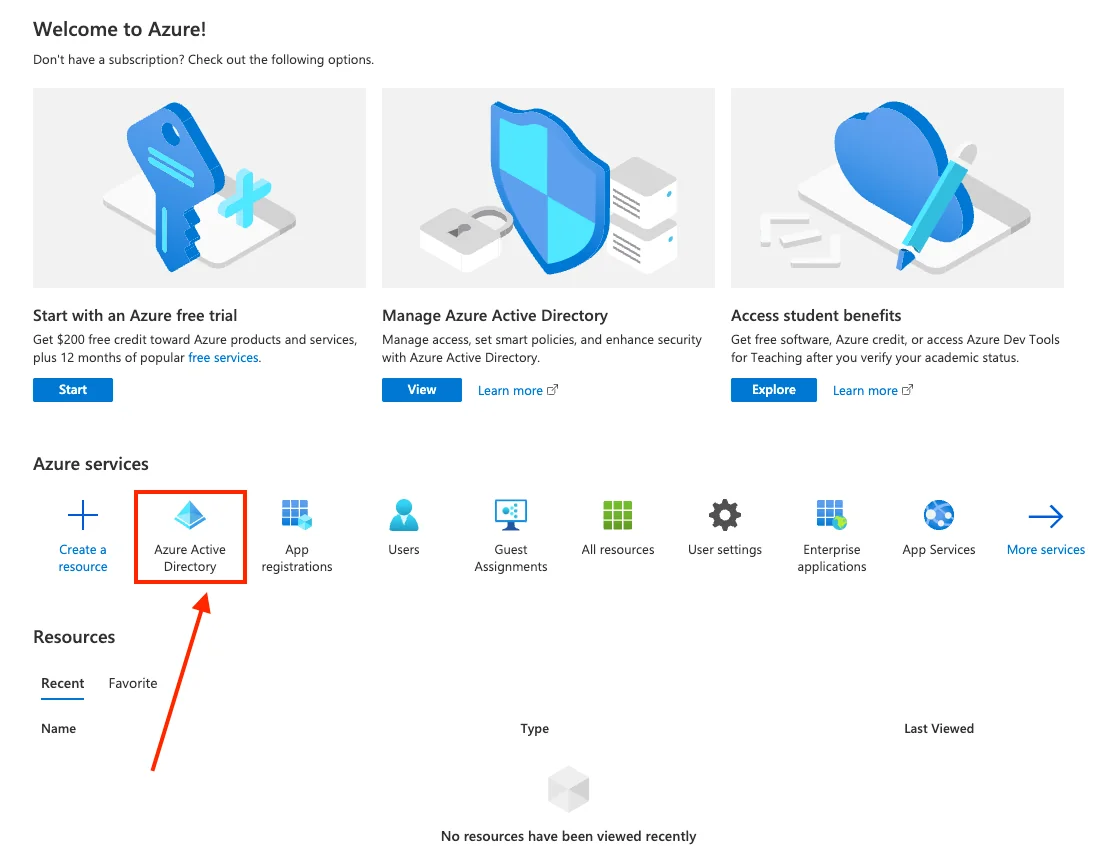
-
Copy the Tenant ID to a safe place.
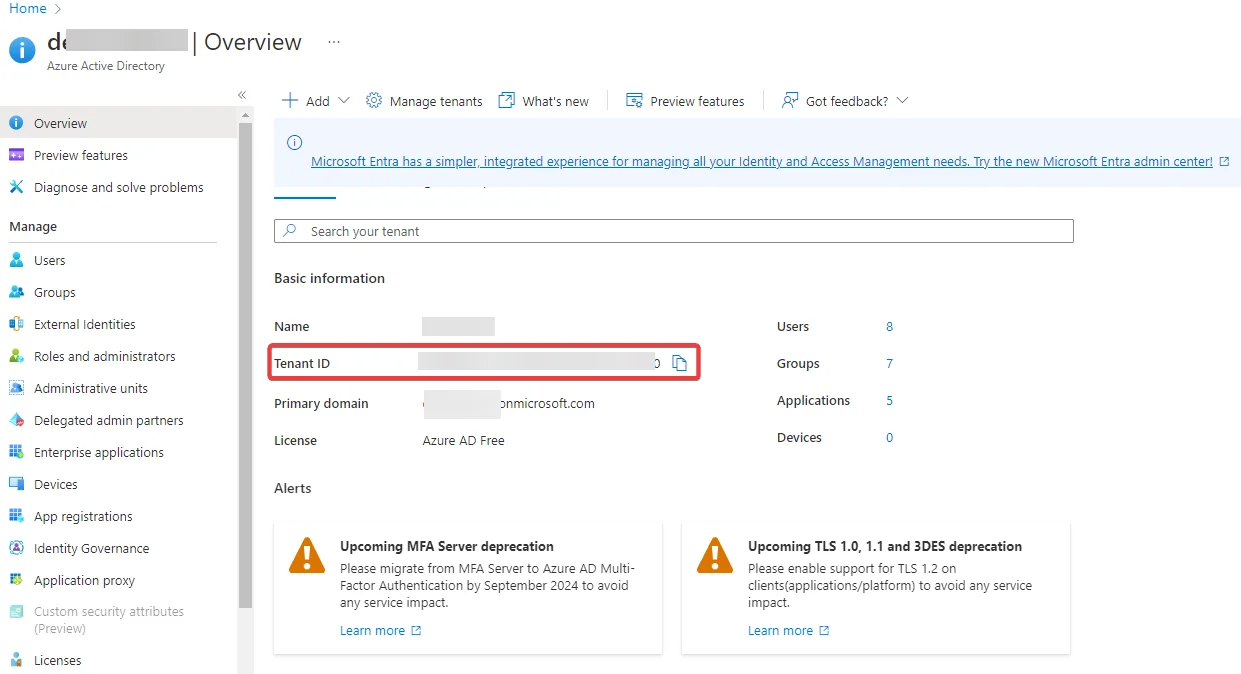
-
Click Applications > New Registration and enter the following details and click Register.
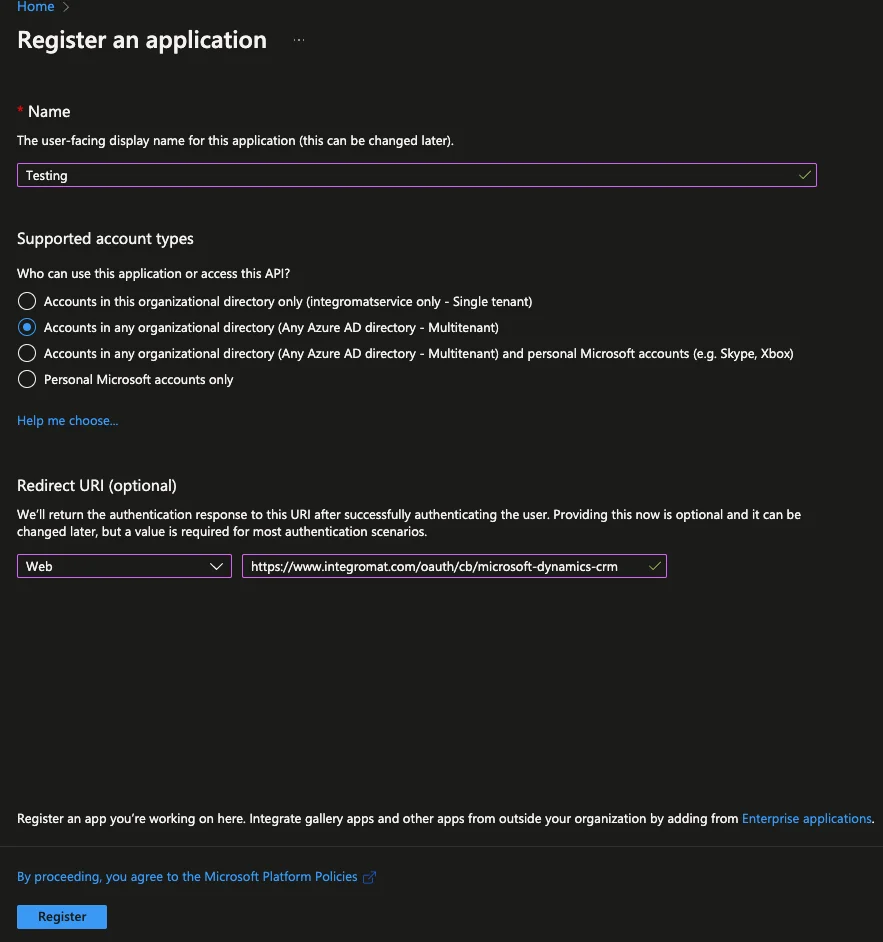
Name
Enter a name for the app.
Supported account types
Select the account type based on your preferences. If you are selecting the multitenant option,Accounts in any organizational directory (
– Single tenant) , then the user establishing the connection will have to:-
use the Tenant ID during the connection creation
-
be in the same Tenant ID
Redirect URI (Optional)
Select the following options:
-
Platform: Web
-
Redirect URI:
https://integrator.boost.space/oauth/cb/microsoft-dynamics-365-crm
-
-
The Client ID and Tenant ID details appear on the app screen. To add a client secret, click Add a certificate or secret.
The Tenant ID is mandatory for single-tenant apps and optional for multi-tenant apps.
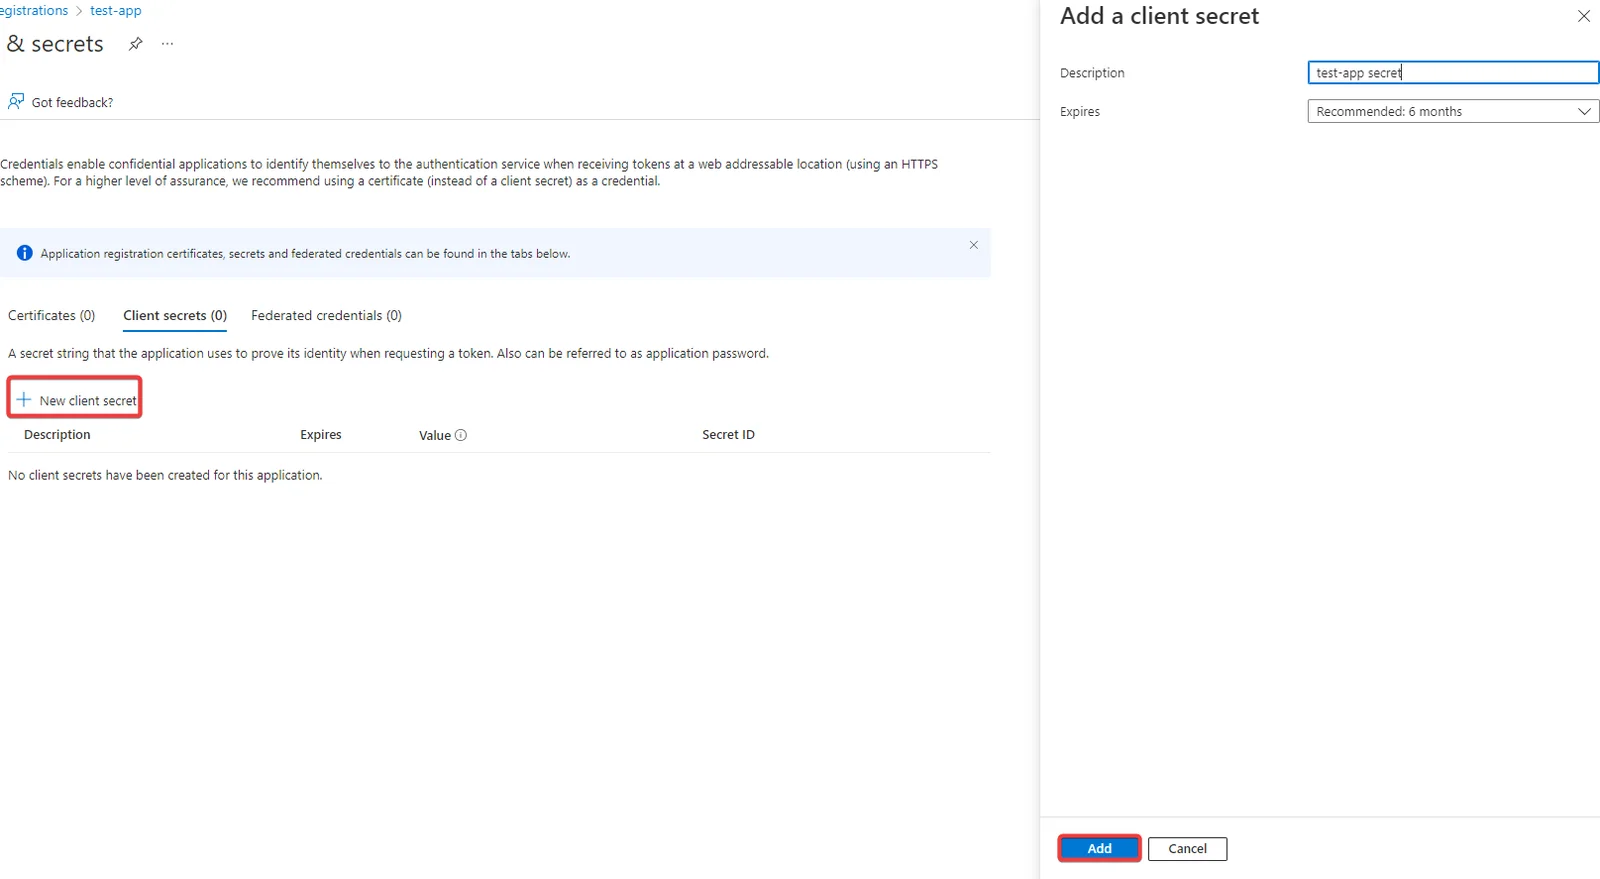
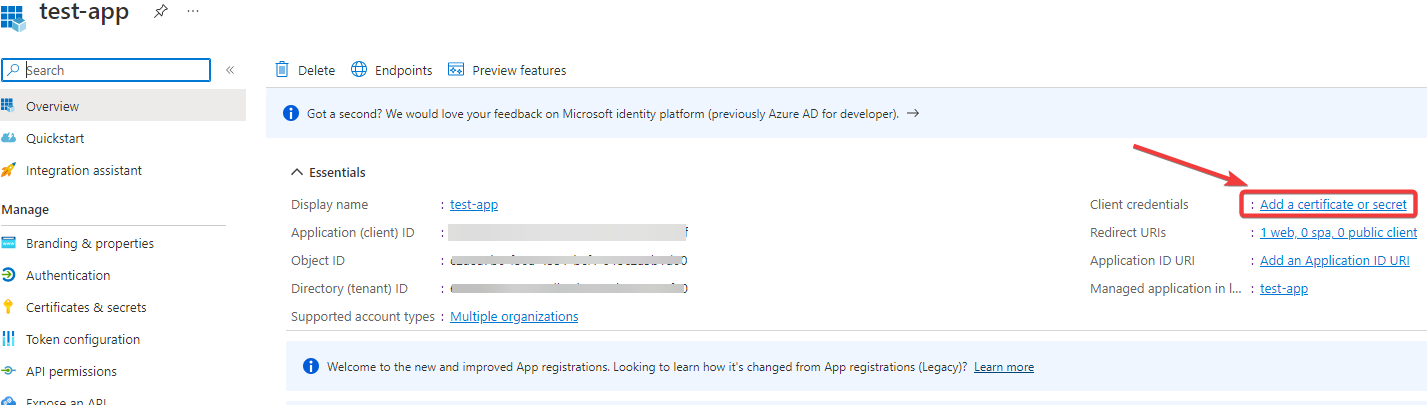6. Click New client secret, enter a description, select the expiry period for the client secret, and click Add.
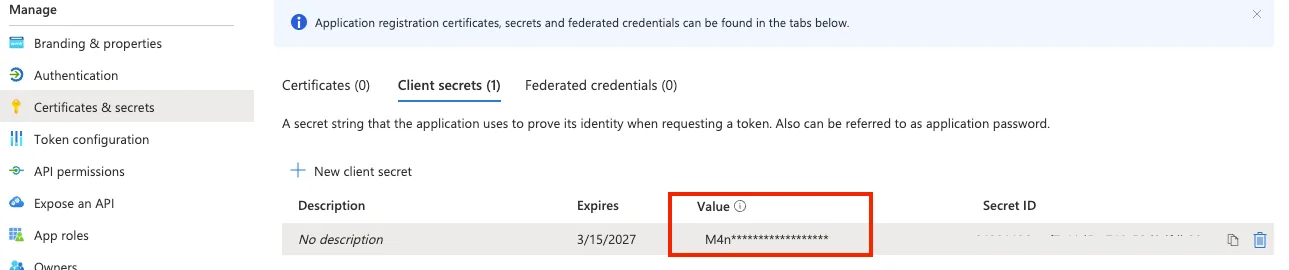
7. Copy the value to use as a Client Secret to a safe place.
8. Click API Permissions > Dynamics CRM , select permission, click Add Permission and click Grant Admin consent for.
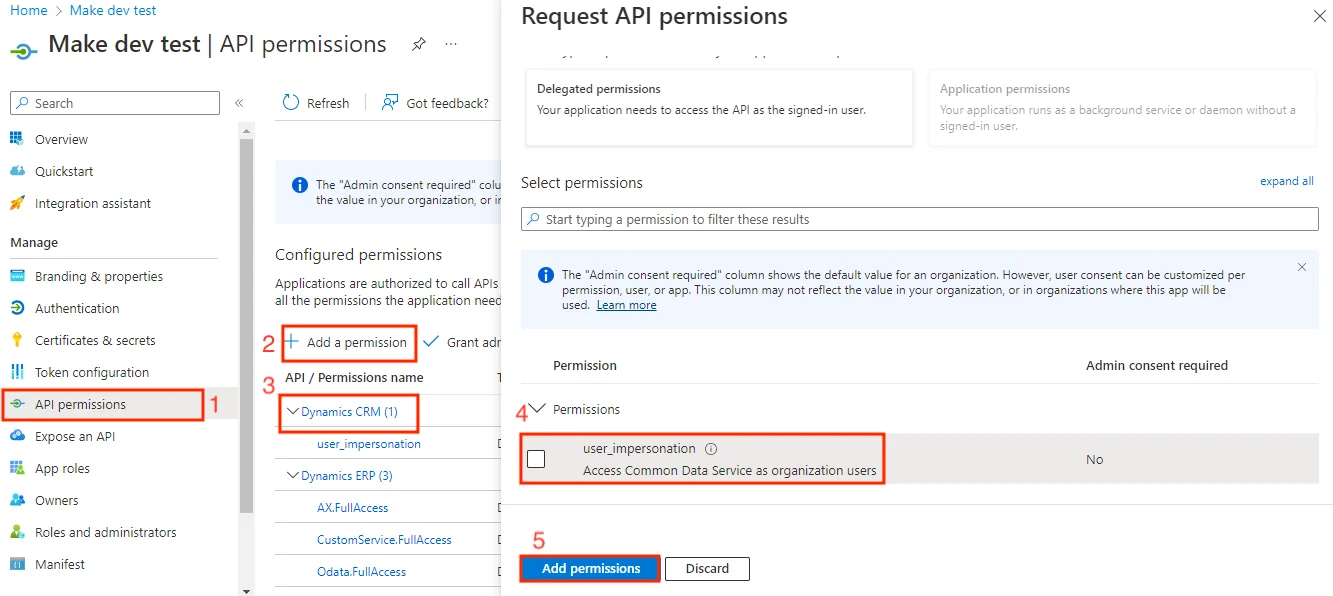 You now have all the permission to connect to the app.9. Log in to your Boost.space Integrator account, add a Microsoft Dynamics 365 module scenario, and click the Add button next to the Connection field.
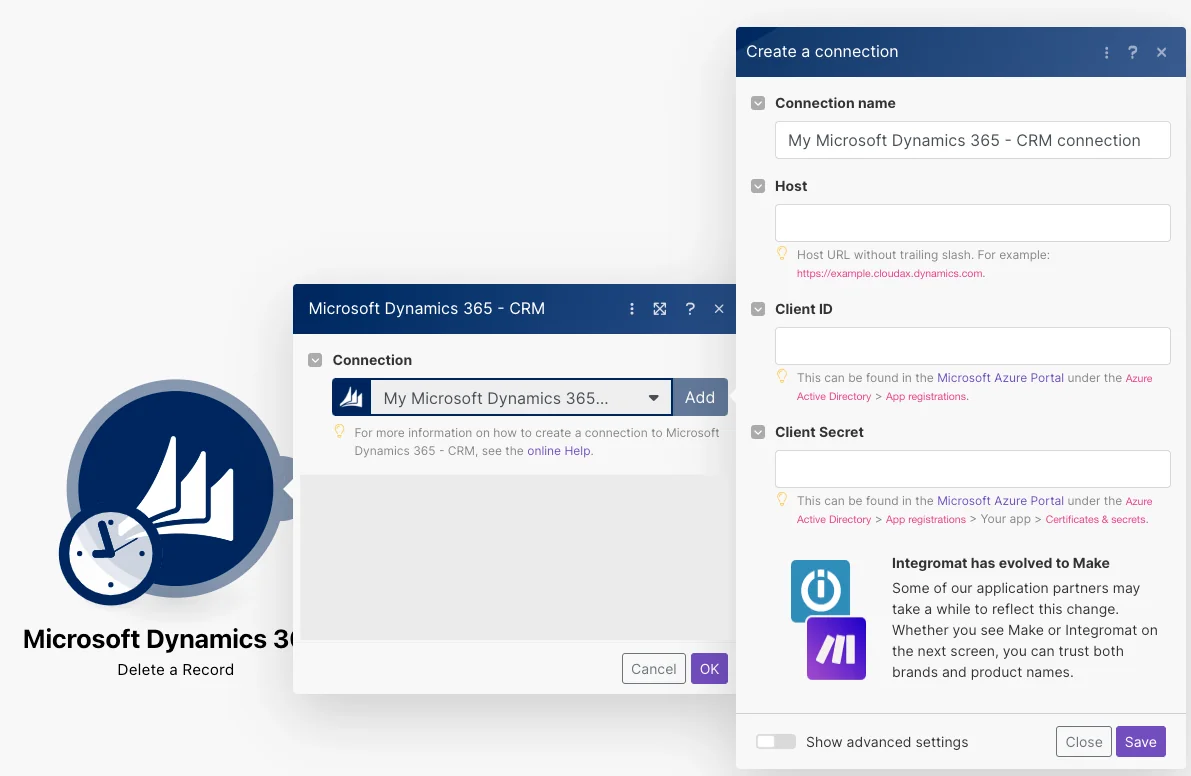10. Enter the following details and click Save.
**Connection name** Optional: Enter the name of your connection. **Host** Enter the Host URL **without trailing slash** ” **/** ” and including HTTPS, `https://<example>.cloudax.dynamics.com`. **Tenant ID** Optional: Click **Show Advanced Settings** and enter the Tenant ID you have copied in step 3. 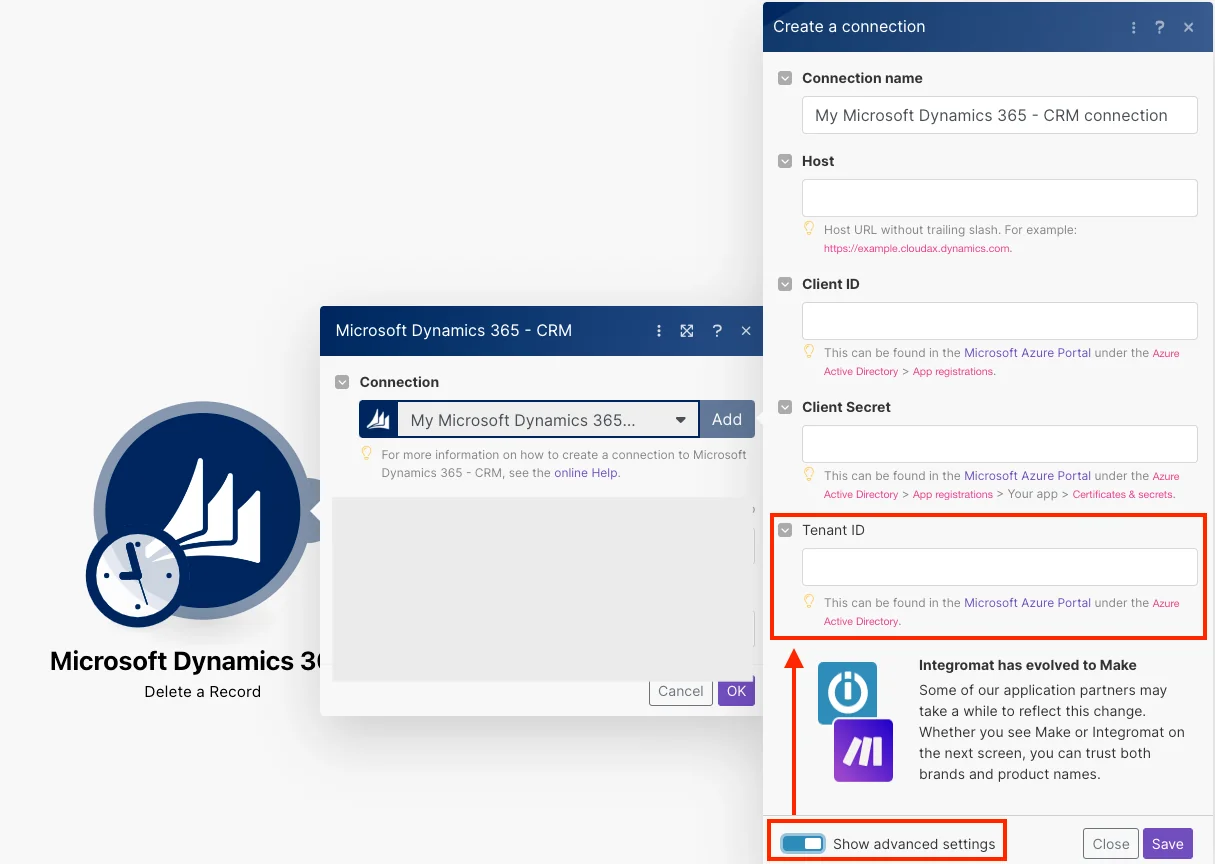 �NOTE� The Tenant ID is mandatory for single-tenant and optional for multi-tenant apps. **Client ID** Enter the Client ID copied in step 5. **Client Secret** Enter the secret value copied in step 7.11. Confirm the dialog by clicking the Accept button.
You have successfully established the connection. You can now edit scenario, add more Microsoft Dynamics 365 modules, and reauthorize your connection if required.
If the Status Code Error: 401 error displays, the Host URL could be inserted with the trailing slash (remove the slash at the end of the URL), or there can be another mistake in the Create a connection dialog field.
Records
You can create, update, retrieve, search, and delete records with the following modules.
Watch Records
Triggers when a new record has been created.
Connection
Establish a connection to your Microsoft Dynamics 365 account.
Logical Name
Select or map the entity whose records you want to watch.
Limit
Set the maximum number of records Boost.space Integrator will return during one execution cycle. The default value is 2.
Create a Record
Creates a new record.
Connection
Establish a connection to your Microsoft Dynamics 365 account.
Logical Name
Select or map the entity for which you want to create the record. The entity property fields auto-populate based on your selection. For entity field descriptions, refer to MS Dynamics Web API Reference.
Update a Record
Updates an existing record.
Connection
Establish a connection to your Microsoft Dynamics 365 account.
Logical Name
Select or map the entity whose record details you want to update.
Record ID
Select or map the record whose details you want to update and edit the entity properties. For entity field descriptions, refer to MS Dynamics Web API Reference.
Get a Record
Retrieves an existing record.
Connection
Establish a connection to your Microsoft Dynamics 365 account.
Logical Name
Select or map the entity whose record details you want to retrieve.
Record ID
Enter the Record ID whose details you want to retrieve.
Search Records
Searches for records or lists them all.
Connection
Establish a connection to your Microsoft Dynamics 365 account.
Logical Name
Select or map the entity name whose records you want to search.
Filter
Enter the filter value to search the records that match the specified value. See the query data for available filters.
Select
Enter a comma-separated list of fields to search the records. See the query data for available fields.
Expand
Enter the fields you want to expand in the response. See the query data for available fields.
Order by
Enter the order for the response. See the query data for available fields.
Apply
By using $apply you can aggregate and group your data dynamically.
Limit
Set the maximum number of records Boost.space Integrator will return during one execution cycle. The default value is 10.
Delete a Record
Deletes an existing record.
Connection
Establish a connection to your Microsoft Dynamics 365 account.
Logical Name
Select or map the entity name whose records you want to delete.
Record ID
Enter the Record ID you want to delete.
Other
You can call APIs with the following module.
Make an API Call
Performs an arbitrary authorized API call.
For the list of available endpoints, refer to the Microsoft Dynamics 365 API Documentation.
Connection
Establish a connection to your Microsoft Dynamics 365 account.
URL
Enter a path relative to your host URL. For example, /api/data/v9.2/WhoAmI.
Method
GET
to retrieve information for an entry.
POST
to create a new entry.
PUT
to update/replace an existing entry.
PATCH
to make a partial entry update.
DELETE
to delete an entry.
Headers
Enter the desired request headers. You don’t have to add authorization headers; we already did that for you.
Query String
Enter the request query string.
Body
Enter the body content for your API call.
Example of use – Get a User
The following API call returns the logged-in user details from your account.
URL: /api/data/v9.2/WhoAmI
Method: GET
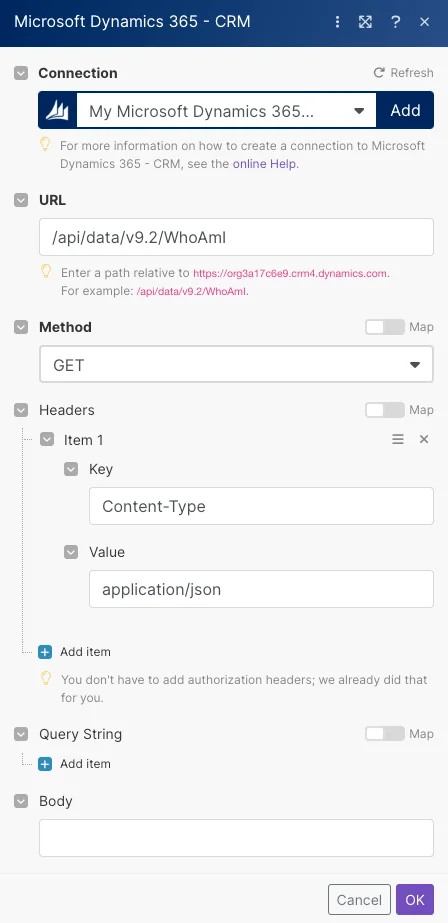
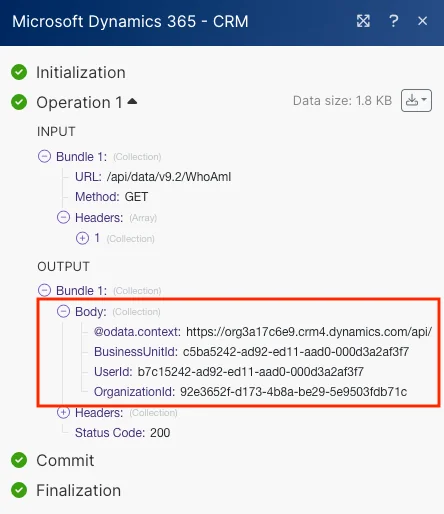
The search matches can be found in the module’s Output under Bundle > Body. Our example returned specified user information:
Legacy article, imported from the original Boost.space knowledge base (/knowledge-base/applications/crm-and-sales-tools/microsoft-dynamics-365-crm/).

