Elastic Email
The Elastic Email modules allow you to create, update, retrieve, list, and delete the contacts, lists, campaigns, and emails in your Elastic Email account.
Getting Started with Elastic Email
Prerequisites
- An Elastic Email account
In order to use Elastic Email with Boost.space Integrator, it is necessary to have an Elastic Email account. If you do not have one, you can create an Elastic Email account at elasticemail.com/account#/create-account.
The module dialog fields that are displayed in bold (in the Boost.space Integrator scenario, not in this documentation article) are mandatory!
Connecting Elastic Email to Boost.space Integrator
To connect your Elastic Email account to Boost.space Integrator you need to obtain the API Key from your Elastic Email account and insert it in the Create a connection dialog in the Boost.space Integrator module.
-
Log in to your Elastic Email account.
-
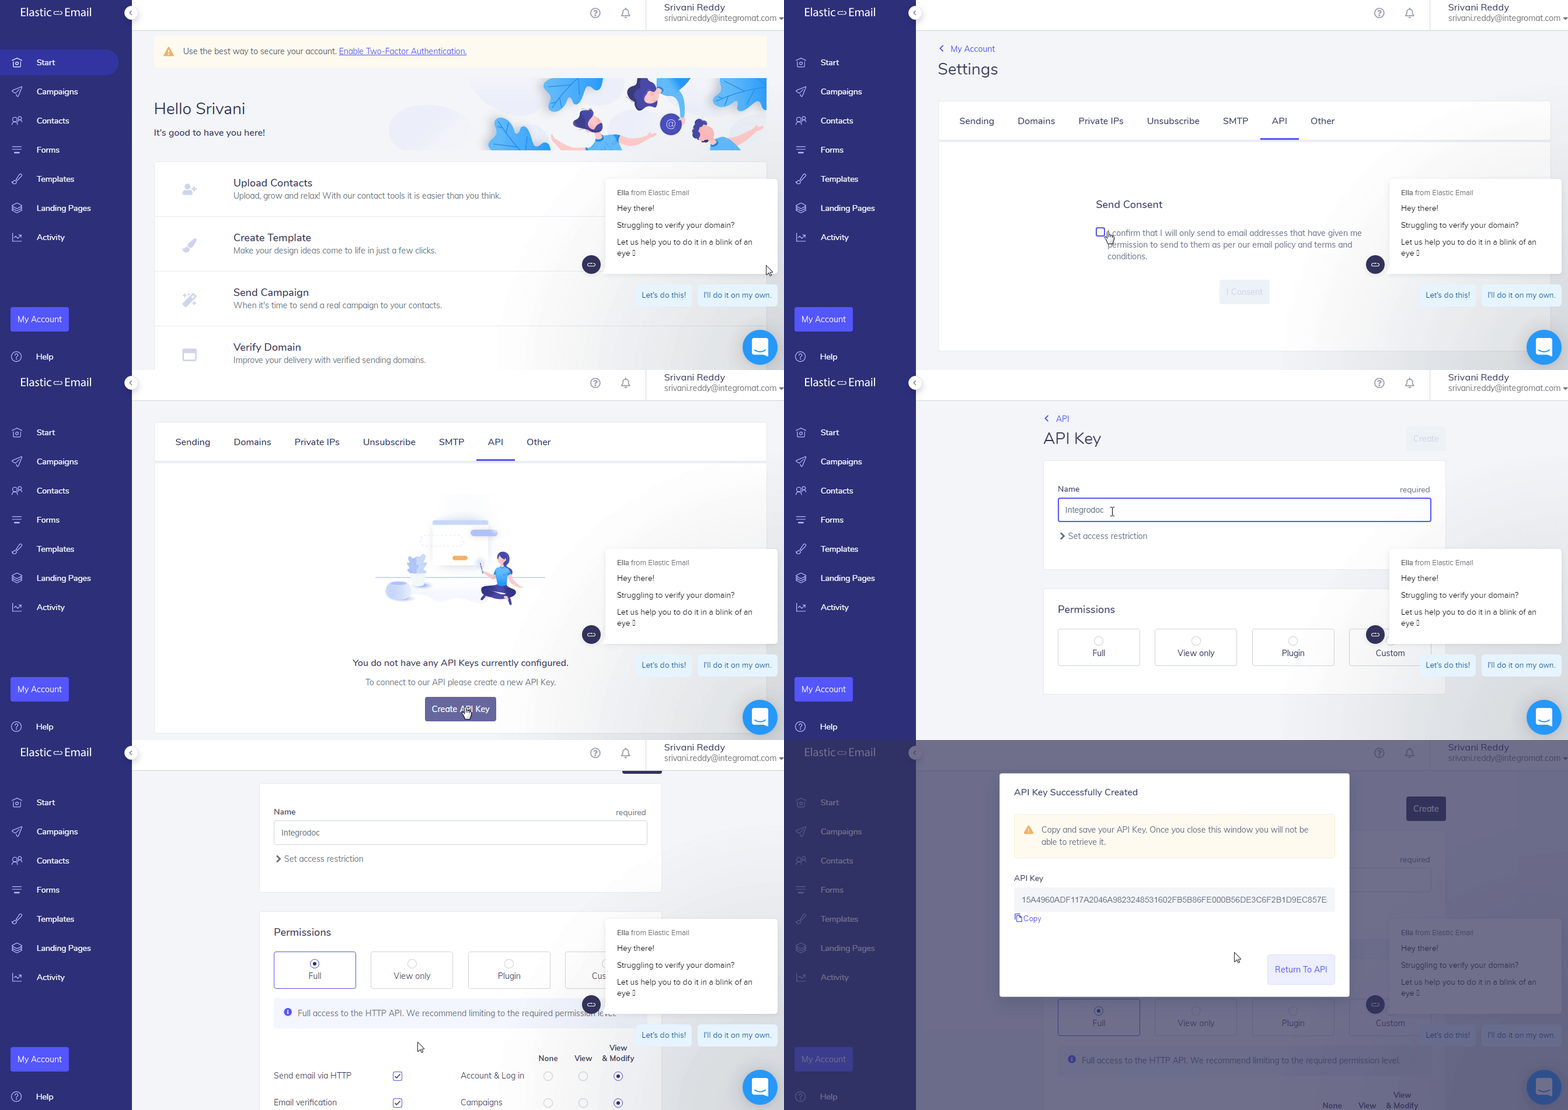
Click Your User Name > Settings > API > Accept Consent > _Create API Ke_y. Enter a name for the key, select the permissions, and click Create. Copy the API key to your clipboard.
-
Go to Boost.space Integrator and open the Elastic Email module’s Create a connection dialog.
-
In the Connection name field, enter a name for the connection.
-
In the API Key field, enter the API key copied in step 2.
-
Select whether you want to establish the connection for private branding and enter the custom domain. For example,
<yourdomain.cz(uk, etc.)>. You can find at My Account > Settings > Domains. -
Click Continue.
The connection has been established.
Contacts

Watch Contact Added to the List
Triggers when a new contact is added to the list.
Connection
Establish a connection to your Elastic Email account.
List Name
Select the contact list name whose contacts you want to watch.
Limit
Set the maximum number of contacts Boost.space Integrator should return during one scenario execution cycle.
Create a Contact
Adds a new contact and optionally to one of your lists.
Connection
Establish a connection to your Elastic Email account.
Enter the email address of the contact.
Public Account ID
Enter the Public Account ID for the contact. This is a public key that provides limited access to the contact. You can find the public key at My Account > Security.
First Name
Enter the first name of the contact.
Last Name
Enter the last name of the contact.
List Name
Add the contact list to which you want to add the contact. You can add multiple contacts.
Consent Tracking
Select whether you want to allow the consent tracking for the contact.
Send Activation
Select whether you want to send the activation email to the contact once you create the contact.
Activation Template
Select the activation template to send to the contact as an activation email.
Notify Email
Add the email address to which contact’s subscription notification emails will be sent.
Activation Return URL
Enter the URL address to which contact will be redirected after activation.
Already Active URL
Enter the URL address to which contact is redirected if already subscribed.
Consent Date
Enter the date on which the contact is provided consent.
Consent IP
Enter the IP address of consent to send this contact from your email.
Return URL
Enter the URL address to navigate to after account creation.
Source
Select the option in which the contact details are uploaded:
-
Delivery API
-
Manual Input
-
File Upload
-
Web Form
-
Contact API
-
Verification API
-
File Verification API
Source URL
Enter the URL address from which the request for creating the contact was sent.
Get a Contact
Loads detailed contact information.
Connection
Establish a connection to your Elastic Email account.
Email Address
Select the email address of the contact whose details you want to retrieve.
Update a Contact
Updates a selected contact.
Connection
Establish a connection to your Elastic Email account.
Email Address
Select the email address of the contact whose details you want to update.
First Name
Enter the first name of the contact.
Last Name
Enter the last name of the contact.
Clear the Rest of Fields
When selected, resets the fields which are omitted in this request.
Custom Fields
Add the custom fields for the contact:
Field Name
Enter the field name. For example, the company name.
Field Type
Select the field type:
-
Number
-
Text
-
Datetime
Value
Enter the field value.
Delete a Contact
Permanently deletes the contacts provided. You can provide either a qualified rule or a list of emails.
Connection
Establish a connection to your Elastic Email account.
Delete Criterion
Select the option through which you want to delete the contacts:
-
Email
-
Rule
Email Address
Add the email addresses of the contact whom you want to delete.
Rule
Select the option to filter the contacts whom you want to delete based on the specified query.
Search Contacts
Searches the contacts or lists them all.
Connection
Establish a connection to your Elastic Email account.
Sort
Select the option to sort the contacts you want to list:
-
Date Added Ascending
-
Date Added Descending
-
Date Updated Ascending
-
Date Updated Descending
Rule
Select the option to filter the contacts whom you want to list based on the specified query.
Limit
Set the maximum number of contacts Boost.space Integrator should return during one scenario execution cycle.
Unsubscribe a Contact
Manually adds or updates a contact to unsubscribed status.
Connection
Establish a connection to your Elastic Email account.
Email Address
Select the email address of the contact whom you want to unsubscribe.
Lists
Create a List
Creates a new list based on the filtering rule or list of IDs.
Connection
Establish a connection to your Elastic Email account.
Create Empty List
Select whether you want to create an empty list.
List Name
Enter a name for the list.
Emails
Add the email addresses of the contacts whom you want to add to the list.
All Contacts
Select to add all the contacts from your account to the list.
Allow Unsubscribe
Select to allow to unsubscribe the contacts from the list.
Rule
Select the option to filter the contacts whom you want to add to the list based on the specified query.
Get a List
Gets detailed information about a specific list.
Connection
Establish a connection to your Elastic Email account.
List Name
Select the list whose details you want to retrieve.
Update a List
Updates an existing list.
Connection
Establish a connection to your Elastic Email account.
List Name
Select the list whose details you want to update.
New List Name
Enter a new name for the list.
Allow Unsubscribe
Select whether you want to allow the contacts in the list to unsubscribe.
Track History
Select whether you want to track the history of the list.
Delete a List
Deletes a list and removes all the contacts from it (does not delete contacts.
Connection
Establish a connection to your Elastic Email account.
List Name
Select the list you want to delete.
Search Lists
Searches the lists or lists them all.
Connection
Establish a connection to your Elastic Email account.
From
Enter the date to list the lists that are created or updated on or after the specified date.
To
Enter the date to list the lists that are created or updated on or before the specified date.
Limit
Set the maximum number of lists Boost.space Integrator should return during one scenario execution cycle.
Campaigns
Watch Campaign Sent
Triggers when a new campaign is sent.
Connection
Establish a connection to your Elastic Email account.
Limit
Set the maximum number of campaigns Boost.space Integrator should return during one scenario execution cycle.
Emails
Send an Email
Submits the emails.
Connection
Establish a connection to your Elastic Email account.
To
Add the recipient’s email addresses to whom you want to send the email.
Lists
Add the contact lists to which you want to send the email.
Segments
Add segments to which you want to send the email. Insert 0 for all Active contacts.
From
Enter the email address from which you want to send the email.
From Name
Enter the name that appears in the email.
Subject
Enter the subject line of the email.
Template ID
Select the email Template ID. The templates must be created in your account.
Attachments
Add the attachments to the email.
Sender
Enter the sender’s email address to which you want to send the email.
Sender Name
Enter the sender’s name.
Reply to
Enter the email address to which the recipient can reply to your email.
Reply to Name
Enter the name to which the recipient can reply to the email.
Track Clicks
Select whether you want to track the clicks fro the email.
Track Opens
Select whether you want to track when the email is opened.
Is Transactional
Select whether this is a transactional email.
Message to
Add the email address that appears in the To field of the email. This field is ignored if the To parameter is also provided.
Visible to all other recipients of the message as TO MIME header.
Message from
Enter the email address that appears in MIME header.
Message From Name
Enter name of the sender that appears in MIME header.
Message BCC
Add the recipient’s email address that you want to mention in the BCC field.
Message CC
Add the recipient’s email address that you want to mention in the CC field.
Body AMP
Enter the AMP email message text.
Body HTML
Enter the email message text in HTML format.
Body Text
Enter the email body text.
Channel
Enter the Channel ID that can be used for reporting. The ID can be of maximum 191 characters.
Charset
Enter the text value of charset encoding. For example, iso-8859-1, windows-1251, utf-8, us-ascii, windows-1250
Charset Body AMP
Enter the charset for body AMP MIME part.
Charset Body HTML
Enter the charset for body HTML MIME part.
Charset Body Text
Enter the charset for body text MIME part.
Data Source
Enter the name or ID of the previously uploaded file. It must be a CSV list of recipients.
Encoding Type
Select the encoding type for the email.
Merge Source Filename
Enter the file name of the attachments which is a CSV list of recipients.
Pool Name
Enter the name of your custom IP Pool to be used in the email sending process.
Post Back
Enter an optional header returned in notifications.
Time Off Set Minutes
Enter the number of the minutes after which the email must be sent. You can send up to 1 year (524160 minutes).
UTM Campaign
Enter the utm campaign marketing parameter appended to each link in the campaign.
UTM Content
Enter the utm content marketing parameter appended to each link in the campaign.
UTM Medium
Enter the utm medium marketing parameter appended to each link in the campaign.
UTM Source
Enter the utm source marketing parameter appended to each link in the campaign.
Other
Make an API Call
Performs an arbitrary authorized API call.
Connection
Establish a connection to your Elastic Email account.
URL
Enter a path relative to https://api.elasticemail.com/. For example: /v2/account/profileoverview
For the list of available endpoints, refer to the Elastic Email API Documentation.
Method
Select the HTTP method you want to use:
GET
to retrieve information for an entry.
POST
to create a new entry.
PUT
to update/replace an existing entry.
PATCH
to make a partial entry update.
DELETE
to delete an entry.
Headers
Enter the desired request headers. You don’t have to add authorization headers; we already did that for you.
Query String
Enter the request query string.
Body
Enter the body content for your API call.
Example of Use – List Lists
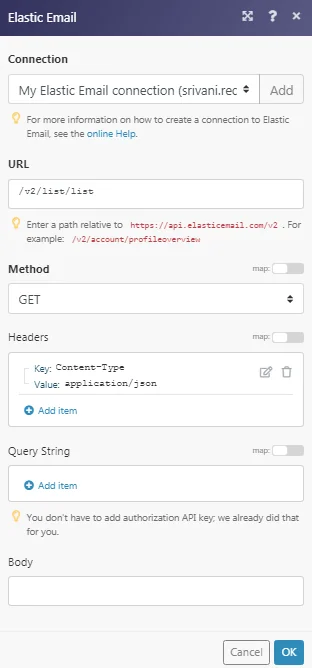
The following API call returns all lists from your Elastic Email account:
URL:
/v2/list/list
Method:
GET
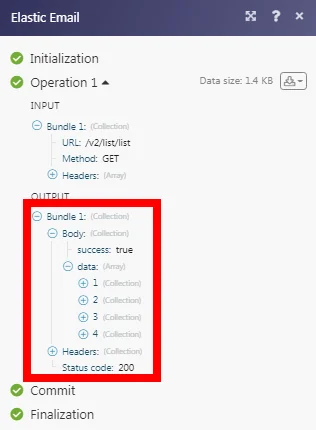
Matches of the search can be found in the module’s Output under Bundle > Body > data.
In our example, 4 lists were returned:
Legacy article, imported from the original Boost.space knowledge base (/knowledge-base/applications/marketing/elastic-email/).

