Reply.io
The Reply.io modules allow you to create, update, list, retrieve, and delete the contacts in your Reply.io account.
Getting Started with Reply.io
Prerequisites
- A Reply.io account
In order to use Reply.io with Boost.space Integrator, it is necessary to have a Reply.io account. If you do not have one, you can create a Reply.io account at reply.io/.
The module dialog fields that are displayed in bold (in the Boost.space Integrator scenario, not in this documentation article) are mandatory!
Connecting Reply.io to Boost.space Integrator
To connect your Reply.io account to Boost.space Integrator you need to obtain the API Key from your Reply.io account and insert it in the Create a connection dialog in the Boost.space Integrator module.
-

Log in to your Reply.io account and open your Dashboard.
-
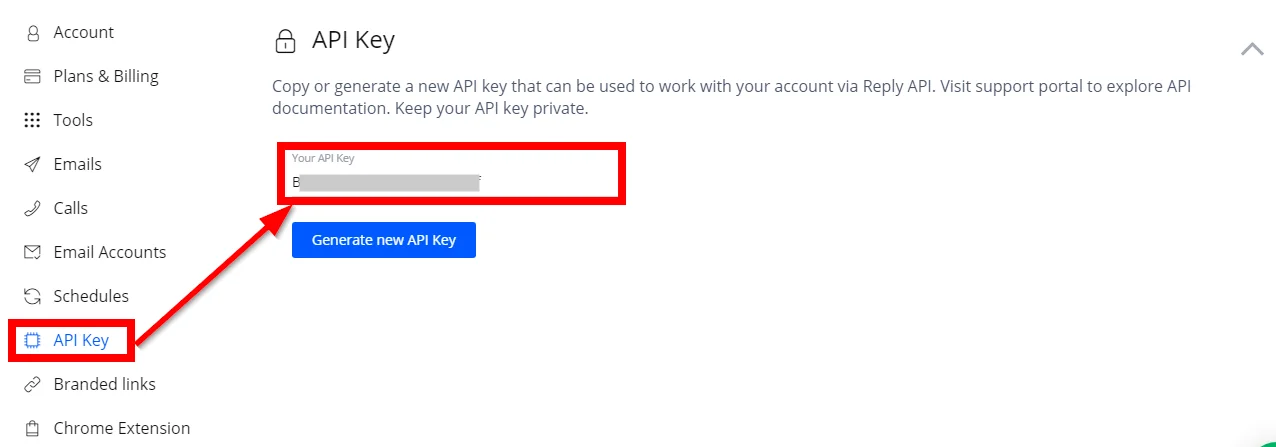
Click Settings > API Key.
-
Copy the API Key to your clipboard.
-

Go to Boost.space Integrator and open the Reply.io module’s Create a connection dialog.
-
In the Connection name field, enter a name for the connection.
-
In the API Key field, enter the API key copied in step 3, and click Continue.
The connection has been established.
Contacts
List Contacts
Retrieves a list of all contacts.
Connection
Establish a connection to your Reply.io account.
Limit
Set the maximum number of contacts Boost.space Integrator should return during one scenario execution cycle.
Get a Contact
Retrieves details of a contact specified by the email address.
Connection
Establish a connection to your Reply.io account.
Choose a Contact
Select the option to choose the contact:
-
By Email
-
By ID
Contact Email
Select the contact’s email address whose details you want to retrieve.
Contact ID
Select the Contact ID whose details you want to retrieve.
Create a Contact
Creates a contact.
Connection
Establish a connection to your Reply.io account.
Enter the contact’s email address.
First Name
Enter the contact’s first name.
Last Name
Enter the contact’s last name.
Company Name
Enter the contact’s company name.
City
Enter the contact’s city name.
State
Enter the contact’s state name.
Country
Enter the contact’s country name.
Time Zone ID
Select the contact’s Time Zone ID.
Title
Enter the contact’s job title.
Phone
Enter the contact’s phone number.
LinkedIn Profile URL
Enter the contact’s LinkedIn profile URL address.
Company Size
Select the contact’s company’s employee size.
Industry
Select the industry into which the contact’s company does the business. For example, e-commerce.
Custom Fields
Add the custom field for contact and its value. For example, contact address.
Create a Contact and Push it to Campaign
Creates and pushes a contact to the selected campaign.
Connection
Establish a connection to your Reply.io account.
Campaign ID
Select the Campaign ID which you want to push.
Enter the contact’s email address.
First Name
Enter the contact’s first name.
Last Name
Enter the contact’s last name.
Company Name
Enter the contact’s company name.
City
Enter the contact’s city name.
State
Enter the contact’s state name.
Country
Enter the contact’s country name.
Time Zone ID
Select the contact’s Time Zone ID.
Title
Enter the contact’s job title.
Phone
Enter the contact’s phone number.
LinkedIn Profile URL
Enter the contact’s LinkedIn profile URL address.
Company Size
Select the contact’s company’s employee size.
Industry
Select the industry into which the contact’s company does the business. For example, e-commerce.
Custom Fields
Add the custom field for contact and its value. For example, contact address.
Update a Contact
Updates a contact specified by email address.
Connection
Establish a connection to your Reply.io account.
Contact ID
Select the Contact ID whose details you want to update.
Enter the contact’s email address.
First Name
Enter the contact’s first name.
Last Name
Enter the contact’s last name.
Company Name
Enter the contact’s company name.
City
Enter the contact’s city name.
State
Enter the contact’s state name.
Country
Enter the contact’s country name.
Time Zone ID
Select the contact’s Time Zone ID.
Title
Enter the contact’s job title.
Phone
Enter the contact’s phone number.
LinkedIn Profile URL
Enter the contact’s LinkedIn profile URL address.
Company Size
Select the contact’s company’s employee size.
Industry
Select the industry into which the contact’s company does the business. For example, e-commerce.
Custom Fields
Add the custom field for contact and its value. For example, contact address.
Mark Contact as Replied
Marks a selected contact as replied.
Connection
Establish a connection to your Reply.io account.
Contact Email
Select the contact’s email address whom you want to mark as replied.
Delete a Contact
Deletes a contact specified by email address.
Connection
Establish a connection to your Reply.io account.
Contact Email
Select the contact’s email address whom you want to delete.
Other
Make an API Call
Performs an arbitrary API call.
Connection
Establish a connection to your Reply.io account.
URL
Enter a path relative to https://api.reply.io.com/. For example: /v1/people
For the list of available endpoints, refer to the Reply.io API Documentation.
Method
Select the HTTP method you want to use:
GET
to retrieve information for an entry.
POST
to create a new entry.
PUT
to update/replace an existing entry.
PATCH
to make a partial entry update.
DELETE
to delete an entry.
Headers
Enter the desired request headers. You don’t have to add authorization headers; we already did that for you.
Query String
Enter the request query string.
Body
Enter the body content for your API call.
Example of Use – List Contacts
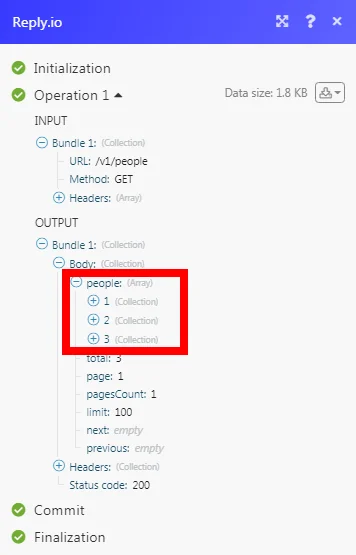
The following API call returns all the contacts from your Reply.io account:
URL:
/v1/people
Method:
GET
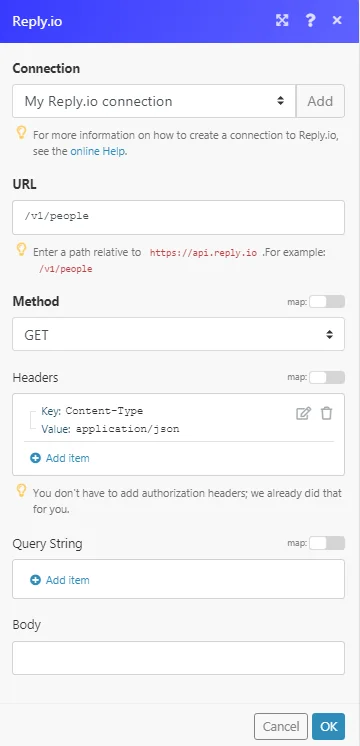
Matches of the search can be found in the module’s Output under Bundle > Body > people.
In our example, 3 people were returned:
Legacy article, imported from the original Boost.space knowledge base (/knowledge-base/applications/marketing/reply-io/).

