Workday Financial Management
With Workday Financial Management modules in Boost.space Integrator, you can monitor, create, update, list, retrieve, and delete the invoices in your Workday account.
To use Workday in Boost.space Integrator, you must have the Enterprise plan.
All Enterprise apps are currently labeled as premium tier 3 in Boost.space Integrator.
Refer to the Workday Financial Management API documentation and Workday Resource Management API documentation for a list of available endpoints.
Connect Workday Financial Management to Boost.space Integrator
You can establish two types of connection between Workday Financial Management and Boost.space Integrator: with user credentials or OAuth2.
Establish the connection with Workday Financial Management in Boost.space Integrator via User Credentials
To establish a connection with user credentials:
-
Log in to your Boost.space Integrator account, add a Workday Financial Management module to your scenario, and click Create a connection.
-
In the Connection type dropdown, select Workday Financial Management.
-
Enter your Host URL Address that you copied above without a trailing slash. For example,
https://wd3-services1.myworkday.comfor your production instance andhttps://wd3-impl-services1.workday.comfor your sandbox instance. -
Enter your Tenant ID. This can be located in your account URL address as follows:
https://HostName.workday.com/**TenantID**/d/home/html. -
In the Username and Password fields, enter the Workday Financial Management login credentials with API access. For more information, see the Getting Startedsection.
-
Click Save.
You have successfully established the connection. You can now edit and add more Workday Financial Management modules. If your connection requires reauthorization, follow the connection renewal steps here.
Establish the connection with Workday Financial Management in Boost.space Integrator via OAuth2
Before establishing an OAuth2 connection, your Workday system administrator must complete the steps in the Set Up Workday Financial Management for OAuth2 Connections section to generate client credentials and refresh tokens.
-
Log in to your Boost.space Integrator account, add a Workday Financial Management module to your scenario, and click Create a connection.
-
In the Connection type dropdown, select Workday Financial Management OAuth2.
-
Enter your Host URL Address. For example,
https://HostName.workday.com. Do not include a trailing slash. -
Enter your Tenant ID. This can be located in your account URL address as follows:
https://HostName.workday.com/**TenantID**/d/home/html. -
In the Client ID and Client Secret fields, enter your client credentials.
-
Enter the Refresh Token for the connection, provided by your Workday system administrator. Each connection should have its own refresh token as sharing tokens may result in connections being broken.
Workday system administrators can generate tokens in Workday > View API Clients > Manage Refresh Tokens for integrations.
-
Set the Access Token Expiry in Seconds, provided by your Workday system administrator. This value must be the same as the token expiry settings in Workday.
-
Click Save.
You have successfully established the connection. You can now edit and add more Workday Financial Management modules. If your connection requires reauthorization, follow the connection renewal steps here.
Set Up Workday Financial Management for OAuth2 Connections
Follow these steps in Workday to retrieve the client credentials and refresh tokens necessary to establish an OAuth2 connection:
Generate Client Credentials
-
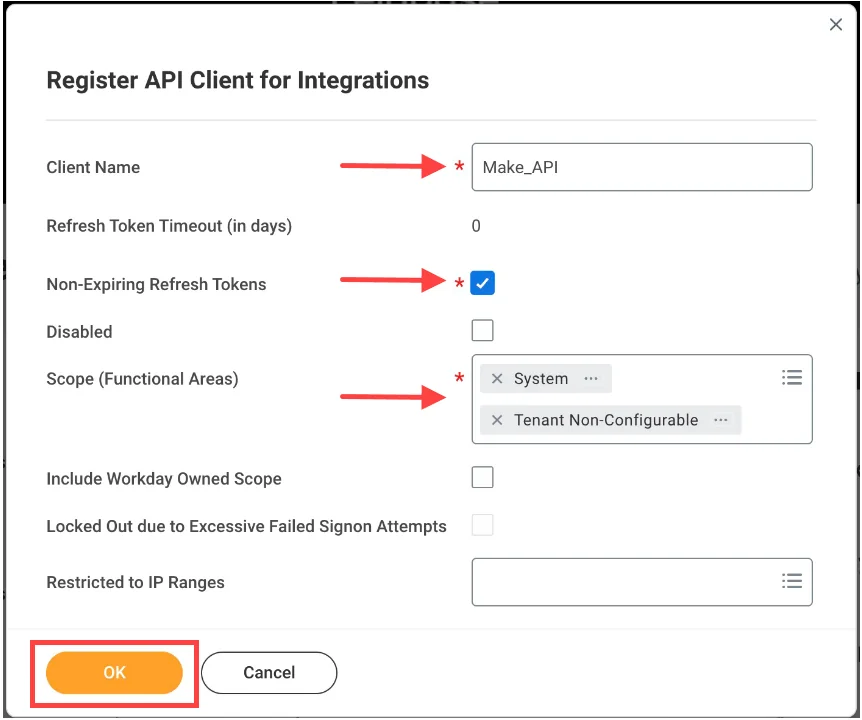
In your Workday account search bar, search for and select the Register API Client for Integrations task.
-
Fill in the Client Name field.
-
Check the Non-Expiring Refresh Tokens box. This is important to minimize risk of integration down-time. If it is not selected, a new refresh token must be manually created and entered into Boost.space Integrator after each expiration.
-
Add the following Scopes (Functional Areas):
Systemfor WQL functionality andTenant Non-Configurablefor RAAS functionality. -
Click OK.
-
Copy the Client ID and Client Secret values and store them in a safe place. This is important as you will not be able to view the Client Secret again after leaving this page. If you lose the Client Secret, you will be required to generate new credentials.
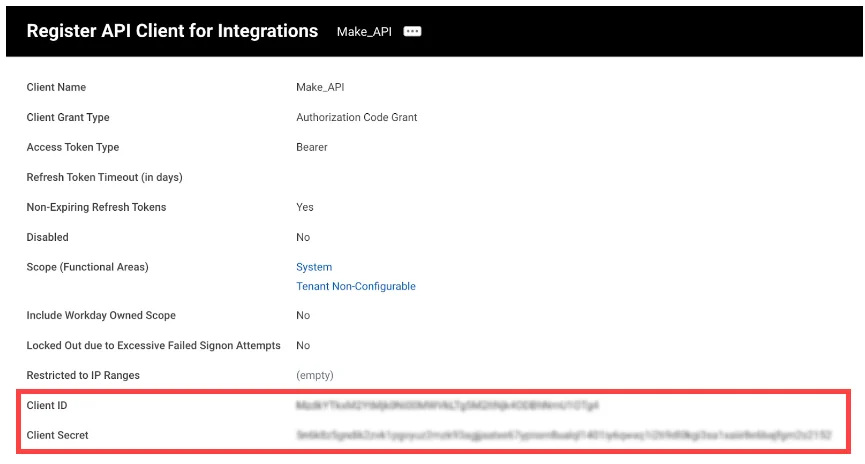
You have successfully created the Client ID and Client Secret to be used when creating the OAuth2 connection in Boost.space Integrator.
Configure Refresh Tokens
-
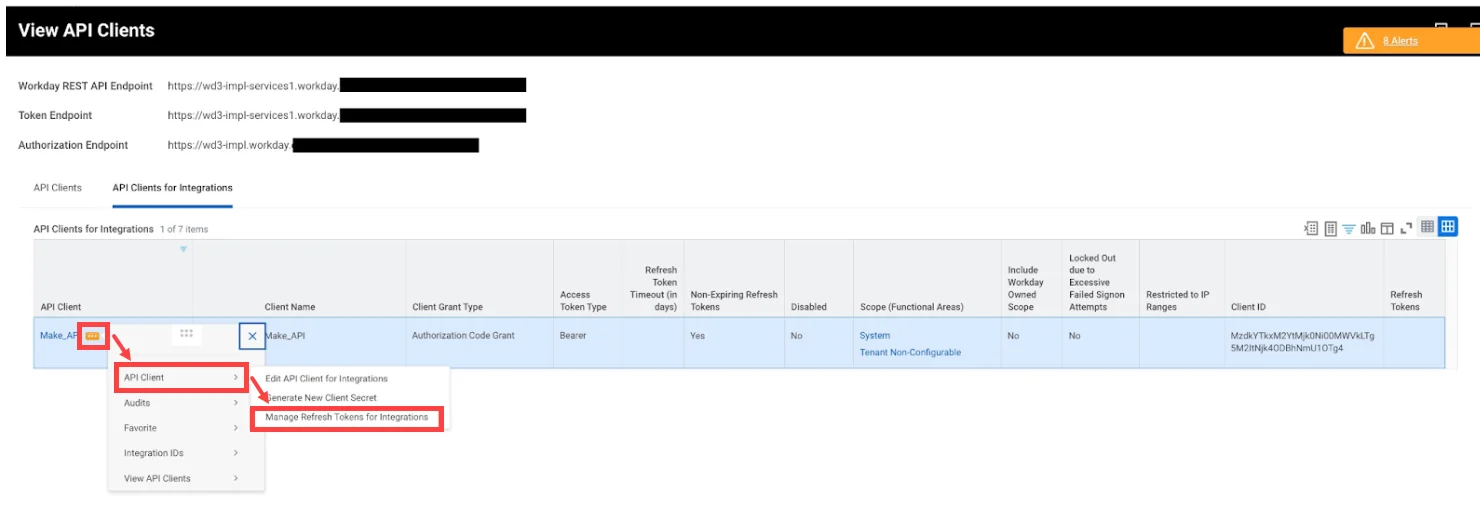
In your Workday account, go to View API Clients.
-
Find the relevant API Client and click on … > API Client > Manage Refresh Tokens for Integrations.
Note: This is also where you can edit API Client scopes, generate new client secrets, and find new refresh tokens if an expiration date was set.
-
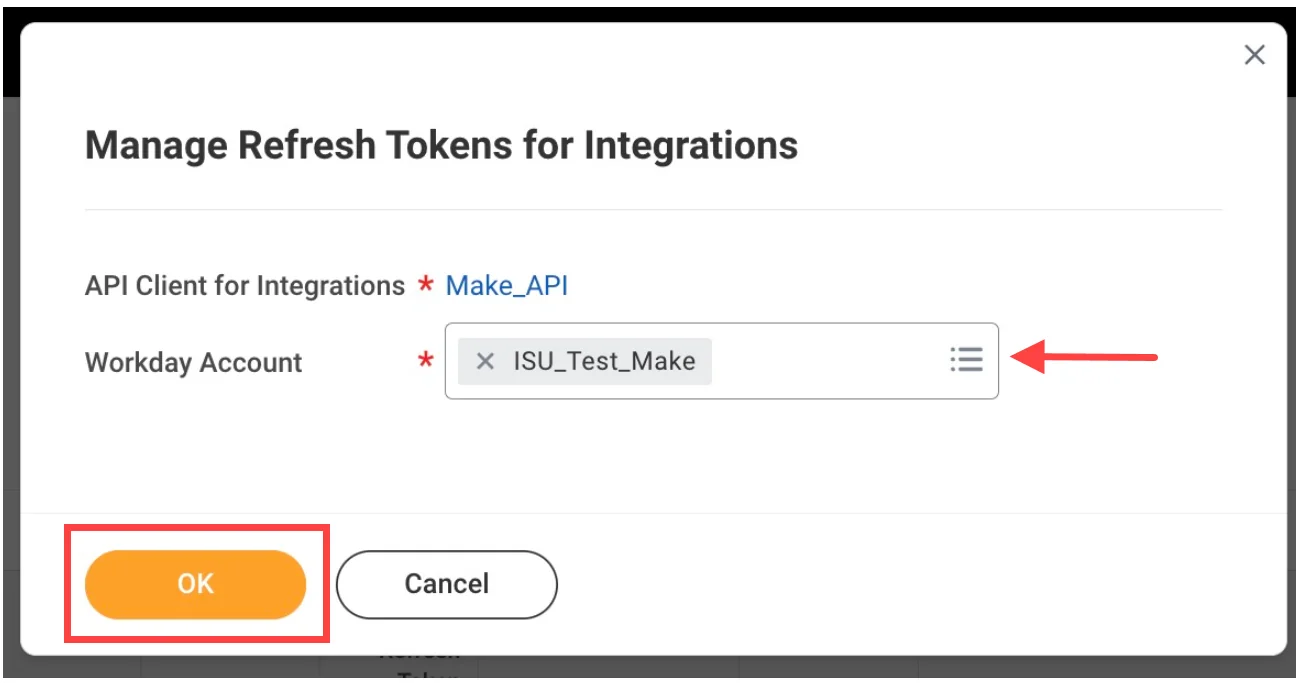
In the Manage Refresh Tokens for Integrations window, enter the Workday Account to be assigned to the API Client. This account must have access to the reports you would like to work with. WQL, RAAS, and SOAP API security is tied to the Workday account.
-
Click OK.
-
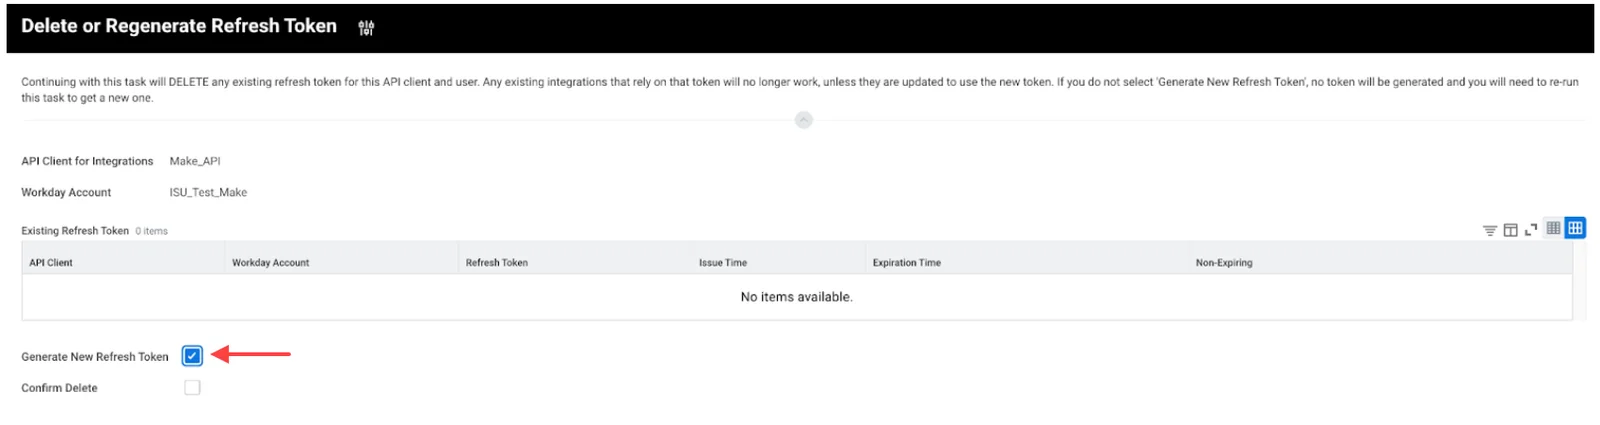
In the Delete or Regenerate Refresh Token task, click the Generate New Refresh Token box.
-
Copy the Refresh Token and store it in a safe place.
Note: Each Workday account will have its own refresh token, but can have the same Client ID and Client Secret as other accounts linked to the same API Client.
You have successfully created the Refresh Token to be used when creating the OAuth2 connection in Boost.space Integrator.
Supplier Invoices
You can create, update, search, retrieve, and cancel invoices with the following modules.
Search Supplier Invoices
Retrieves a list of supplier invoices filtered by criteria.
Connection
Establish a connection to your Workday account.
Supplier
Add the Supplier IDs whose invoices you want to search.
Company
Add the Company Reference IDs whose invoices you want to search.
Supplier Status
Add the Supplier Status of the invoices you want to search.
Invoice Date On or After
Enter (map) the date to search the invoices that have the date on or after the specified date.
Invoice Date On or Before
Enter (map) the date to search the invoices that have the date on or before the specified date.
Purchase Order
Add the Purchase Order Reference ID to search the invoices the math the specified purchase orders.
Supplier Hierarchy
Add the Supplier Reference ID to search the invoices that match the specified reference ID.
Invoice on Hold
Select whether you want to include the invoices in the search that are on hold.
Intercompany Invoice
Select whether you want to include the invoices in the search that are related to intercompany.
Payment Status
Add the payment status to list the invoices that match the specified status.
Created By Worker
Add the workers to search the invoices created by the specified workers. You can search the workers by their Employee ID or Contingent Worker ID.
Approving Worker
Add the approving worker for the invoice to search for the invoices that match the specified worker.
External PO Number
Enter (map) the external purchase order number of the invoice to search for the invoices that match the specified PO number.
Invoice Status
Add the invoice status to search for the invoices that match the specified status.
Limit
Set the maximum number of invoices Boost.space Integrator should return during one execution cycle.
Create a Supplier Invoice
Creates a new supplier invoice.
Connection
Establish a connection to your Workday account.
Company Reference ID
Enter (map) the Company Reference ID to which the invoice belongs.
Supplier ID
Enter (map) the Supplier ID associated with the invoice.
Contingent Worker ID
Enter (map) Contingent Worker ID associated with the invoice.
Payment Terms ID
Select or map the Payment Terms ID applicable to the invoice. Payment Terms are the rules for establishing when invoice payment is due and whether discounts are eligible to be taken or given for early payment. If no payment terms are specified, Workday will populate this with the customer’s default payment terms if one is defined. Workday will automatically determine the due date and discount date based on the invoice date and payment terms.
Supplier Connection ID
Select or map the default Supplier Business Connection ID
Use Default Supplier Connection
Select whether you want to use the default supplier connection details for the invoice.
Currency ID
Select or map the applicable Currency ID for the invoice.
Invoice Number
Enter (map) the invoice number. If adding a new invoice, then ensure to make the invoice number the same as Reference ID.
Gapless Document Number
Enter (map) the gapless document number on the supplier’s invoice.
Invoice Date
Enter (map) the date on the invoice.
Submit
Select whether you want to submit the invoice for approval.
Locked in Workday
Select whether the invoice is locked in the Workday system.
Invoice Received Date
Enter (map) the date on which the invoice is received.
Accounting Date Override
Enter (map) the date to override the accounting date.
Control Amount Total
Enter (map) the expected invoice total, including tax. An invoice cannot be submitted for approval if it has a non-zero control total that does not equal the sum of the extended amount for all invoice lines plus tax.
Freight Amount
Enter (map) the freight amount applicable to items in the invoice.
Other Charges
Enter (map) the details of other charges.
Worktag Allocation Template ID
Enter (map) the Worktag Allocation Template ID of the invoice.
Tax-Only
Select whether you want to mark the invoice as tax-only.
Due Date Override
Enter (map) the date after which you want to override the date used to look up the currency conversion rate. The default date is normally the same as the invoice date.
Payment Type ID
Select or map the Payment Type ID of the invoice/
Tax Option ID
Select or map the default Tax Option ID for the invoice.
Default Tax Code
Add the default tax code applicable to the invoices.
Withholding Tax Code ID
Select or map the Withholding Tax Code ID.
Address ID
Select or map the Address ID of the invoice to which the item should be shipped.
On Hold
Select whether this invoice is on hold.
Supplier Document Received
Select whether the supplier documents for this invoice have been received.
Suppliers Invoice Number
Enter (map) the supplier’s invoice number.
External PO Number
Enter (map) the external purchase order number of the invoice.
Referenced Invoices
Add the referenced invoices applicable to this invoice.
Invoice Type ID
Enter (map) the Invoice Type ID.
Supplier Contract ID
Search and add the Supplier Contract ID of the invoice.
Memo
Enter (map) the transaction header text, which will be printed on the delivered transaction.
Employee ID
Enter (map) the Employee ID who has requested the invoice.
Contingent Worker ID
Enter (map) the Contingent Worker ID who has requested the invoice.
Invoice Line Replacement Data
Add the invoice line replacement data for the invoice:
External Supplier Invoice Source ID
Enter (map) the External Supplier Invoice Source ID of the invoice. By default, it considers the Web Service.
Cancel Accounting Date
Enter (map) the date on which the supplier invoice is canceled. Cancel Accounting Date is populated only when a Supplier Invoice is Canceled.
Invoice Accounting Date
Enter (map) the date for a Supplier Invoice Adjustment.
Payment Practices
Select whether the invoice is eligible for the payment practices field to flag a Supplier Invoice for Payment Practices Reporting.
Budget Date
Enter (map) the date to override the Date on all supplier invoice lines and splits.
Tax Amount
Enter (map) the tax amount applicable to the invoice amount.
Withholding Tax Amount
Enter (map) the withholding tax amount of the invoice.
Document Link
Enter (map) the URL Address to the scanned image of the paper invoice.
Supplier Invoice Request ID
Enter (map) the Supplier Invoice Request ID who has requested the invoice.
Employee ID
Enter (map) the Employee ID who has requested the invoice.
Contingent Worker ID
Enter (map) the Contingent Worker ID who has requested the invoice.
Additional Reference Type ID
Enter (map) the Additional Reference Type ID encoded with key payment information on the invoice document.
Additional Reference Number
Enter (map) the additional reference number that is encoded with key payment information on the invoice document
Handling Code ID
This is the reference code of the payment handling instructions for the supplier invoice or supplier invoice adjustment.
Prepaid
Select whether this invoice is prepaid.
Prepayment Release Type ID
Select or map the Prepayment Release Type ID of the invoice.
Release Date
Enter (map) the date when the items in the invoice should be released.
Frequency Behavior ID
Enter (map) the Behaviour ID for the invoice.
Number of Installments
Enter (map) the number of installments applicable for this invoice to complete the total payment.
Use Invoice Date
Select whether you want to use the invoice date for creating this invoice.
From Date
Enter (map) the date from which you want to use the invoice date.
Gross Invoice Amount
Enter (map) the total gross invoice amount.
Total Amount Retained
Enter (map) the invoice amount kept pending.
Total Amount Released
Enter (map) the amount released for the invoice.
Retention Memo
Enter (map) the transaction header text, which will be printed on the delivered transaction.
Currency Rate Type ID
Enter (map) whether you want to override the default Rate Type used to look up the currency conversion rate
Currency Rate Date Override
Enter (map) whether you want to override the date used to determine the currency conversion rate. The default date is normally the same as the invoice date.
Currency Rate Manual Override
Enter (map) whether you want to allow a direct override of the currency conversion rate that will be used.
Document Currency Conversion Rate
Enter (map) the currency conversion rate for the accounting document ledger. This information is for outbound purposes and is not processed on inbound Workday Web Services requests.
Rate Override
Enter (map) an indicator of whether the currency exchange rate has been overwritten. For example, Yes. This information is for outbound purposes and is not processed on inbound Workday Web Services requests.
Currency Rate Lookup Override
Enter (map) the currency exchange rate derived based on the currency rate type override or currency rate date override. This information is for outbound purposes and is not processed on inbound Workday Web Services requests.
Manual Override Percent
Enter (map) the percentage of the currency rate manual override against the default currency rate. This information is for outbound purposes and is not processed on inbound Workday Web Services requests.
Default Rate Type
Enter (map) the default rate type applicable to the invoice when used for foreign currencies. This information is for outbound purposes and is not processed on inbound Workday Web Services requests.
Rate Basis Date
Enter (map) a basis date to derive the currency exchange rate applicable to the invoice. This information is for outbound purposes only and is not processed on inbound Workday Web Services requests.
Default Currency Rate
Enter (map) the currency rate applicable to the invoice.
Attachment Data
Add the attachment to the invoice:
Content Type
Enter (map) the attachment content type. For example, HTML.
File Name
Enter (map) the attachment file name with an extension.
File Content
Enter (map) the attachment content details.
Encoding
Enter (map) the encoding information available for the invoice.
Compressed
Select whether the attachment is a compressed file.
Comment
Enter any additional information about the attachment to share internally.
Tax Code Data
Add the ta code data:
Tax Applicability ID
Enter (map) the Tax Applicability ID for the invoice.
Tax Code ID
Select or map the Tax Code ID applicable to the invoice.
Tax Amount
Enter (map) the tax amount applicable to the invoice.
Tax Rate Data
Add the tax rate information.
Withholding Tax Code Data
Add the withholding tax code information:
Withholding Tax ID
Select or map the Withholding Tax ID applicable to the invoice. If left blank, Workday will consider the default withholding tax code from the invoice header if there is one.
Withholding Tax Amount
Enter (map) the total tax amount for the withholding tax code.
Withholding Tax Rate Data
Add the withholding tax information.
Retention Release Line Data
Add the retention amount release line information of the invoice:
Retention Release Line ID
Enter (map) the retention Release Line ID of the invoice.
WID
Enter (map) the Purchase Order Number of the invoice.
Amount Released
Enter (map) the amount being released for the invoice.
Auto Complete
Select whether you want to complete the supplier invoice intercompany sub-process.
Skip
Select whether you want to skip the supplier invoice intercompany sub-process.
Business Process Comment Data
Add the comments for the invoice:
Comment
Enter (map) the comment text you want to add to the invoice.
Worker
Add the workers associated with the comment.
Business Process Attachment Data
Add the business process attachment data of the invoice:
File Name
Enter (map) the file name.
File Content
Enter (map) the details of the content in the file.
Event Attachment Description
Enter (map) the attachment details.
Content Type
Enter (map) the content type. For example, HTML.
Event Attachment Category
Enter (map) the attachment category.
Supplier Invoice Prepaid Amortization Schedule
Add the supplier invoice prepaid amortization schedule for the invoice:
Prepaid Spend Amortization Schedule ID
Select or map the prepaid spend amortization schedule ID.
Frequency
Add the frequency of the schedule.
Number of Installments
Enter the number of installments
Use Invoice Date
Select whether you want to include the invoice date for the schedule.
From Date
Enter (map) the date from which you want to add the invoice lines.
Include All Available Prepaid Lines
Select whether you want to include all the available prepaid lines
Prepaid Supplier Invoice Lines
Add the supplier invoice line IDs related to this invoice.
Tax Certificate Number
Add the tax certificate number of the invoice.
Tax Certificate Number
Enter (map) the withholding tax certificate number.
Tax Authority
Add the tax authority ID applicable to the invoice.
Tax Category
Add the tax categories applicable to the invoice.
Last Updated Date
Enter (map) the date the tax certificate number was last updated.
Work Queue Information Data
Add the work information for the invoice:
Assignee
Add the assignees to the work queue.
Work Queue Tags
Add the tags for the work queue. For example, new.
Work Queue Notes
Enter any additional information for the work queue you want to add internally.
Get Supplier Invoices
Retrieves a list of supplier invoices with attachment data by their IDs.
Connection
Establish a connection to your Workday account.
Supplier Invoice ID
Add the Supplier Invoice IDs whose details you want to search.
Update a Supplier Invoice
Updates a supplier invoice by its ID.
Connection
Establish a connection to your Workday account.
Supplier Invoice ID
Select or map the invoice ID whose details you want to update.
See the Create a Supplier Invoice for field descriptions.
Cancel a Supplier Invoice
Cancels an existing supplier invoice by its ID.
Connection
Establish a connection to your Workday account.
Supplier Invoice ID
Select or map the Invoice ID you want to cancel.
Other
List Currencies
Retrieves all existing currencies in a tenant.
Connection
Establish a connection to your Workday account.
Limit
Enter the maximum number of currencies Boost.space Integrator will return during one execution cycle. The default value is 10.
Make a SOAP API Call
Performs an arbitrary authorized SOAP API call.
For a list of available web services, their URLs, and request and response types, refer to the Workday Web Services Directory.
Connection
Establish a connection to your Workday account.
Web Service URL
Enter the web service URL for the request.
For example, /Adoption/v40.2.
Request Type
Enter the request type.
For example, Get_Adoption_Items_Request.
Response Type
Enter the response type.
For example, Get_Adoption_Items_Response.
SOAP Body
Enter the body content for your API call. Do not include <bsvc:Request Type> or </bsvc:Request Type>, only include the body in between.
SOAP Header
Enter the desired request headers. Do not include <soapenv:Header> or </soapenv:Header>.
Make a SOAP API Call (Advanced)
Performs an arbitrary authorized API call.
For a list of available endpoints, refer to the Workday Financial Management API documentation.
Connection
Establish a connection to your Workday account.
URL
Enter a path relative to https://{hostname}.workday.com/ccx/service/{tenant}. For example, /Resource_Management.
Method
Select the HTTP method you want to use:
GET
to retrieve information for an entry.
POST
to create a new entry.
PUT
to update/replace an existing entry.
PATCH
to make a partial entry update.
DELETE
to delete an entry.
Headers
Enter the desired request headers. You don’t have to add authorization headers; we already did that for you.
Query String
Enter the request query string.
Body
Enter the body content for your API call. Only enter the body between <soapenv:Body> and </soapenv:Body>.
Example of use – Get Supplier Invoice
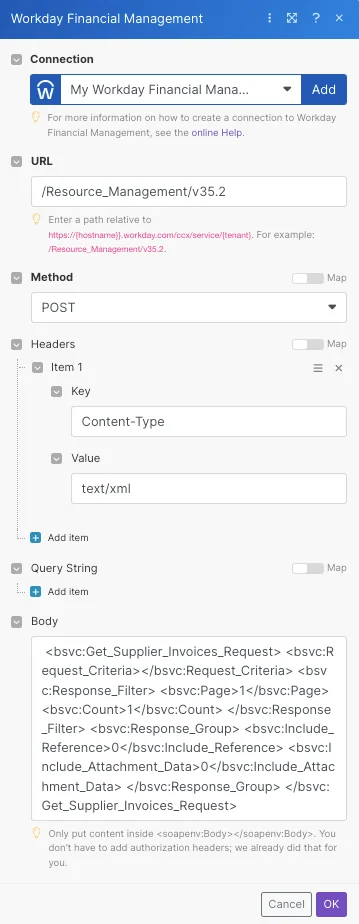
The following API call returns the specified supplier invoice from your Workday account:
URL: /Resource_Management/v35.2
Method: POST
Body:
<bsvc:Get_Supplier_Invoices_Request>
<bsvc:Request_Criteria></bsvc:Request_Criteria>
<bsvc:Response_Filter>
<bsvc:Page>1</bsvc:Page>
<bsvc:Count>1</bsvc:Count>
</bsvc:Response_Filter>
<bsvc:Response_Group>
<bsvc:Include_Reference></bsvc:Include_Reference>
<bsvc:Include_Attachment_Data></bsvc:Include_Attachment_Data>
</bsvc:Response_Group>
</bsvc:Get_Supplier_Invoices_Request>
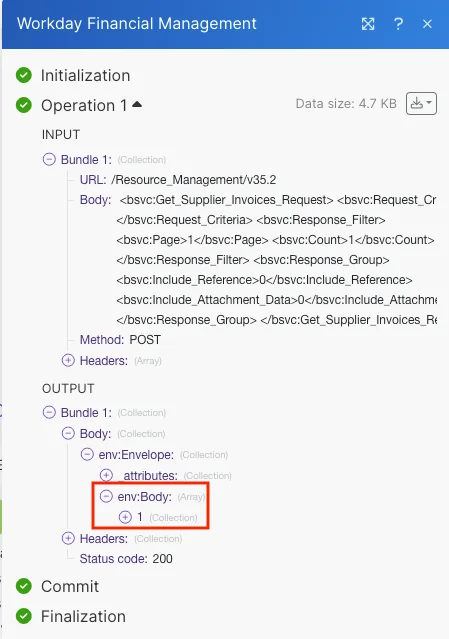
The search matches can be found in the module’s Output under Bundle > Body > env. In our example, 1 supplier invoice is returned:
Make a REST API Call
Performs an arbitrary authorized REST API call. Can only be used with an OAuth2 connection.
For a list of available endpoints, refer to the Workday Financial Management API documentation.
Connection
Establish a connection to your Workday account.
URL
Enter a path relative to https://{hostname}.workday.com/ccx/api. For example, /<serviceName>/v1/<tenant>/workers.
Method
Select the HTTP method you want to use:
GET
to retrieve information for an entry.
POST
to create a new entry.
PUT
to update/replace an existing entry.
PATCH
to make a partial entry update.
DELETE
to delete an entry.
Headers
Enter the desired request headers. You don’t have to add authorization headers; we already did that for you.
Query String
Enter the request query string.
Body
Enter the body content for your API call.
Run a WQL Query
Runs a WQL Query. Can only be used with an OAuth2 connection.
For information regarding WQL, refer to the Workday Query Language (WQL) Community guide. If you do not have access to Workday Community, you can request a community account.
Connection
Establish an OAuth2 connection to your Workday account.
WQL Query
Enter the query using WQL. Do not include the limit.
Limit
Enter the maximum number of bundles Boost.space Integrator will return during one execution cycle. The default value is 10.
Offset
Enter an offset for advanced pagination. If more then 3,200 results are expected, use together with the Repeater module.
Get a RaaS Report
Retrieves a RaaS report by the report URL. Can only be used with an OAuth2 connection.
Connection
Establish an OAuth2 connection to your Workday account
RaaS Report URL
Enter the URL of the RaaS report to retrieve. The Raas Report URL must be in JSON format. For example, https://wd3-services1.myworkday.com/ccx/service/customreport2/{tenant}/{user}/{custom report name}?format=json.
Output Format
Select the format in which you want to get the RaaS report.
Unescape HTML Entities
Select whether you want to unescape HTML entities in the RaaS report.
Legacy article, imported from the original Boost.space knowledge base (/knowledge-base/applications/business-operations-and-erps/workday-financial-management/).

