Workday Human Capital Management
With Workday Human Capital Management (HCM) modules in Boost.space Integrator, you can manage the staffing, human resources, compensation, absence, recruiting, benefits, learning, finances, resources, performance, and payrolls in your Workday Human Capital Management account.
Refer to the Workday HCM API documentation for a list of available endpoints.
Get Started with Workday HCM
To use Workday HCM with Boost.space Integrator, a Workday HCM admin must first complete the following:
Create an Integration System User
Workday recommends using an Integration System User (ISU) to integrate with external services such as Boost.space Integrator for the following reasons:
-
ISUs carry all operations and documents under the ISU, rather than using a worker specifically for integration and workflow activities
-
Integrations using an ISU will not stop working if a worker’s security profile changes or they are no longer an employee
-
Each ISU can and should be limited to a single integration, such as Boost.space Integrator, for security reasons
The ISU must have the mandatory permissions to perform the required actions for your scenario. If you receive an error that states The task submitted is not authorized when building a scenario, the ISU does not have sufficient permissions.
To create an ISU task and configure the ISU account for the integration, follow these steps:
-
In your Workday account search bar, search for and select the Create Integration System User task.
-
Enter the following details and click OK.
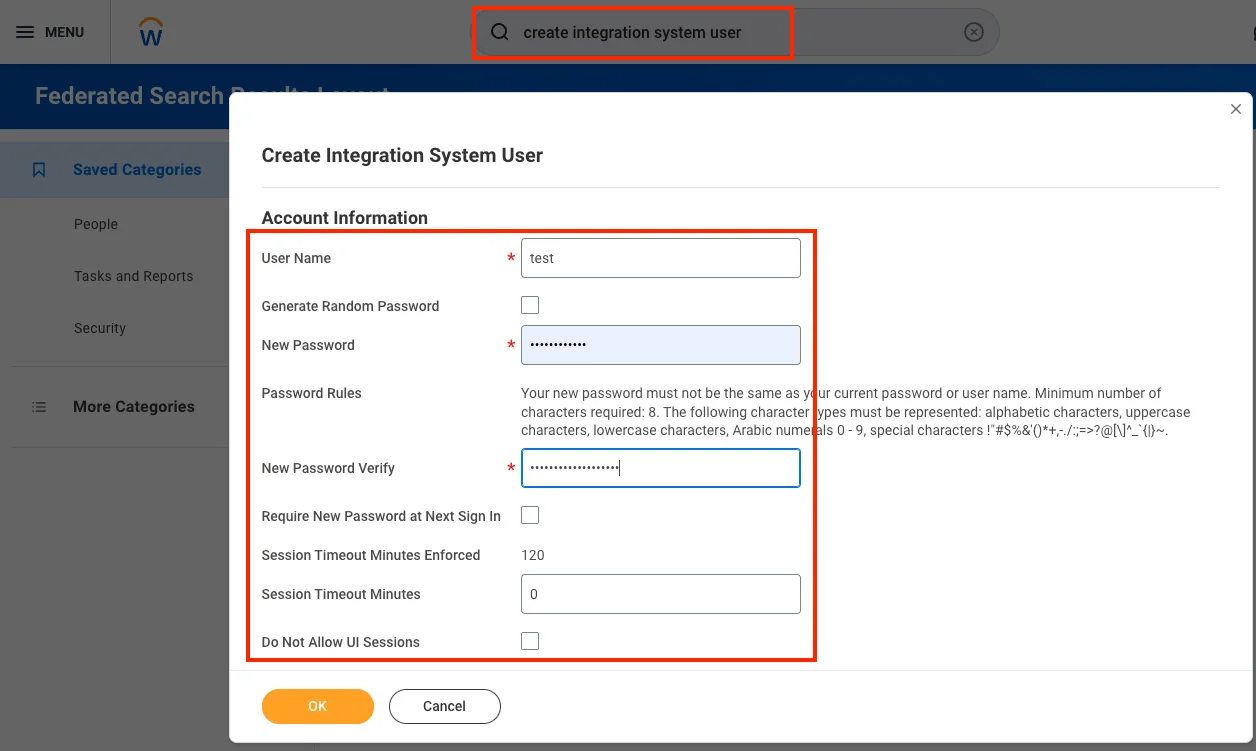
User Name
Enter the name of the user. We recommended including ISU in the user name for easy identification.
Generate Random Password
Select if you want to generate a random password for the user.
New Password
Enter a password according to the password requirements.
New Password Verify
Re-enter the password to confirm.
Require New Password at Next Sign In
Select the checkbox to enable the new password settings on the user’s next login.
Session Timeout Minutes Enforced
This field cannot be edited.
Session Timeout Minutes
Leave the Session Timeout Minutes as the default value of 0 to prevent session expiration.
An expired session can cause the integration to time out before it successfully completes.
Do Not Allow UI Sessions
This field can be checked as ISUs do not typically require the UI.
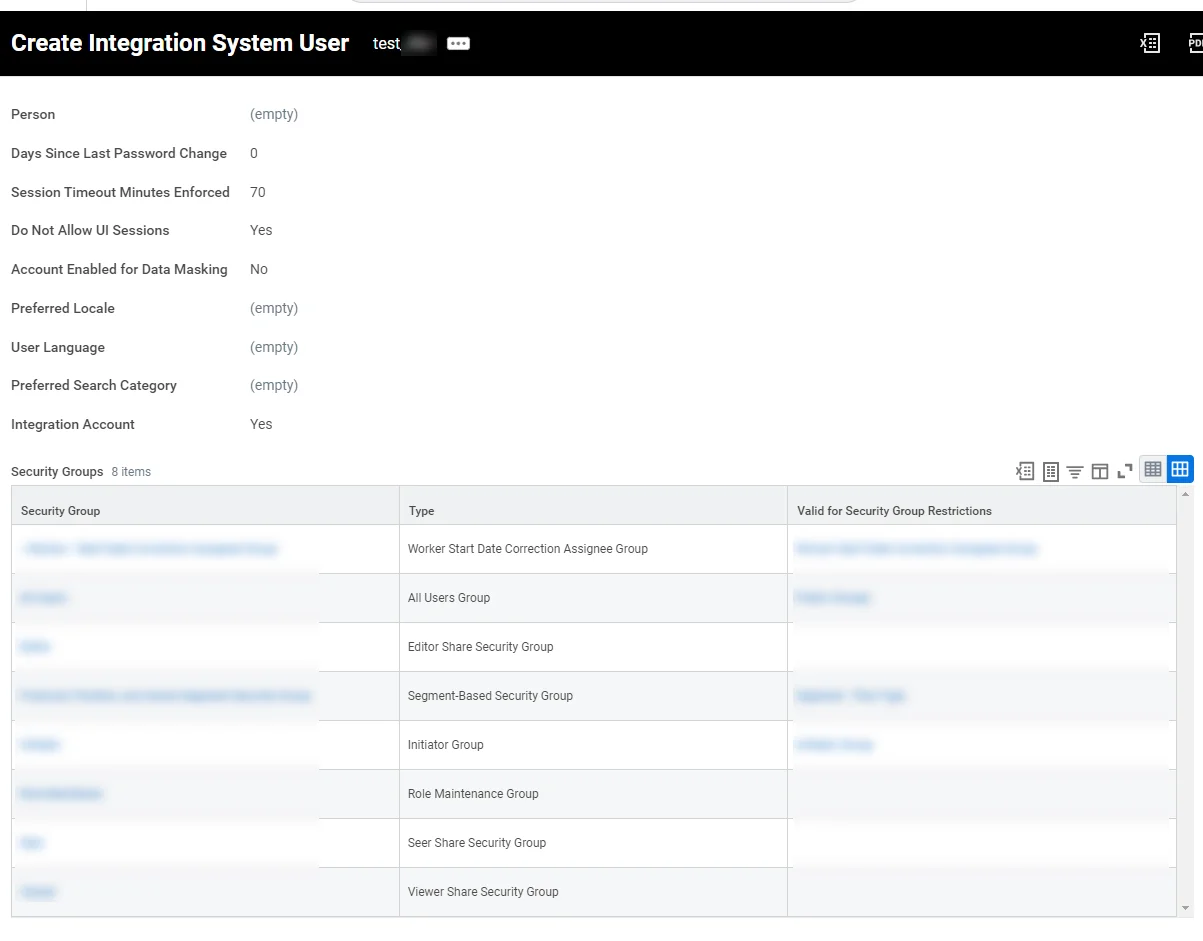
You have successfully created the ISU and a list of security groups are assigned by default. This default list can differ for customer environments specifications.
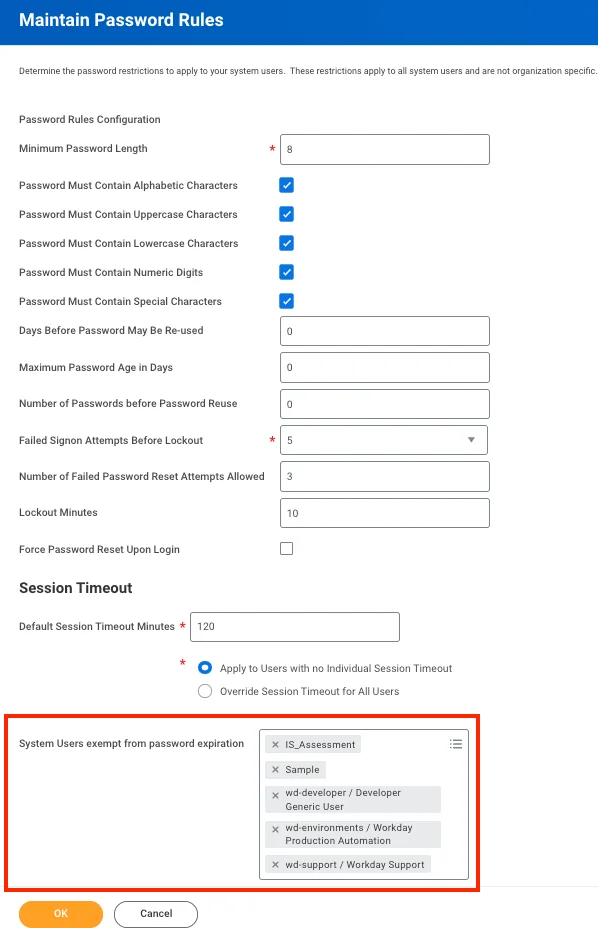
To avoid integration errors due to expired passwords, Workday recommends preventing the ISU password from expiring. Go to the Maintain Password Rules task and add the ISU to the System Users exempt from password expiration field.
Create an Integrated System Security Group
An Integrated System Security Group (ISSG) will be used to create a connection between the ISU, Domain, and Web Service.
To create a security group task, follow these steps:
-
In your Workday account search bar, search for and select the Create Security Group task.
-
Enter the following details and click OK.
Type of Tenanted Security Group
Select Integration System Security Group (Constrained) or (Unconstrained).
Name
Enter a name for the security group. We recommend including ISSG in the name for easy identification.
You have successfully created the security group.
Assign Integrated System Security Group to the ISU
To assign the ISSG to the ISU:
-
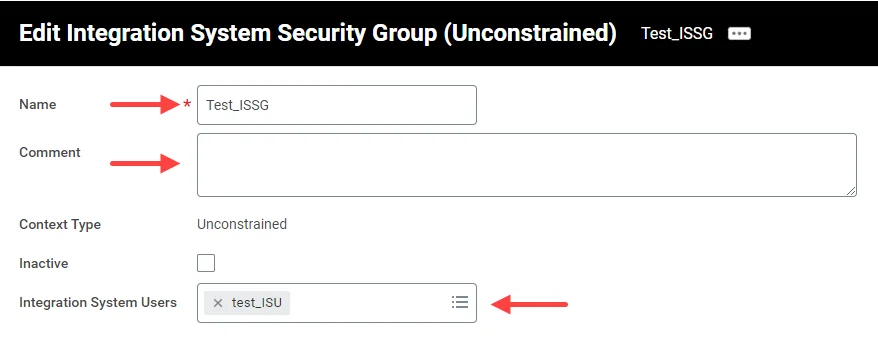
Open the security group created in the above section, enter the following details, and click OK.
Name
Enter the security group name.
Comment
Add applicable notes.
Integration System Users
Select the ISU created in the section above.
-
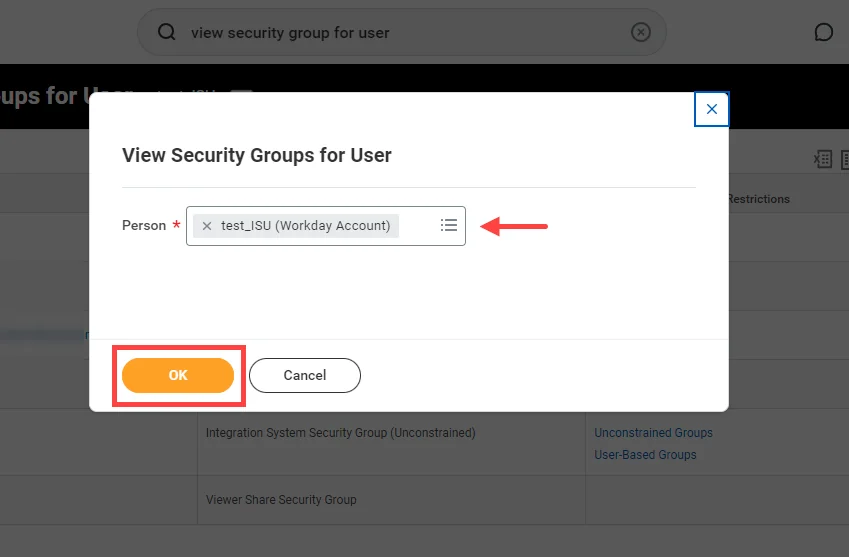
To validate the relation between the ISU and the security group, search for and select the View Security Groups for User task.
-
In the Person field, select the account and click OK.
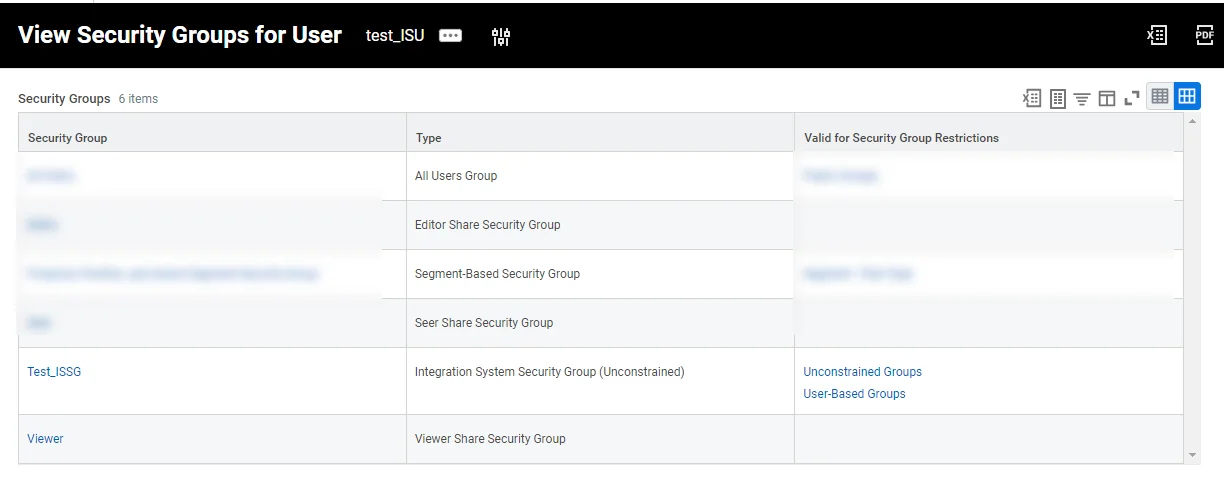
Verify that the created Security Group is now assigned to the ISU.
Configure Domain Settings for ISU
In this section, you will configure the domain settings for the ISU.
There are several ways to access the Domain Settings screen, Boost.space Integrator recommends following the steps defined in this section.
Continue from the Custom report created in the previous section.
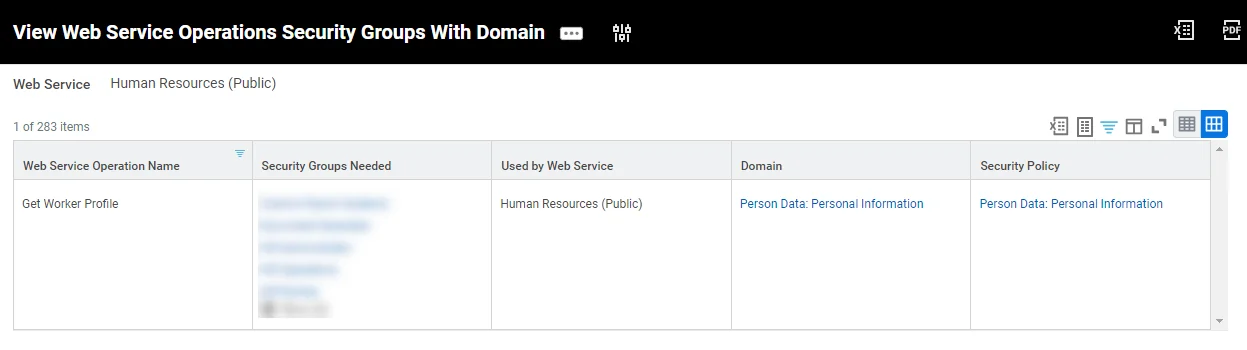
The following screens will contain examples for configuring domain settings for Web Service Operation Name, Get Worker Profile based on the Web Service Matrix, Get an Employee module.
-
Filter the report by Web Service Operation Name and select the relevant domain. For example, Get Worker Profile.
-
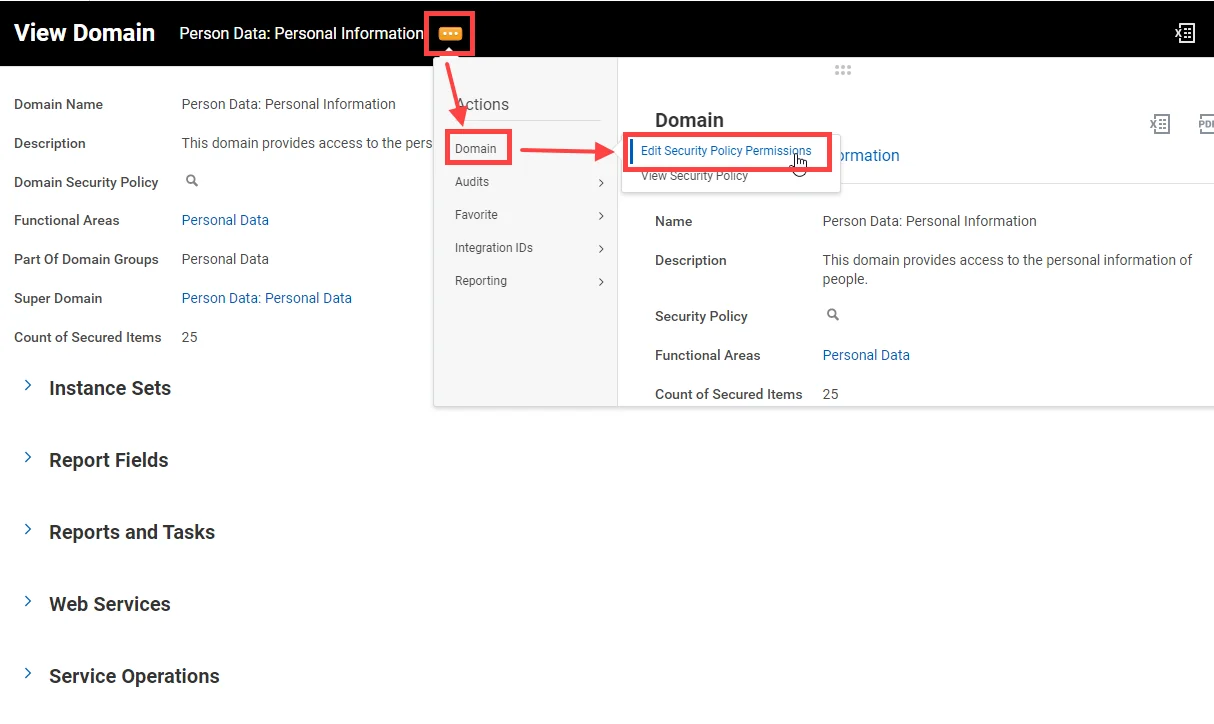
Click on the … menu > Domain > Edit Security Policy Permissions
-
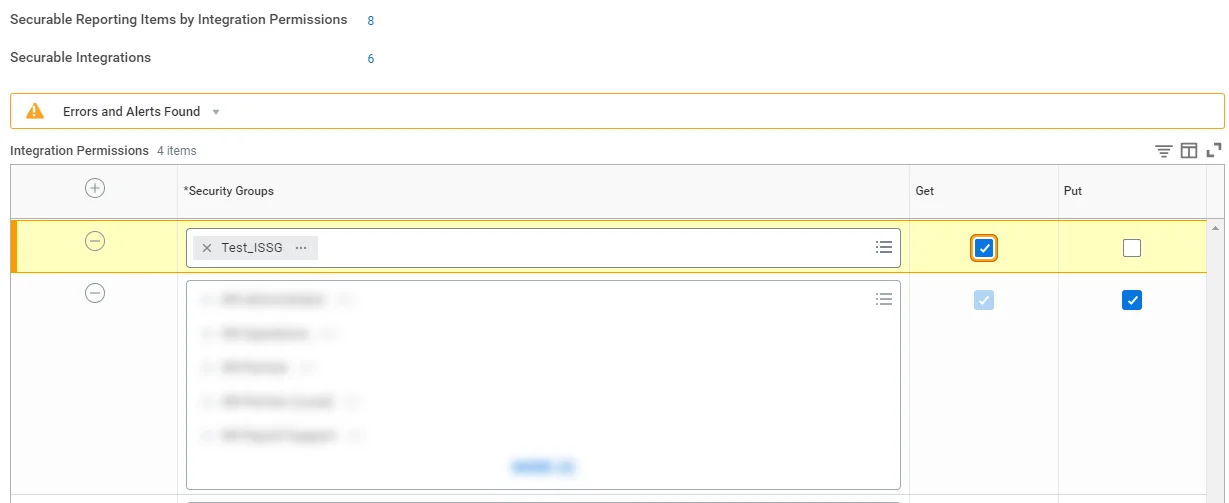
Click Security Groups and search for and select the Integration ISSG you created. This will grant the Integration ISSG access to the domain using available operations.
-
Confirm the action by clicking OK.
Activate Pending Security Policy Changes
You need to activate any Pending Security Policy Changes required by Workday; otherwise, executed steps are not saved and available for the Workday environment.
-
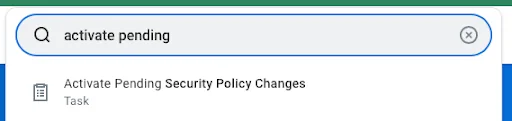
In your Workday account search bar, search for and select the Activate Pending Security Policy Changes task and enter the mandatory information.
-
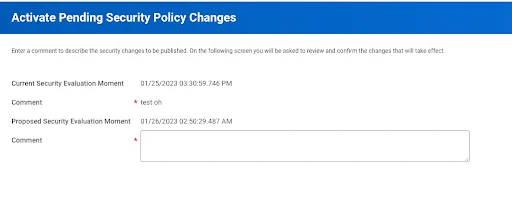
Complete the Comment field.
-
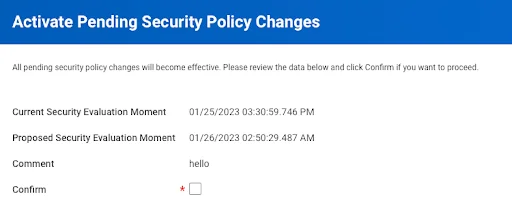
Confirm the activation by selecting the Confirm checkbox.
Validate Integration Security Group
To validate the security group:
-
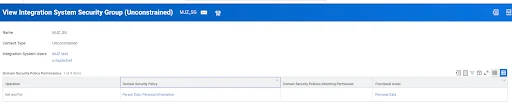
In your Workday account search bar, search for and select the View Security Group task.
-
Enter the security group name you have created.
-
Verify that the created Integration Security Group has assigned operation for the specified domain.
Connect Workday HCM to Boost.space Integrator
You can establish two types of connection between Workday HCM and Boost.space Integrator: with user credentials or OAuth2.
The System Administrators must thoroughly understand and review their organization’s authentication policy and design the integration user based on it.
Connect Workday HCM to Boost.space Integrator (User Credentials)
To establish the connection, you must:
-
Establish the connection in Boost.space Integrator:
Obtain your Host URL in Workday HCM
To obtain a Host URL from your Workday HCM account:
-
Log in to your Workday HCM account as an admin.
-
Go to View API Clients.
-
Copy a Token Endpoint and store in a safe place.
You will use this value in the Host URL field in Boost.space Integrator.
Establish the connection with Workday HCM in Boost.space Integrator (User Credentials)
To establish a connection with user credentials:
-
Log in to your Boost.space Integrator account, add a Workday HCM module to your scenario, and click Create a connection.
-
In the Connection type dropdown, select Workday HCM.
-
Enter your Host URL Address that you copied above without a trailing slash. For example,
https://wd3-services1.myworkday.comfor your production instance andhttps://wd3-impl-services1.workday.comfor your sandbox instance. -
Enter your Tenant ID. This can be located in your account URL address as follows:
https://HostName.workday.com/**TenantID**/d/home/html. -
In the Username and Password fields, enter the Workday HCM login credentials with API access. For more information, see the Getting Startedsection.
-
Click Save.
You have successfully established the connection. You can now edit and add more Workday HCM modules. If your connection requires reauthorization, follow the connection renewal steps here.
Establish the connection with Workday HCM in Boost.space Integrator (OAuth2)
Before establishing an OAuth2 connection, your Workday system administrator must complete the steps in the Set Up Workday HCM for OAuth2 Connections section to generate client credentials and refresh tokens.
-
Log in to your Boost.space Integrator account, add a Workday HCM module to your scenario, and click Create a connection.
-
In the Connection type dropdown, select Workday HCM OAuth2.
-
Enter your Host URL Address that you copied above without a trailing slash. For example,
https://wd3-services1.myworkday.comfor your production instance andhttps://wd3-impl-services1.workday.comfor your sandbox instance. -
Enter your Tenant ID. This can be located in your account URL address as follows:
https://HostName.workday.com/**TenantID**/d/home/html. -
In the Client ID and Client Secret fields, enter your client credentials.
-
Enter the Refresh Token for the connection, provided by your Workday system administrator. Each connection should have its own refresh token as sharing tokens may result in connections being broken.
Workday system administrators can generate tokens in Workday > View API Clients > Manage Refresh Tokens for integrations.
-
Set the Access Token Expiry in Seconds, provided by your Workday system administrator. This value must be the same as the token expiry settings in Workday.
-
Click Save.
You have successfully established the connection. You can now edit and add more Workday HCM modules. If your connection requires reauthorization, follow the connection renewal steps here.
Set Up Workday HCM for OAuth2 Connections
Follow these steps in Workday to retrieve the client credentials and refresh tokens necessary to establish an OAuth2 connection:
Generate Client Credentials
-
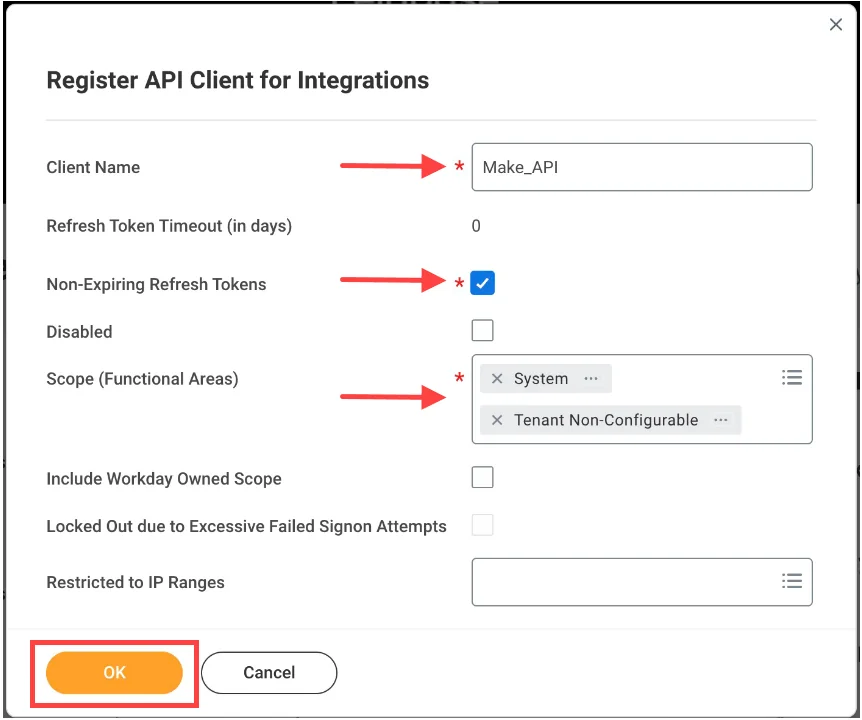
In your Workday account search bar, search for and select the Register API Client for Integrations task.
-
Fill in the Client Name field.
-
Check the Non-Expiring Refresh Tokens box. This is important to minimize risk of integration down-time. If it is not selected, a new refresh token must be manually created and entered into Boost.space Integrator after each expiration.
-
Add the following Scopes (Functional Areas):
Systemfor WQL functionality andTenant Non-Configurablefor RAAS functionality. -
Click OK.
-
Copy the Client ID and Client Secret values and store them in a safe place. This is important as you will not be able to view the Client Secret again after leaving this page and you will be required to generate new credentials.
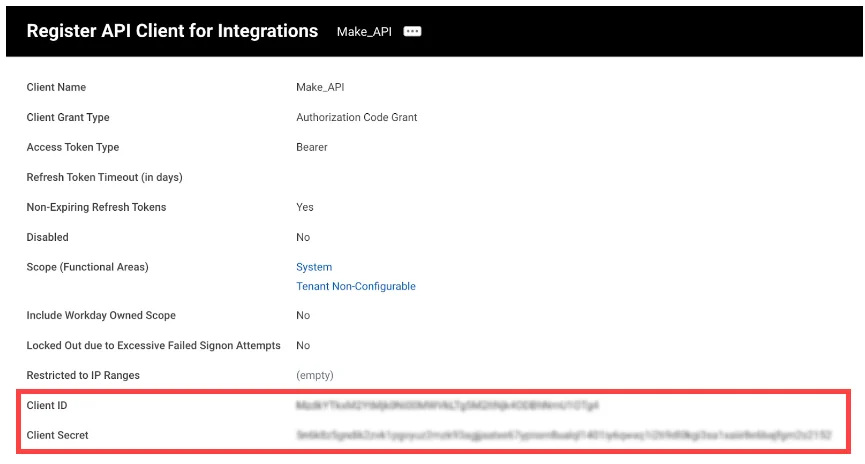
You have successfully created the Client ID and Client Secret to be used when creating the OAuth2 connection in Boost.space Integrator.
Configure Refresh Tokens
-
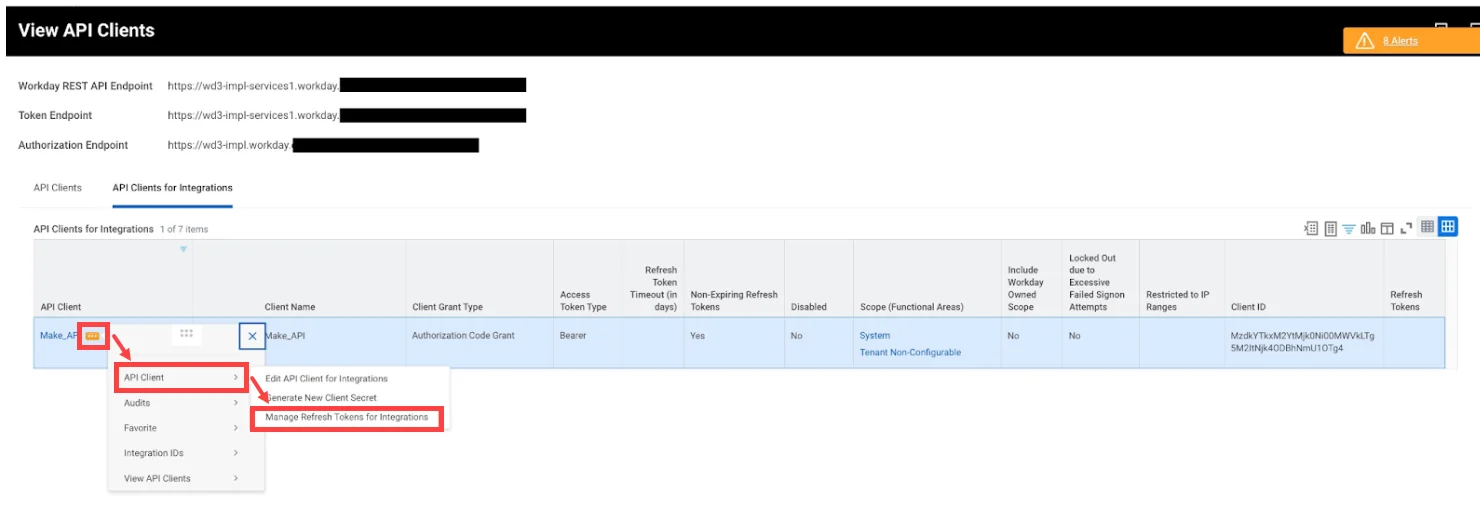
In your Workday account, go to View API Clients.
-
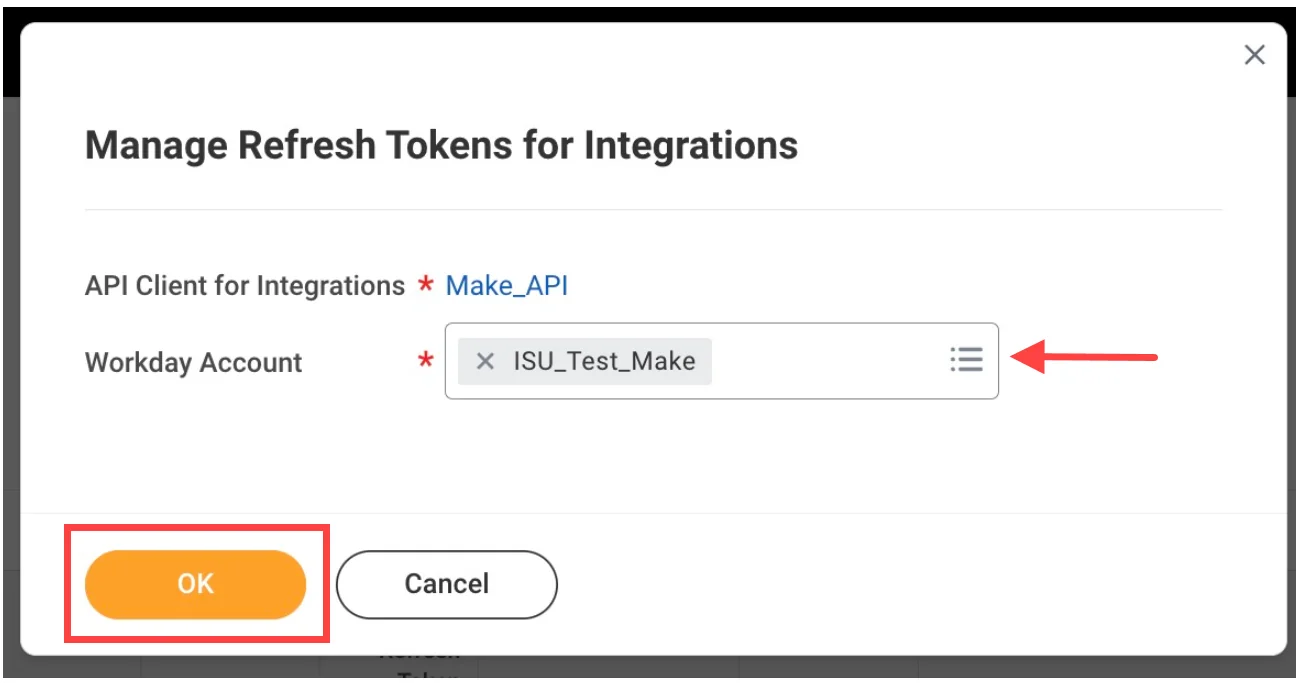
Find the relevant API Client and click on … > API Client > Manage Refresh Tokens for Integrations.
Note: This is also where you can edit API Client scopes, generate new client secrets, and find new refresh tokens if an expiration date was set.
-
In the Manage Refresh Tokens for Integrations window, enter the Workday Account to be assigned to the API Client. This account must have access to the reports you would like to work with. WQL, RAAS, and SOAP API security is tied to the Workday account.
-
Click OK.
-
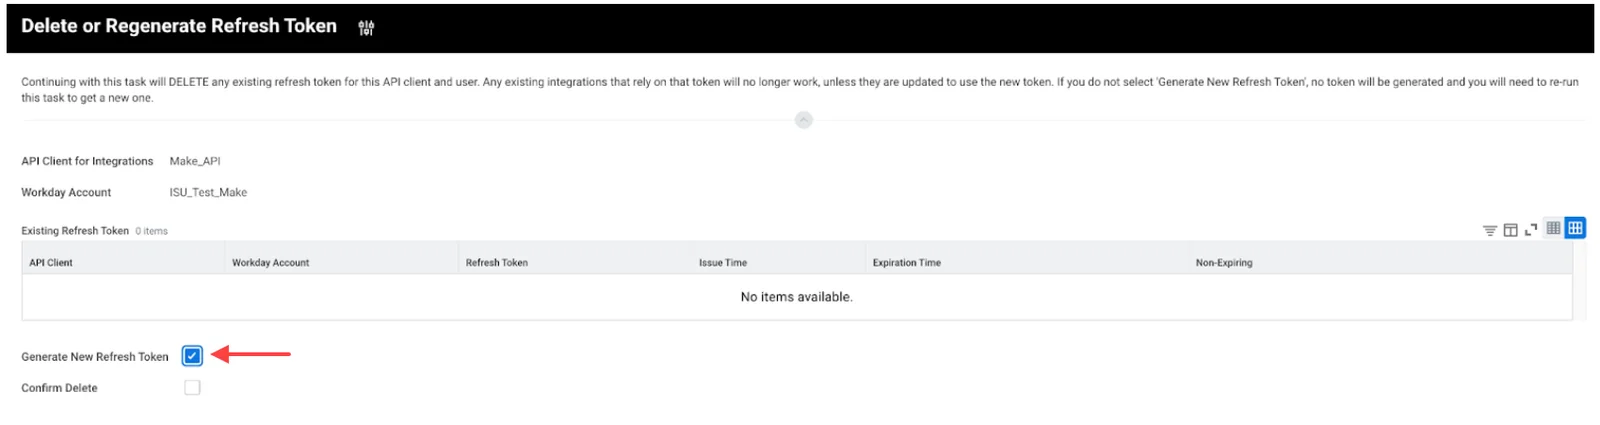
In the Delete or Regenerate Refresh Token task, click the Generate New Refresh Token box.
-
Copy the Refresh Token and store it in a safe place.
Note: Each Workday account will have its own refresh token, but can have the same Client ID and Client Secret as other accounts linked to the API client.
You have successfully created the Refresh Token to be used when creating the OAuth2 connection in Boost.space Integrator.
Build Workday HCM Scenarios
Locate Type ID and Option ID
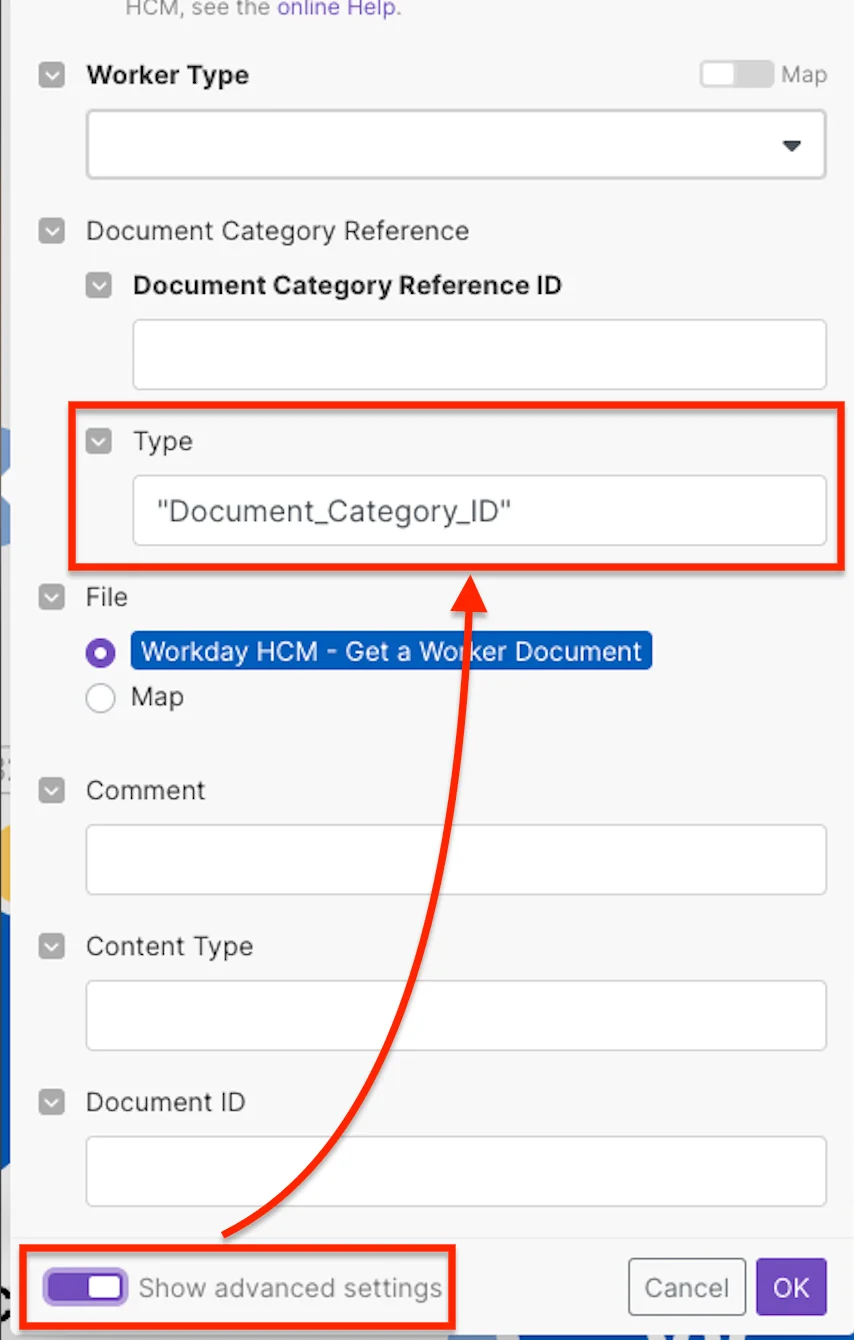
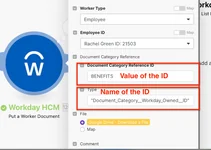
For most modules, you need the Type of ID to work with the ID fields successfully, but for a few modules, you must click the Show advanced settings toggle to access the Type ID you need, as shown in the below image:
You can find the Type ID and Option ID in two ways.
For example, you need to find the correct Type ID and Value of ID in the Document Category Reference ID field of the Put a Worker Document module. The following methods provide instructions to find these parameters.
Method 1:
-
Log in to your Workday account, and navigate to the record whose Type ID and Option ID you want to locate.
-
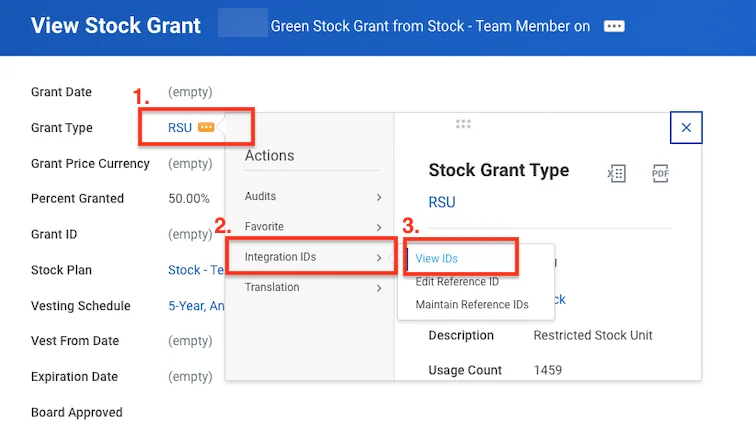
Click three dots > Select Integration IDs > View IDs.
You can find the Type ID and Option ID.

Method 2:
-
In the Search bar, enter integration IDs and choose the Integration IDs from the search results.
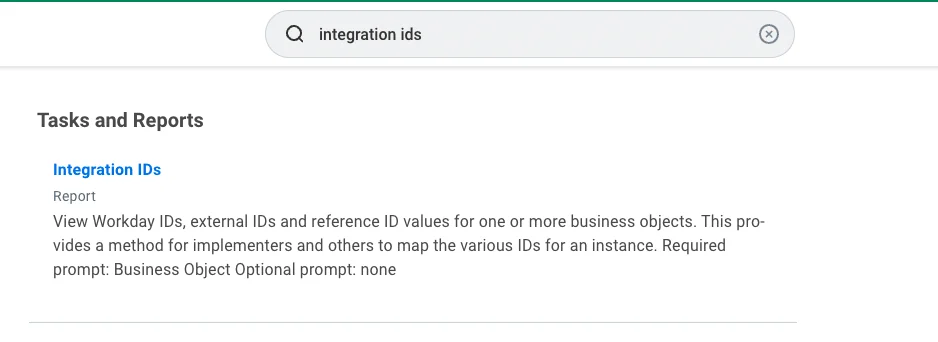
-
Enter the type name, for example, Document Category.
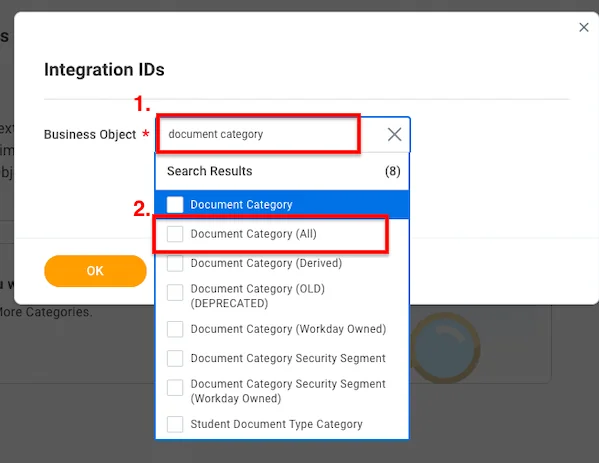
Locate the details in the report.
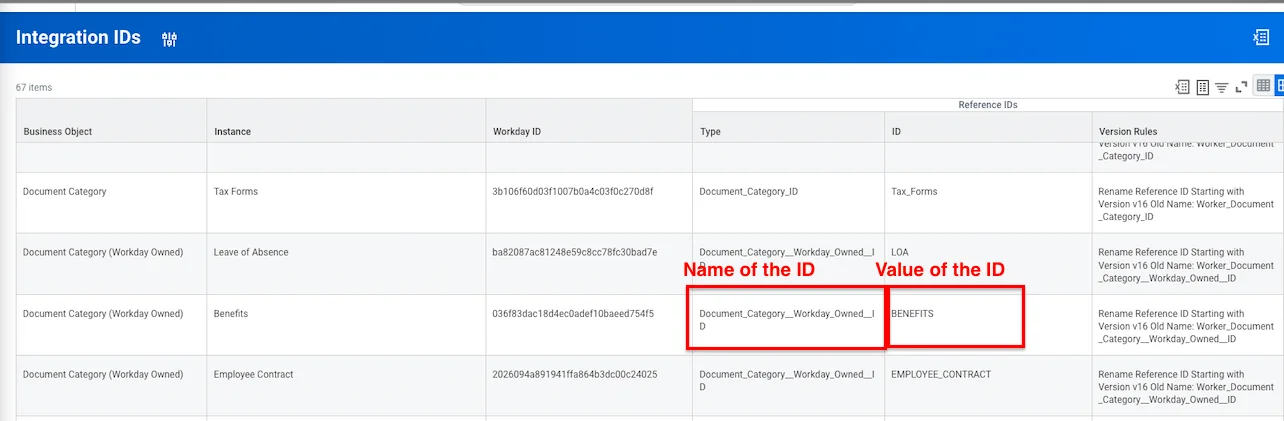
If you have used the Type ID that is not accurate, rewrite the name to match the value of the ID.
Staffing
You can add only an employee, add an additional job, put a pre-hire, hire an employee, list pre-hires, move workers by organization, put a worker document, retrieve worker document, terminate employees, add and remove retiree status using the following modules.
Add Only an Employee
Create an employee through a hiring process.
Connection
Establish a connection to your Workday Human Capital Management account.
See the Workday Human Capital Management Staffing API reference for field descriptions.
Add an Additional Job
Adds an additional job for an existing employee.
Connection
Establish a connection to your Workday Human Capital Management account.
See the Workday Human Capital Management Staffing API reference for field descriptions.
Create or Update a Pre-Hire
Creates or updates a pre-hire (applicant).
Connection
Establish a connection to your Workday Human Capital Management account.
See the Workday Human Capital Management Staffing API reference for field descriptions.
Hire an Employee
Hires a new or existing pre-hire (applicant) into an employee position, headcount, or job.
Connection
Establish a connection to your Workday Human Capital Management account.
See the Workday Human Capital Management Staffing API reference for field descriptions.
List or Get a Pre-Hire by Email
Retrieves pre-hires (applicants) or pre-hire by email address.
Connection
Establish a connection to your Workday Human Capital Management account.
Worker Reference
Select the worker type:
Worker Type
Select the worker type:
-
Employee
-
Contingent Worker
Employee ID
Select or map the Employee ID whose pre-hires you want to list.
Contingent Worker ID
Select or map the Contingent Worker ID whose pre-hires you want to list.
Former Worker Reference
Enter the details of the former worker reference:
Former Worker ID
Select or map the Former Worker ID if any.
Type
Enter the type of former worker.
Email Address
Enter the email address to search and return those references with an exact match.
Response Group
Select the wrapper element to retrieve the applicant information to be included in the response.
Try to retrieve only the required amount of data. Fetching too much data would slow down the scenario.
Limit
Set the maximum number of pre-hires Boost.space Integrator will return during one execution cycle. The default value is 10.
Move Workers by Organization
Moves workers by Organization.
Connection
Establish a connection to your Workday Human Capital Management account.
For field descriptions, see the Workday Human Capital Management Staffing API reference.
Create or Update a Worker Document
Creates or updates a worker document.
Connection
Establish a connection to your Workday Human Capital Management account.
Worker Type
Select the worker type:
-
Employee
-
Contingent Worker
Employee ID
Select or map the Employee ID whose document you want to create or update.
Contingent Worker
Select or map the Contingent Worker ID whose document you want to create or update.
Document Category Reference
Enter the details of the document:
Type
Select the category that the worker document belongs to.
ID
Enter the Document Category Reference ID
File
Enter the file details:
File Name
Enter the name of the worker document file.
File
Enter the file content in base64 encoding.
Comment
Enter a comment about the worker document, if any.
Content Type
Enter the text attribute identifying the content type of the attachment.
Document ID
Enter the ID for the worker document.
Get a Worker Document
Retrieves worker document data.
Connection
Establish a connection to your Workday Human Capital Management account.
Worker Reference
Enter the details of the worker:
Worker Type
Select the worker type:
-
Employee
-
Contingent Worker
Employee ID
Select or map the Employee ID whose document you want to retrieve.
Contingent Worker
Select or map the Contingent Worker ID whose document you want to retrieve.
End a Contingent Worker Contract
Ends a contingent worker’s contract.
Connection
Establish a connection to your Workday Human Capital Management account.
For field descriptions, see the Workday Human Capital Management Staffing API reference.
Terminate an Employee
Terminates an employee.
Connection
Establish a connection to your Workday Human Capital Management account.
Terminate Employee Data
Enter the employee details:
Employee ID
Select or map the Employee ID whom you want to terminate.
Type
Enter the type of employee data.
Termination Date
Enter the date when termination will happen. See the list of supported date and time formats.
Terminate Event Data
Enter the primary reason reference:
Event Classification Subcategory ID
Select the Event Classification Subcategory ID to
Type
Enter the type of event data.
Add a Retiree Status
Changes the status of a previously terminated worker to retiree.
Connection
Establish a connection to your Workday Human Capital Management account.
For field descriptions, see the Workday Human Capital Management Staffing API reference.
Delete a Retiree Status
Removes the retirement status of a retired employee.
Connection
Establish a connection to your Workday Human Capital Management account.
For field descriptions, see the Workday Human Capital Management Staffing API reference.
Human Resources
You can create a job profile, put a location, put search settings, and retrieve worker profiles, workers’ event history, and list academic ranks using the following modules.
Update a Workday Account
Updates an existing workday account (e.g. user name/password) with the supplied information.
Connection
Establish a connection to your Workday Human Capital Management account.
See the Workday Human Capital Management Human Resources API reference for field descriptions.
Create or Update a Job Family
Creates or updates a job family.
Connection
Establish a connection to your Workday Human Capital Management account.
See the Workday Human Capital Management Human Resources API reference for field descriptions.
Creates or Update a Job Family Group
Creates or updates a job family group.
Connection
Establish a connection to your Workday Human Capital Management account.
Job Family Group Data
Enter the job family group details:
Name
Enter a name to identify the job family group. This name will be used for compensation and benefits eligibility rules.
ID
Enter the reference ID of the job family group.
Effective Date
Enter the effective date of the job family group. See the list of supported date and time formats.
Summary
Enter the summary to identify the job family group.
Inactive
Select whether the job family group is inactive.
Job Family Data
Enter the job family details.
Job Family Group Reference
Enter the job family group references.
Create or Update a Job Profile
Creates or updates a job profile.
Connection
Establish a connection to your Workday Human Capital Management account.
See the Workday Human Capital Management Human Resources API reference for field descriptions.
Create or Update a Location
Creates or updates a location.
Connection
Establish a connection to your Workday Human Capital Management account.
See the Workday Human Capital Management Human Resources API reference for field descriptions.
Create or Update Search Settings
Creates or updates search configurations in Workday.
Connection
Establish a connection to your Workday Human Capital Management account.
Synonyms
Enter the synonyms details:
Workday Term
Enter the workday term whose synonym you want to create. These synonyms help in discovering the tasks and reports.
Custom Term
Enter the custom term to replace the workday term.
Object Type to Suppress from Search Reference
Enter the details:
IID
Enter the object types that are suppressed by default in search results.
Suppressions are not applied to domain searches and can be turned off by using the “all:” domain.
Type
Enter the IID type entered.
Get a Worker Profile
Retrieves a subset of data related to a worker and his/her employment/contract, personal, and compensation information.
Connection
Establish a connection to your Workday Human Capital Management account.
Worker Type
Select the worker type:
-
Employee
-
Contingent Worker
Applicant Reference
Enter the applicant details:
Employee Reference ID
Select or map the Employee Reference ID whose worker profile you want to retrieve.
Type
Enter the applicant reference ID selected. For example, WD-EMPLID.
Applicant Reference
Enter the applicant details:
Contingent Worker Reference ID
Select or map the Contingent Worker Reference ID whose worker profile you want to retrieve.
Type
Enter the applicant reference ID selected. For example, WD-EMPLID.
Get an Employee
Retrieves data related to an employee and his/her employment, personal, and compensation.
Connection
Establish a connection to your Workday Human Capital Management account.
Employee ID
Select or map the Employee ID whose details you want to retrieve.
Type
Enter the type of employee you have selected. For example, WD-EMPLID.
Get a Worker Event History
Retrieves references to all events associated with a worker based on the event type and date parameters.
Connection
Establish a connection to your Workday Human Capital Management account.
Worker Type
Select the worker type:
-
Employee
-
Contingent Worker
Applicant Reference
Enter the applicant’s details:
Employee Reference ID
Select or map the Employee Reference ID whose event history you want to retrieve.
Contingent Worker Reference ID
Select or map the Contingent Worker Reference ID whose event history you want to retrieve.
Type
Enter the application type selected. For example, WD-EMPLID.
Updated from
Enter the date and time that defines the earliest moment data was entered into the Workday system. See the list of supported date and time formats.
Updated through
Enter the date and time that defines the latest moment data was entered into the Workday system. See the list of supported date and time formats.
Effective from
Enter the earliest effective date when the data is marked within the Workday system. See the list of supported date and time formats.
Effective through
Enter the latest effective date when the data is marked within the Workday system. See the list of supported date and time formats.
List Academic Ranks
Retrieves academic ranks.
Connection
Establish a connection to your Workday Human Capital Management account.
Limit
Set the maximum number of academic ranks Boost.space Integrator will return during one execution cycle. The default value is 10.
Compensation
You can add and update stock grants, request compensation change, and employee merit adjustments using the following modules.
Add a Stock Grant
Allows the addition of stock grants to an employee via the request stock option grant business process.
Connection
Establish a connection to your Workday Human Capital Management account.
For field descriptions, see the Workday Human Capital Management Compensation API reference.
Request a Compensation Change
Allows the requesting of a compensation change for an employee via the request compensation change business process.
Connection
Establish a connection to your Workday Human Capital Management account.
For field descriptions, see the Workday Human Capital Management Compensation API reference.
Request an Employee Merit Adjustment
Request a merit adjustment for an employee and initiates the request employee merit adjustment business process.
Connection
Establish a connection to your Workday Human Capital Management account.
For field descriptions, see the Workday Human Capital Management Compensation API reference.
Absence Management
You can request a leave of absence, return from a leave of absence, and list time off plan balances and absence inputs using the following modules.
Request a Leave of Absence
Adds new leave of absence request.
Connection
Establish a connection to your Workday Human Capital Management account.
For field descriptions, see the Workday Human Capital Management Absence Management API reference.
Request a Return from Leave of Absence
Adds new return from a leave of absence request.
Connection
Establish a connection to your Workday Human Capital Management account.
For field descriptions, see the Workday Human Capital Management Absence Management API reference.
Recruiting
You can move and list job requisitions using the following modules.
Move a Job Requisition
Moves a job requisition from one job management organization to another job management organization.
Connection
Establish a connection to your Workday Human Capital Management account.
For field descriptions, see the Workday Human Capital Management Recruiting API reference.
List Job Requisitions
Retrieves information for job requisitions and provides a reference to the related position.
Connection
Establish a connection to your Workday Human Capital Management account.
Limit
Set the maximum number of job requisitions Boost.space Integrator will return during one execution cycle. The default value is 10.
Benefits Administration
You can add dependents using the following modules.
Add a Dependent
Adds a dependent.
Connection
Establish a connection to your Workday Human Capital Management account.
For field descriptions, see the Workday Human Capital Management Recruiting API reference.
Learning
You can enroll in learning content and list budget fringe rate tables using the following modules.
Enroll in Learning Content
Uses enrollment in the content business process to enroll learners into learning content.
Connection
Establish a connection to your Workday Human Capital Management account.
For field descriptions, see the Workday Human Capital Management Recruiting API reference.
Financial Management
You can list currencies and budget fringe rate tables using the following modules.
List Currencies
Retrieves all existing currencies in a tenant.
Connection
Establish a connection to your Workday Human Capital Management account.
Limit
Set the maximum number of currencies Boost.space Integrator will return during one execution cycle. The default value is 10.
Resource Management
You can search timesheets and list asset book configurations using the following modules.
Search Timesheets
Retrieves worker timesheets for the specified criteria.
Connection
Establish a connection to your Workday Human Capital Management account.
Supervisory Organization Reference
Select or map the Organization Reference ID whose worker’s timesheets you want to search.
Worker Reference
Enter the worker references details:
Worker Type
Select the worker type:
-
Employee
-
Contingent Worker
Employee ID
Select or map the Employee ID whose timesheets you want to search.
Contingent Worker ID
Select or map the Contingent Worker ID whose timesheets you want to search.
Start Date On or After
Enter the start date to search timesheets from this date or after this date. See the list of supported date and time formats.
Start Date On or Before
Enter the start date to search timesheets from this date or before the date. See the list of supported date and time formats.
Last Updated On or After
Enter the last updated date to search timesheets from this date or after this date. See the list of supported date and time formats.
Last Updated On or Before
Enter the last updated date to search timesheets from this date or before the date. See the list of supported date and time formats.
Limit
Set the maximum number of timesheets Boost.space Integrator will return during one execution cycle. The default value is 10.
Performance Management
You can list competency categories, snapshots, and certification issuers using the following modules.
List Competency Categories
Retrieves all competency categories.
Connection
Establish a connection to your Workday Human Capital Management account.
Limit
Set the maximum number of competency categories Boost.space Integrator will return during one execution cycle. The default value is 10.
List Competency Snapshots
Retrieves competency snapshot information for use in translation integrations.
Connection
Establish a connection to your Workday Human Capital Management account.
Limit
Set the maximum number of competency snapshots Boost.space Integrator will return during one execution cycle. The default value is 10.
List Certification Issuers
Retrieves the certification issuers that are currently defined.
Connection
Establish a connection to your Workday Human Capital Management account.
Limit
Set the maximum number of certification issuers Boost.space Integrator will return during one execution cycle. The default value is 10.
Payroll
You can list company vehicles, ROE history data, and contact types using the following modules.
List Company Vehicles
Provides the ability to retrieve all or some company vehicles.
Connection
Establish a connection to your Workday Human Capital Management account.
Limit
Set the maximum number of company vehicles Boost.space Integrator will return during one execution cycle. The default value is 10.
List ROE History Data
Retrieves Canadian record of employment history data for a given record of employment.
Connection
Establish a connection to your Workday Human Capital Management account.
Limit
Set the maximum number of company vehicles Boost.space Integrator will return during one execution cycle. The default value is 10.
List Contact Types
Retrieves contact types for the specified request references or criteria.
Connection
Establish a connection to your Workday Human Capital Management account.
Limit
Set the maximum number of company vehicles Boost.space Integrator will return during one execution cycle. The default value is 10.
Other
You can call APIs using the following module.
Make a SOAP API Call
Performs an arbitrary authorized SOAP API call.
For a list of available web services, their URLs, and request and response types, refer to the Workday Web Services Directory.
Connection
Establish a connection to your Workday account.
Web Service URL
Enter the web service URL for the request.
For example, /Adoption/v40.2.
Request Type
Enter the request type.
For example, Get_Adoption_Items_Request.
Response Type
Enter the response type.
For example, Get_Adoption_Items_Response.
SOAP Body
Enter the body content for your API call. Do not include <bsvc:Request Type> or </bsvc:Request Type>, only include the body in between.
SOAP Header
Enter the desired request headers. Do not include <soapenv:Header> or </soapenv:Header>.
Make a SOAP API Call (Advanced)
Performs an arbitrary authorized API call.
For a list of available endpoints, refer to the Workday Human Capital Management API documentation.
Connection
Establish a connection to your Workday account.
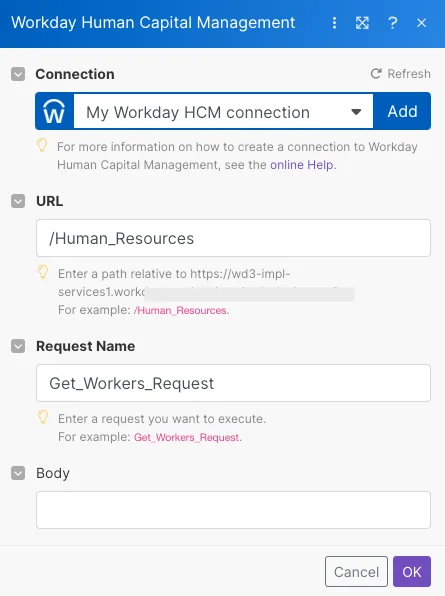
URL
Enter a path relative to /ccx/service/{tenant}. For example: /Human_Resources.
Request Name
Enter a request you want to execute. For example, Get_Workers_Request.
Body
Enter the body content for your API call.
Example of use – Get Resource
The following API call returns all the resources from your account.
URL:/Human_Resources
Request Name:GET_Workers_Request
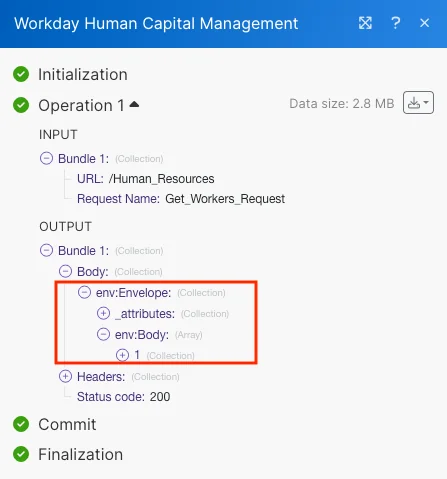
The search matches can be found in the module’s Output under Bundle > Body > env. In our example, 1 resource is returned:
Make a REST API Call
Performs an arbitrary authorized REST API call. Can only be used with an OAuth2 connection.
For a list of available web services, their URLs, and request and response types, refer to the Workday Web Services Directory.
Connection
Establish a connection to your Workday account.
Web Service URL
Enter the web service URL for the request. Enter a path relative to https://{hostname}.workday.com/ccx/api.
For example, /<serviceName>/v1/<tenant>/workers.
Method
Select the HTTP method you want to use:
GET
to retrieve information for an entry.
POST
to create a new entry.
PUT
to update/replace an existing entry.
PATCH
to make a partial entry update.
DELETE
to delete an entry.
Headers
Enter the desired request headers. You don’t have to add authorization headers; we already did that for you.
Query String
Enter the request query string.
Body
Enter the body content for your API call.
Run a WQL Query
Runs a WQL Query. Can only be used with an OAuth2 connection.
For information regarding WQL, refer to the Workday Query Language (WQL) Community guide. If you do not have access to Workday Community, you can request a community account.
Connection
Establish an OAuth2 connection to your Workday account.
WQL Query
Enter the query using WQL. Do not include the limit, we will paginate for you.
Limit
Enter the maximum number of bundles Boost.space Integrator will return during one execution cycle. The default value is 10.
Offset
Enter an offset for advanced pagination. If more then 3,200 results are expected, use together with the Repeater module.
Get a RaaS Report
Retrieves a RaaS report by the report URL. Can only be used with an OAuth2 connection.
Connection
Establish an OAuth2 connection to your Workday account
RaaS Report URL
Enter the URL of the RaaS report to retrieve. The Raas Report URL must be in JSON format. For example, https://wd3-services1.myworkday.com/ccx/service/customreport2/{tenant}/{user}/{custom report name}?format=json.
Output Format
Select the format in which you want to get the RaaS report.
Unescape HTML Entities
Select whether you want to unescape HTML entities in the RaaS report.
Legacy article, imported from the original Boost.space knowledge base (/knowledge-base/applications/hr-management/workday-hcm/).

