Expensify
The Expensify modules allow you to monitor, create, update, export, list, and retrieve the reports, policies, expense rules, credit cards, and employees in your Expensify account.
Getting Started with Expensify
Prerequisites
- An Expensify account – create an Expensify account at expensify.com
The module dialog fields that are displayed in bold (in the Boost.space Integrator scenario, not in this documentation article) are mandatory!
Connecting Expensify to Boost.space Integrator
To connect your Expensify account to Boost.space Integrator you need to obtain the Identifier, Key, and Website ID from your Expensify account and insert it in the Create a connection dialog in the Boost.space Integrator module.
1. Go to the website, expensify.com/tools/integrations/ and log in with your account credentials.
2. Copy the _partnerUserID_and _partnerUserSecret_to a safe place.
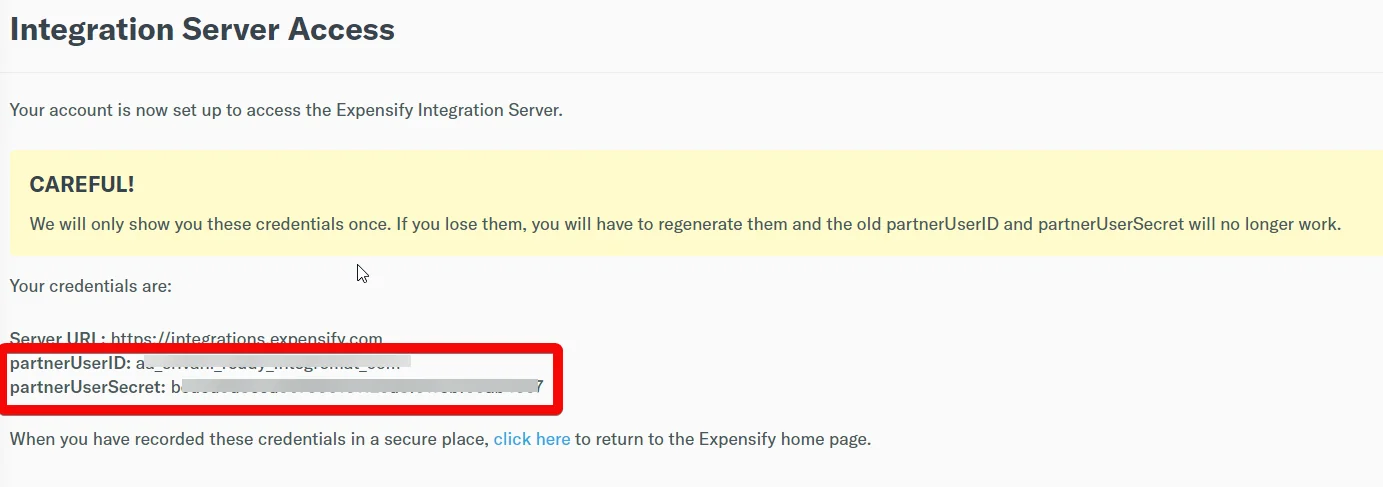
3. Go to the Boost.space Integrator and open the Expensify module’s Create a connection dialog.

4. In the Connection name field, enter a name for the connection.
5. In the Partner User ID and Partner User Secret fields, enter the details copied in step 2 respectively.
6. Click Continue.
The connection has been established.
Expenses
Creates a Single Expense
Creates a single expense item.
Connection
Establish a connection to your Expensify account.
Enter (map) the email address whose expense you want to create.
Transactions
Add the transactions to the expense:
Merchant
Enter (map) the name of the merchant.
Created At
Enter (map) the date on which you are creating the expense.
Amount
Enter (map) the amount of the expense.
Currency
Select or map the currency applicable to the expense.
Is Billable
Select whether this expense is billable to the client.
Is Reimbursable
Select whether this expense is reimbursable.
External ID
Enter (map) the External ID of the expense in an external system.
Category
Select or map the category to which the expense belongs to. For example, equipment.
Tag
Enter (map) the tags for the expense.
Comment
Enter (map) the additional information about the expense.
Report ID
Enter (map) the Report ID to which you want to attach the expense to.
Policy ID
Enter (map) the Policy ID of the tax to which the expense to.
Tax
Add the tax applicable for the expense:
Rate ID – Enter (map) the Rate ID for the expense.
Amount – Enter (map) the amount of tax applicable to the expense.
Reports
Create an Expense Report
Creates an expense report.
Connection
Establish a connection to your Expensify account.
Enter (map) the email address whose expense report you want to create.
Title
Enter (map) name for the expense report.
Custom Fields
Add the custom fields and their values. For example, company name.
Expenses
Add the expenses to the report:
Merchant
Enter (map) the merchant name to which the expense belongs to.
Currency
Select or map the currency applicable to the expense.
Date
Enter (map) the date on which the expense was made.
Amount
Enter (map) the amount of the expense.
Policy ID
Select or map the Policy ID under which you want to create the expense report..
Update a Report Status
Updates the selected report status.
Connection
Establish a connection to your Expensify account.
Status
Select or map the status you want to update for the report. Note: Only the reports with status approved can be updated to reimbursed. All other reports will be ignored.
Report ID List
Enter (map) the Report ID Lists separated by a comma that you want to update.
Start Date
Enter (map) the date to list the reports that were submitted or created on or after the specified date. This field is required if no Report ID List is mentioned.
End Date
Enter (map) the date to list the reports that were submitted or created on or before the specified date.
Export a Report
Export expense or report data and downloads it.
Connection
Establish a connection to your Expensify account.
File Extension
Select or map the file extension type in the format the report should be generated for export. For export, CSV.
Report ID List
Enter (map) the Report ID Lists separated by a comma that you want to export.
Start Date
Enter (map) the date to list the reports for exporting that were submitted or created on or after the specified date. This field is required if no Report ID List is mentioned.
Policy ID List
Add the Policy IDs whose reports data you want to export.
End Date
Enter (map) the date to list the reports for exporting that were submitted or created on or before the specified date. This field is required if no Report ID List is mentioned.
Approved After
Enter (map) the date to filter all the reports for exporting that were approved on or after the specified date. This field should be used only for approved reports.
Marked as Exported
Enter (map) whether you want to filter only the reports that were already exported.
Report State
Select or map the status of the reports you want to export.
Limit
Set the maximum number of reports Boost.space Integrator should return during one execution cycle.
Employee Email
Enter (map) the employee’s email address from whose account you want to export the reports.
File Basename
Enter (map) the name to give to the generated file(s). A random part of the name will be added to make each filename globally unique.
Spreadsheet Filename
Enter (map) the spreadsheet filename (workbook template) to which report data will be written.
If this is provided, then the only file made available to export will be an xlsx file.
Perform Action to Finish
Select the checkbox to perform the export action from start to finish. If you have selected this field, then actions specified On Finish will not be executed.
On Finish
Add the actions you want to perform when export is completed. For example, mail.
Policies
List Policies
Lists all policies.
Connection
Establish a connection to your Expensify account.
User’s Email
Enter (map) the user’s email address whose policies you want to retrieve.
Admin Only
Select the checkbox if you want to retrieve only the reports for which the user is an admin.
Limit
Set the maximum number of reports Boost.space Integrator should return during one execution cycle.
Get a Policy
Returns information about the selected policy.
Connection
Establish a connection to your Expensify account.
Policy ID
Select or map the Policy ID whose details you want to retrieve.
Fields
Select or map the fields whose details you want to retrieve about the policy.
User Email
Enter (map) the user’s email address whose policy details you want to retrieve.
You must have been granted third-party access by that user/company domain beforehand.
Create a Policy
Creates a policy.
Connection
Establish a connection to your Expensify account.
Policy Name
Enter (map) for the policy.
Plan
Select or map the plan for the policy. For example, Team.
Update a Policy
Updates the selected policy.
Connection
Establish a connection to your Expensify account.
Policy ID
Select or map the Policy ID whose details you want to update.
Action
Enter (map) the action for updating the category of the policy. For example, replace.
Category Data
Add the category data:
Name
Enter (map) the name of the category.
Is Enabled
Select whether you want to enable the category.
GL Code
Enter the applicable general ledger code for the category.
Payroll Code
Enter (map) the payroll code applicable to the category.
Are Comments Required
Select whether the comments are required for the expenses in this category.
Comment Hint
Enter (map) the tips for entering the comments in this category.
Maximum Expense Amount
Enter (map) the maximum amount allowed for the expenses in this category.
Action
Select or map the report fields for the policy you want to update.
Report Fields Data
Name – Enter the report field name. For example, time.
Type – Select or map the applicable data for the field. For example, text or date.
Tags Data
Add the tags for the policy:
Name – Enter (map) the tag’s level name.
Is Required – Select whether users must specify a tag for this level when coding expenses to the policy.
Tags – Add the tag names.
Expense Rules
Create Expense Rules
Creates expenses rules for a given employee on a given policy.
Connection
Establish a connection to your Expensify account.
Enter (map) the email address for whom you want to create the expense rules.
Policy ID
Select or map the Policy ID applicable to the expense rule.
Tag
Enter (map) the tags for the expense rule.
Default Billable
Enter (map) default billing details for the expense rule.
Update Expense Rules
Updates a preexisting expense rule for a given employee on a given policy.
Connection
Establish a connection to your Expensify account.
Employee Email
Enter (map) the employee email address for whom you want to update the expense rules.
Policy ID
Select or map the Policy ID whose expense rules you want to update.
Rule ID
Enter (map) the Rule ID you want to update.
Tag
Enter (map) the tags for the expense rule.
Default Billable
Enter (map) the default billing details for the expense rule.
Credit Cards
List Domain Credit Cards
Lists all domain credit cards.
Connection
Establish a connection to your Expensify account.
Domain
Enter (map) the domain to list the credit cards that match the specified domain.
Limit
Set the maximum number of domain credit cards Boost.space Integrator should return during one execution cycle.
Employees
Update an Employee
Updates the selected employee.
Connection
Establish a connection to your Expensify account.
Filename
Enter the filename that contains the data you want to update for the employee.
CSV File
Enter (map) the CSV file containing the employee data to update. The first line of the file lists the columns that will exist. The order of the columns does not matter.
Policy ID
Select or map the Policy ID applicable for the employee.
For more information, see Expensify API Documentation.
Legacy article, imported from the original Boost.space knowledge base (/knowledge-base/applications/commerce/expensify/).

