Pushover
The Pushover modules allow you to send messages and interact with the Pushover API.
Getting Stared with Pushover
Prerequisites
-
A Pushover account
-
A valid device
-
A registered application
In order to use Pushover with Boost.space Integrator, you must have a Pushover account. If you do not have one, you can create one at pushover.net.
The module dialog fields that are displayed in bold (in the Boost.space Integrator scenario, not in this documentation article) are mandatory!
Connecting Pushover to Boost.space Integrator
To connect your Pushover account to Boost.space Integrator, you need your User Key and an API Token.
-
Log in to your Pushover account.
-
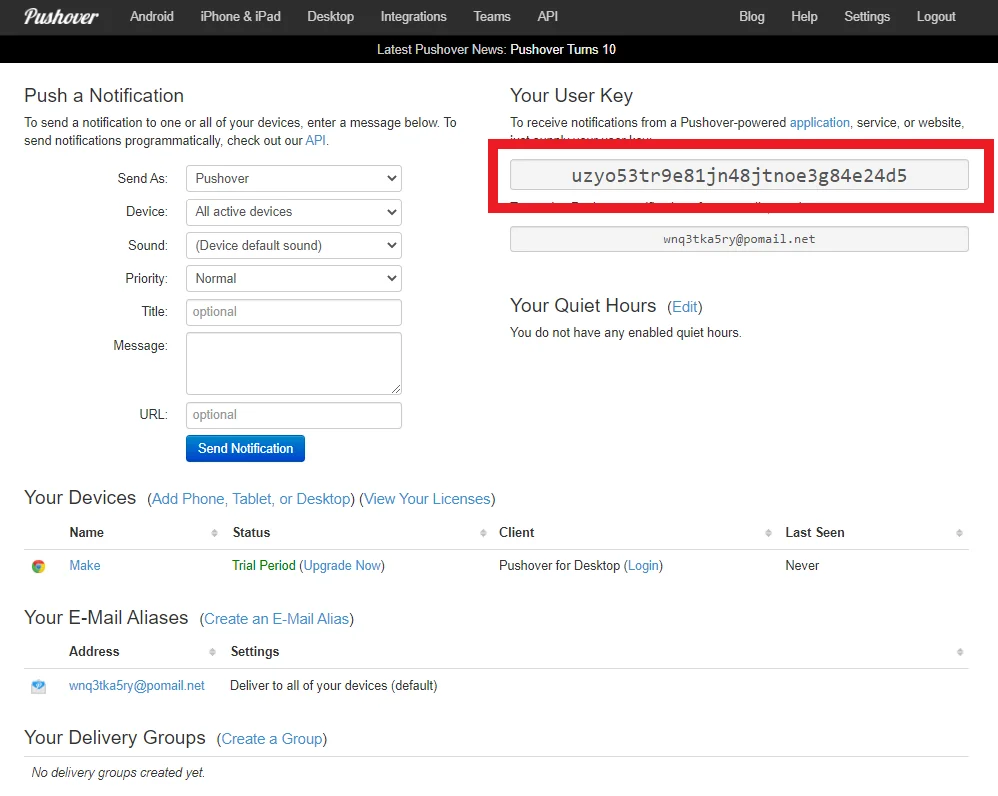
You can find your User Key on the homepage.
-
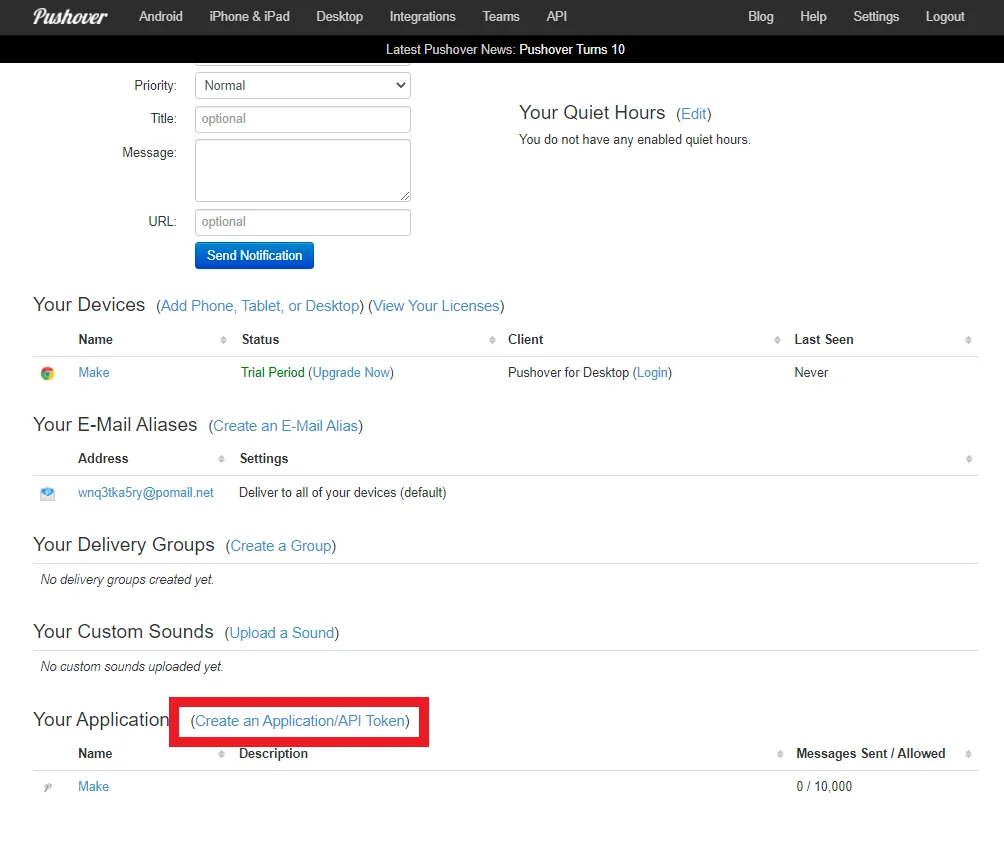
To obtain an API Token, you must register an application. Scroll to the bottom of the page and click Create an Application/API Token.
-
Configure the application how you’d like. Click Create Application.
-
Go to your newly created application to find the API Token.
-
In Boost.space Integrator, choose the Pushover module you want to use. Next to Connection, click Add.
-
Enter your User Key and API Token in the respective fields.
-
Click Save.
You have established the connection.
Actions
Send a Message
Sends the written message to your pushover devices.
Connection
Establish a connection to your Pushover account.
Message
Enter the body of your message. Messages are currently limited to 1024 characters.
Title
Enter the title of your message. The title is currently limited to 250 characters.
If you don’t specify a title, the application’s name will show by default.
HTML
Select whether to format your message with HTML tags. If Yes, the normal message content in your message parameter will display as HTML. May not be used together with monospace.
Monospace
Select whether to enable monospace messages. May not be used if html is used, and vice versa.
Device
Choose the name of one of your devices to send just to that device, instead of all devices.
URL
Enter a supplementary URL to show with your message.
URL Title
Enter a title for the URL specified as the url parameter, otherwise just the URL is shown.
Timestamp
Enter a timestamp to show to the message receiver. See the list of supported date and time parameters.
In some cases, such as when messages have been queued on a remote server before reaching the Pushover servers, or delivered to Pushover out of order, this default timestamping may cause a confusing order of messages when viewed on the user’s device. For these scenarios, your app may send messages to the API with the timestamp parameter set to the time of the original message.
Priority
Select the priority of your message and how the message is presented to the receiver.
-
No Notification / Alert
Considered the lowest priority and does not generate any notification.
-
Send as a Quiet Notification
Considered low priority and does not generate any sound or vibration, but still generates a popup/scrolling notification depending on the client operating system.
-
Default User’s Settings
Messages trigger sound, vibration, and display an alert according to the user’s device settings.
-
Bypass User’s Quiet Hours
High priority messages that bypass a user’s quiet hours. These messages will always play a sound and vibrate (if the user’s device is configured to) regardless of the delivery time.
-
Repeat Until the User has Acknowledged
Similar to high-priority notifications, but they repeat until the notification is acknowledged by the user.
Sound
Select the sound to play when receiving notifications, rather than the standard Pushover tone. You can sample the full list o available sounds here.
File
Choose whether to add any attachments to your message.
Make an API Call
Performs an arbitrary authorized API call.
Connection
Establish a connection to your Pushover account.
URL
Enter a path relative to https://api.pushover.net. For example: /1/users/validate.json
For the list of available endpoints, refer to the Pushover API Documentation.
Method
Select the HTTP method you want to use:
GET to retrieve information for an entry.
POST to create a new entry.
PUT to update/replace an existing entry.
PATCH to make a partial entry update.
DELETE to delete an entry.
Headers
Enter the desired request headers. You don’t have to add authorization headers; we already did that for you.
Query String
Enter the request query string.
Body
Enter the body content for your API call.
Example of Use – List Users
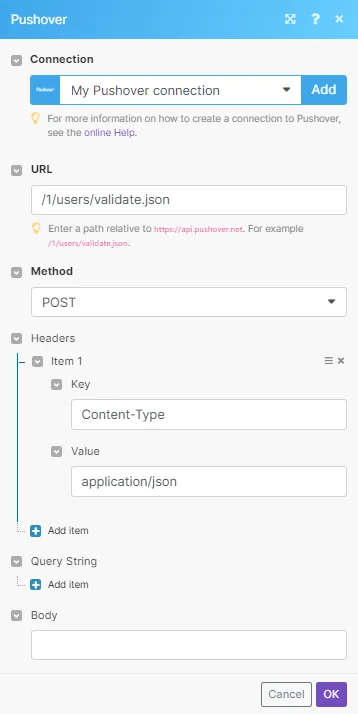
The following API call returns all the users from your Pushover account:
URL: /1/users/validate.json
Method: POST
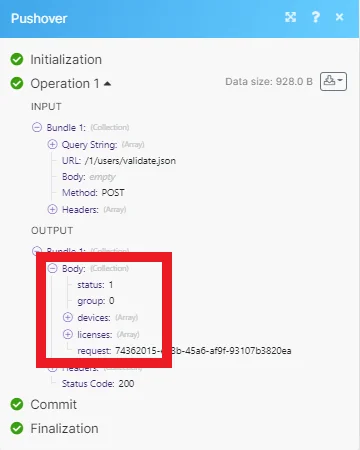
Matches of the search can be found in the module’s Output under Bundle > Body. Our example returned 1 user:
Legacy article, imported from the original Boost.space knowledge base (/knowledge-base/applications/communication/pushover/).

