CloudConvert
Getting Started with CloudConvert
The CloudConvert modules allow you to monitor and manage jobs, tasks, and import&export files in your CloudConvert account.
Prerequisites
- A CloudConvert account
In order to use CloudConvert with Boost.space Integrator, it is necessary to have a CloudConvert account. If you do not have one, you can create a CloudConvert account at cloudconvert.com/register.
The module dialog fields that are displayed in bold (in the Boost.space Integrator scenario, not in this documentation article) are mandatory!
Connecting CloudConvert to Boost.space Integrator
To connect your CloudConvert account to Boost.space Integrator you need to obtain the API Key from your CloudConvert account and insert it in the Create a connection dialog in the Boost.space Integrator module.

1. Log in to your CloudConvert account and open your Dashboard.
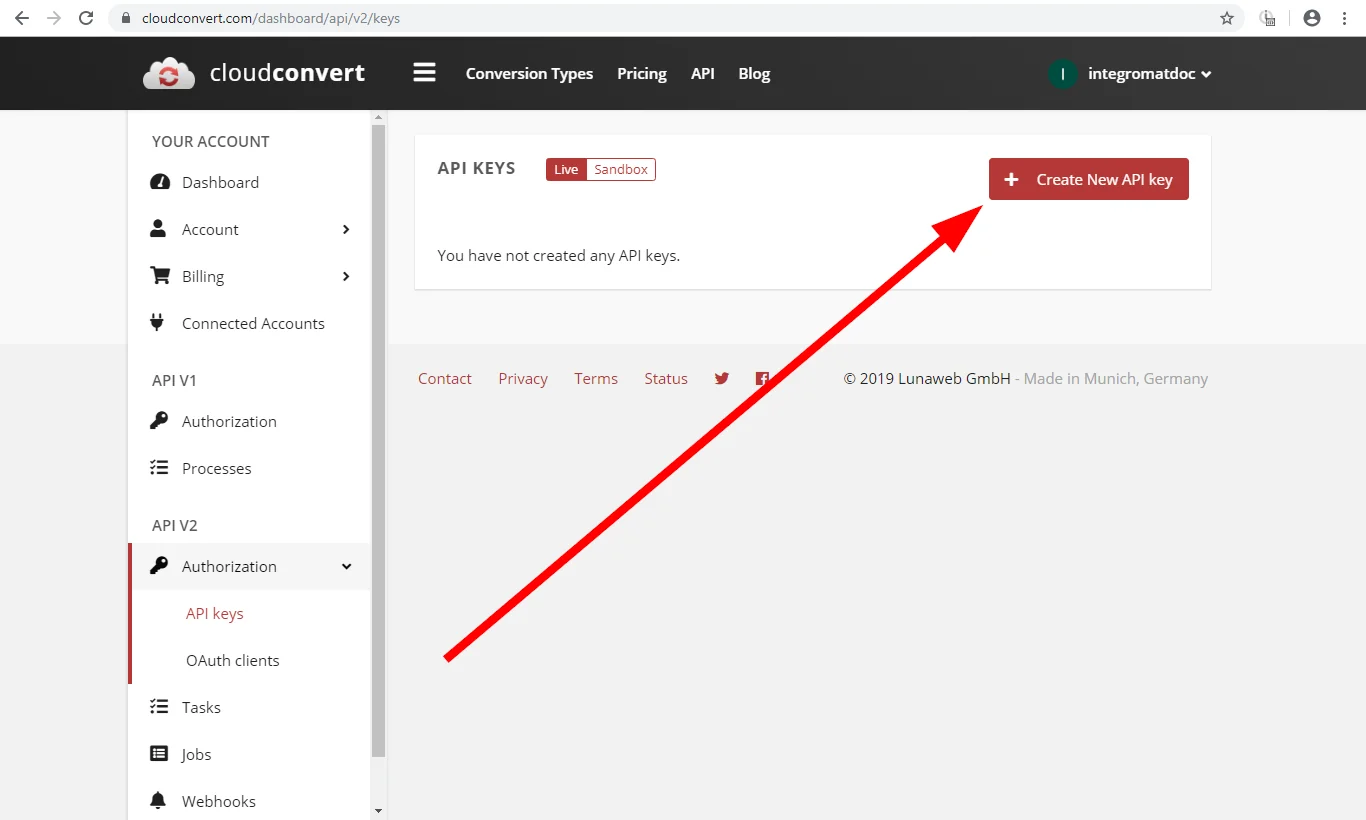
2. Open the Authorization > API Keys section.
3. Click on the Create New API key button.
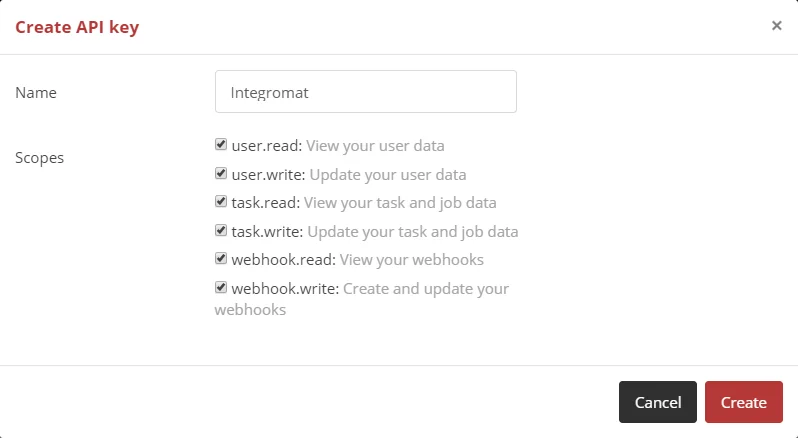
4. Enter the name for the API key, enable the scopes you want to use, and click the Create button.
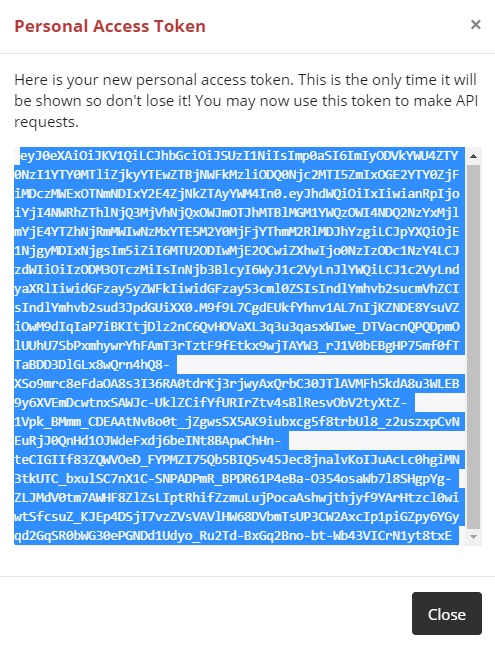
5. Copy the provided token and store it in a safe place.
6. Go to Boost.space Integrator and open the CloudConvert module’s Create a connection dialog.
7. Enter the token you have created in step 5 and click the Continue button to establish the connection.
Common Tasks
Convert a File
Converts a specified file to the selected file format.
Connection
Establish a connection to your CloudConvert account.
Input File
Select whether you want to upload a file using Boost.space Integrator or provide the URL the file will be uploaded from.
Upload a File
Enter the source file by adding the file name and file data manually or by mapping the file from a previous module. E.g. Dropbox > Get a File.
Data
Enter or map the file data.
File Name
Enter the file name including the file extension. E.g. test.txt
Import a File from URL
URL
Enter the URL of the file you want to convert.
Headers
Define request headers (optional). Useful, for example, when the specified URL requires the authorization.
Format
Select whether you want to specify the input format of the file you want to convert. If not specified, the extension of the input file is used as the input format.
Input Format
Select the current format of the file.
Output Format
Select the target file format you want to convert the file to.
File Name
Choose a filename (including extension) for the target output file.
Conversion and engine specific options
Specify conversion and engine specific options. To view available options, please visit their API documentation and select the input_format and output_format.
Download a file
Enable this option to include also file data in the module’s output.
Capture a Website
Captures a specified website and saves it in PDF, JPG, or PNG format.
Connection
Establish a connection to your CloudConvert account.
URL
Enter the URL of the website you want to capture.
Output Format
Select whether you want to save the captured website in PNG, JPG, or PDF format.
File Name
Enter a filename (including extension) for the target output file.
Headers
Define request headers (optional). Useful, for example, when the specified URL requires the authorization.
Conversion and engine specific options
Specify conversion and engine specific options. To view available options, please visit their API documentation and select the input_format and output_format.
Download a file
Enable this option to include also file data in the module’s output.
Optimize a File
Optimizes and compresses a file. Currently supported formats are PDF, PNG and JPG.
Connection
Establish a connection to your CloudConvert account.
Input File
Select whether you want to upload a file using Boost.space Integrator or provide the URL the file will be uploaded from.
Upload a File
Enter the source file by adding the file name and file data manually or by mapping the file from a previous module. E.g. Dropbox > Get a File.
Data
Enter or map the file data.
File Name
Enter the file name including the file extension. E.g. test.txt
Import a file from URL
URL
Enter the URL of the file you want to optimize.
Headers
Define request headers (optional). Useful, for example, when the specified URL requires the authorization.
Optimization for
Select the optimization profile for specific target needs.
web Optimization for the web (Default)
-
Remove redundant and unnecessary data for the web
-
Down-sample, clip, and intelligently compress images
-
Merge and subset fonts
-
Convert colors to RGB
print Optimization for print
-
Remove redundant and unnecessary data for printing
-
Down-sample, clip, and intelligently compress images
-
Merge and subset fonts
-
Convert colors to CMYK
archive Optimization for archiving purposes
-
Remove redundant and unnecessary data for archiving
-
Intelligently compress images
-
Merge and subset fonts
scanned images Optimization for scanned images
-
Profile optimized for PDFs that mainly consist of raster images
-
Compress the images without significantly reducing the visual quality
maximal size reduction Optimization for maximal size reduction
-
Use the maximal possible compression
-
Might reduce the visual quality
Input format
Select the format of the input file you want to optimize.
File name
Enter the file name (including extension) for the target output file.
Conversion and engine specific options
Specify conversion and engine specific options. To view available options, please visit their API documentation and select the output_format.
Download a file
Enable this option to include also file data in the module’s output.
Create an Archive
Enables you to add one or multiple files to the ZIP, RAR, 7Z, TAR, TAR.GZ or TAR.BZ2 archive.
Connection
Establish a connection to your CloudConvert account.
Input Files
Specify files you want to add to the archive.
Upload a File
Enter the source file by adding the file name and file data manually or by mapping the file from a previous module. E.g. Dropbox > Get a File.
Data
Enter or map the file data.
File Name
Enter the file name including the file extension. E.g. test.txt
Import a file from URL
URL
Enter the URL of the file you want to archive.
Headers
Define request headers (optional). Useful, for example, when the specified URL requires the authorization.
Output Format
Select the target format of the archived file.
File name
Enter the file name (including extension) for the target output file.
Conversion and engine specific options
Specify conversion and engine specific options. To view available options, please visit their API documentation and select the output_format.
Download a File
Enable this option to include also file data in the module’s output.
Merge Files
Merges at least two files into one PDF. If input files are not PDFs yet, they are automatically converted to PDF.
Connection
Establish a connection to your CloudConvert account.
Input Files
Specify files you want to merge.
Upload a File
Enter the source file by adding the file name and file data manually or by mapping the file from a previous module. E.g. Dropbox > Get a File.
Data
Enter or map the file data.
File Name
Enter the file name including the file extension. E.g. test.txt
Import a file from URL
URL
Enter the URL of the file you want to merge.
Headers
Define request headers (optional). Useful, for example, when the specified URL requires the authorization.
Output Format
Select the target format.
File name
Enter the file name (including extension) for the target output file.
Conversion and engine specific options
Specify conversion and engine specific options. To view available options, please visit their API documentation and select the output_format.
Download a File
Enable this option to include also file data in the module’s output.
Jobs
New Job Event
Triggers when the job or task is created, has finished, or has _failed_in your account.
The job created by the Create a Job (advanced) module consists of several tasks.
The New Job Event trigger is also triggered when an individual task is created, has finished, or has failed.
Webhhook name
Enter the webhook name. E.g. Document Conversion Finished
Connection
Establish a connection to your CloudConvert account.
Event
Select whether the module is triggered when the job/task is created, has finished, or has failed.
Create a Job (advanced)
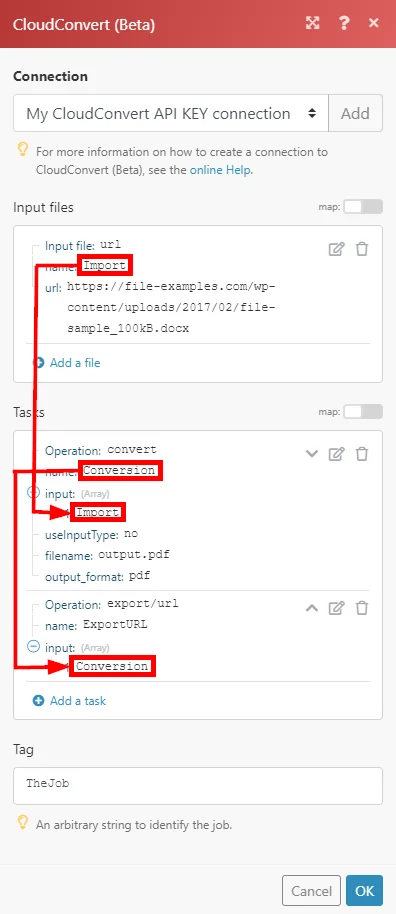
This module performs a job (a job can be one or multiple tasks that are identified in the Name field and linked between each other using the Input field).
For further processing of the finished job created with_the Create a Job_ module, please use the New Job Event (job.finished) module in another scenario.
Connection
Establish a connection to your CloudConvert account.
Input Files
Add the files you want to use within the job.
Upload a File
Enter the source file by adding the file name and file data manually or by mapping the file from a previous module. E.g. Dropbox > Get a File.
Data
Enter or map the file data.
File Name
Enter the file name including the file extension. E.g. test.txt
Import a file from URL
URL
Enter the URL of the file you want to process.
Headers
Define request headers (optional). Useful, for example, when the specified URL requires the authorization.
Tasks
Add tasks that will be performed within the job.
Please find the descriptions of the operations’ fields in the corresponding section.
-
Execute a Command (CloudConvert API Documentation)
-
Export a File to Temporary URL (specify the task name and input task name(e.g. Conversion)).
Tag
An arbitrary string to identify the job. Does not have any effect and can be used to associate the job with an ID.
If working with the Array Aggregator (e.g. you have many files in different formats to convert), use the I don’t know the input format option in the Add a task dialog. Otherwise the error is returned.
Linking tasks within the job (name > input, name > input,…):
List Jobs
Retrieves all jobs that have been run in your account.
Connection
Establish a connection to your CloudConvert account.
Status
Select the job status to filter returned jobs by.
Limit
Set the number of returned jobs Boost.space Integrator will return during one execution cycle.
Get a Job
Retrieves job details.
Connection
Establish a connection to your CloudConvert account.
Job ID
Enter (map) the ID of the job you want to retrieve details about.
Delete a Job
Deletes a job, including all tasks and data.
Jobs are deleted automatically 24 hours after they have ended.
Connection
Establish a connection to your CloudConvert account.
Job ID
Enter (map) the ID of the job you want to delete.
Tasks
Get a Task
Retrieves task details.
Connection
Establish a connection to your CloudConvert account.
Task ID
Enter (map) the ID of the task you want to retrieve details about.
Download a File
Retrieves file name and file data from the specified task.
Connection
Establish a connection to your CloudConvert account.
Task ID
Enter (map) the ID of the task you want to download the file from.
List Tasks
Retrieves all tasks in your account based on filter settings.
Connection
Establish a connection to your CloudConvert account.
Status
Select the task status to filter returned tasks by.
Job ID
Enter (map) the Job ID to return only tasks within the specified job.
Operation
Enter the operation type to return only tasks with the specified operation. Use the List Possible Operations module to retrieve operations.
Limit
Set the number of returned tasks Boost.space Integrator will return during one execution cycle.
Retry a Task
Creates a new task, based on the settings (payload) of another task.
Connection
Establish a connection to your CloudConvert account.
Task ID
Enter (map) the ID of the task you want to create a new task from.
Cancel Task
Cancels a task that has a status of waiting or processing.
Connection
Establish a connection to your CloudConvert account.
Task ID
Enter (map) the ID of the task you want to cancel.
Delete a Task
Delete a task, including all data.
Tasks are deleted automatically 24 hours after they have ended.
Connection
Establish a connection to your CloudConvert account.
Task ID
Enter (map) the ID of the task you want to delete.
Other
Get My Info
Retrieves authenticated account details (including credits – remaining conversion minutes).
Make an API Call
Allows you to perform a custom API call.
Connection
Establish a connection to your CloudConvert account.
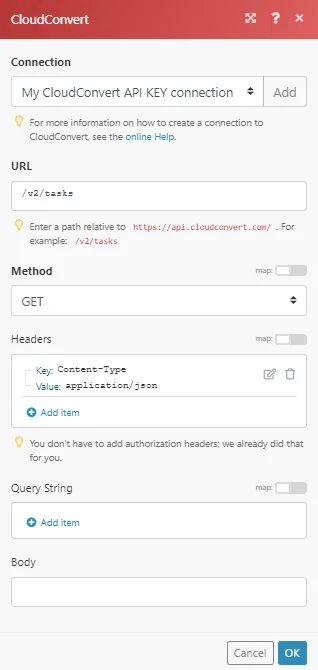
URL
Enter a path relative to https://api.cloudconvert.com/. For example: /v2/tasks
For the list of available endpoints, refer to the CloudConvert API v2 Documentation.
Method
Select the HTTP method you want to use:
-
GET – to retrieve information for an entry.
-
POST – to create a new entry.
-
PUT – to update/replace an existing entry.
-
PATCH – to make a partial entry update.
-
DELETE – to delete an entry.
Headers
Enter the desired request headers. You don’t have to add authorization headers; we already did that for you.
Query String
Enter the request query string.
Body
Enter the body content for your API call.
Example of Use – List Tasks
The following API call returns all tasks from your CloudFront account:
URL:
/v2/tasks
Method:
GET
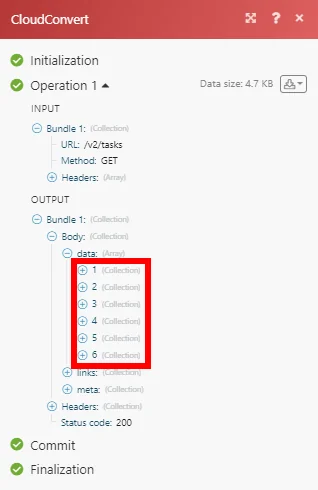
Matches of the search can be found in the module’s Output under Bundle > Body > data.
In our example, 6 tasks were returned:
Troubleshooting
Error
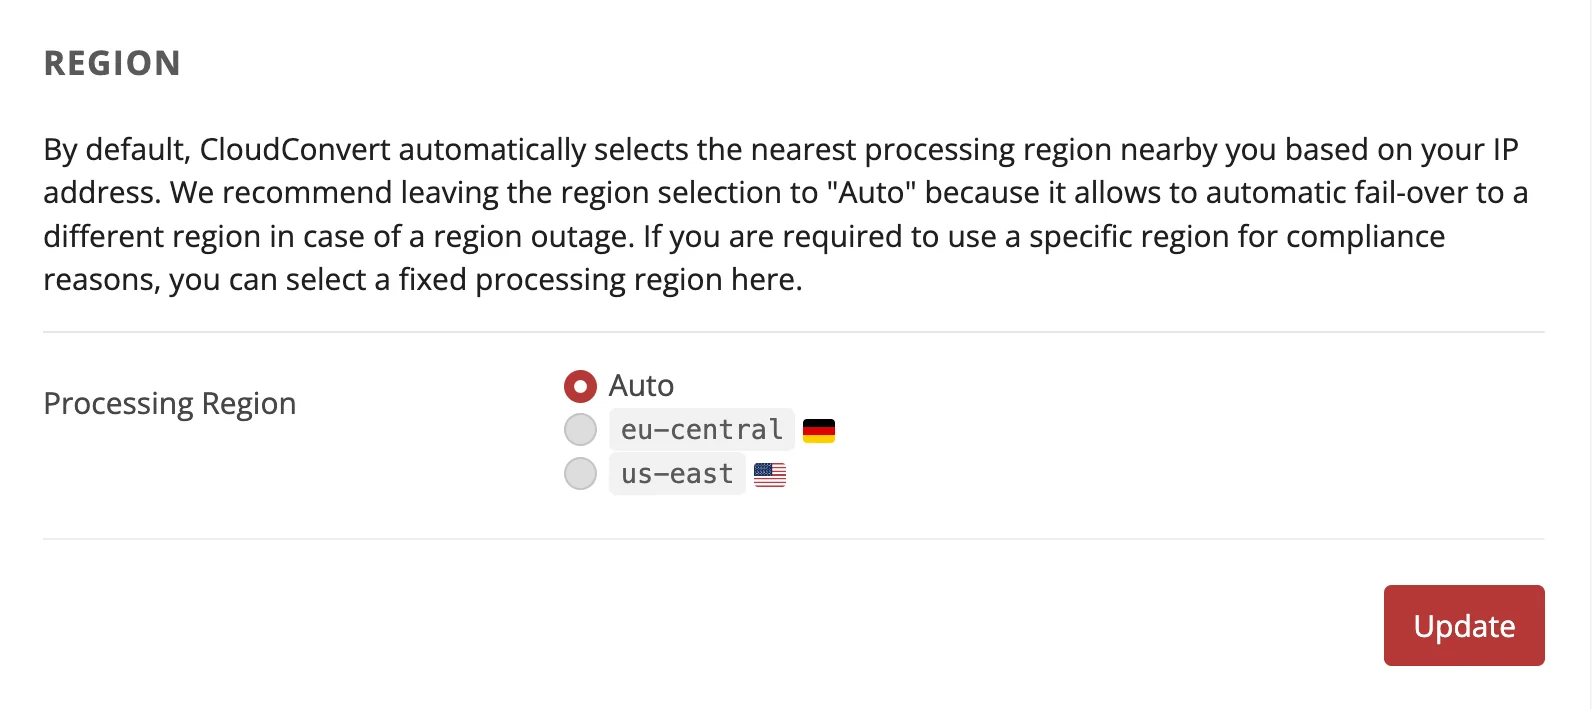
The authorization type is not supported or configured incorrectly, which can result in an error such as 400, often caused by issues with the processing region. To change your region in CloudConvert:
-
Navigate to the CloudConvert dashboard.
-
In the left sidebar, click Region.
-
In the Processing Region section, select one of the specific servers instead of Auto.
-
Click Update.
For more information, refer to CloudConvert Region Endpoints.
The following errors may occur when using the Convert a File module:
Error
The output file size exceeds the limit allowed for your scenario.
Please refer to file size limits in Working with files.
Error
You have exceeded the maximum conversion time.
The free CloudConvert plan offers 25 conversion minutes daily. If your usage exceeds the limit of the free plan, you may switch to a (prepaid) package or subscription.
Error
Failed to read frame size: Could not seek to 1508. �/output/JLIADSA00137P0.mp3: Invalid argument.
This error is thrown e.g. when converting files from MP3 to WAV. Make sure that you have selected the correct region because it will find references to files but not only just the correct file.
RuntimeError
Maximum number of repeats exceeded.
Locate the corresponding CloudConvert job in your CloudConvert dashboard‘s list of jobs and check the job’s duration:
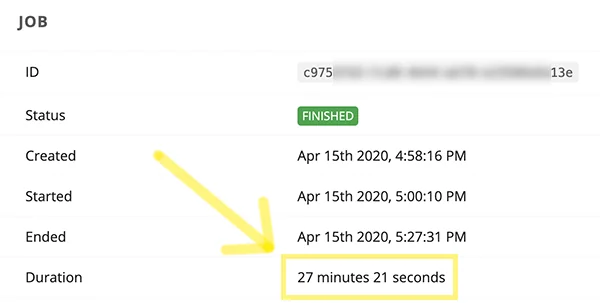
The CloudConvert > Convert a Filemodule’s timeout is set to 3 minutes. If the job’s duration exceeds 3 minutes (possibly due to a temporary overload of the CloudConvert service), the module throws the above mentioned error.
In this case consider one of these options:
-
Enable the Allow storing of Incomplete Executions option in the scenario settings to store the incomplete executions for later manual resolution. Optionally you may attach an error handling route to the CloudConvert module with the Break directive to resolve the incomplete executions automatically.Introduction to Error Handling
-
Disable the Download a file option in the CloudConvert > Convert a file module. In this case the module will not wait for the conversion result. To obtain the conversion result, create a new scenario and use the CloudConvert > New Job Event trigger.
Example: Converting a video from MOV to MP4 format
-
Click on the “Select File” button and choose your sample MOV file.
-
Click on the dropdown, next to “Convert to” and choose MP4.
-
Click on the wrench icon.
-
Configure the MP4 compression settings as you see fit.
-
Click on the Convert button.
-
Once the conversion has been finished, click on the Download button.
-
Review the converted video.
-
Repeat steps 1 to 8 until you have found the optimal conversion settings in step 5.
-
Choose ‘mov’ for the input_format field.
-
Choose ‘mp4’ for the output_format field.
-
A list of all possible parameters like
video_codec,crf, etc. will appear. -
In Boost.space Integrator, insert the CloudConvert > Convert a File module in your scenario.
-
Open the module’s settings.
-
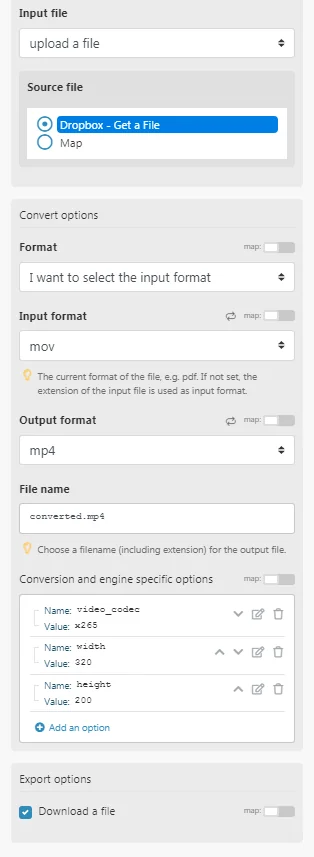
Configure the module as shown below:
-
Make sure to include all the settings in the Conversion and engine specific options field: for each setting from step 5, locate the corresponding parameter from step 13 and its corresponding value.
Legacy article, imported from the original Boost.space knowledge base (/knowledge-base/applications/file-and-document-management/cloudconvert/).

