Google Docs
With Google Docs modules in Boost.space Integrator you can monitor, create, edit, retrieve, download, and delete documents in your Google Docs account.
To use the Google Docs modules, you must have a Google account. You can create an account at accounts.google.com.
Refer to the Google Docs API documentation for a list of available endpoints.
Boost.space Integrator‘s use and transfer of information received from Google APIs to any other app will adhere to Google API Services User Data Policy.
Connect Google Docs to Boost.space Integrator
To establish the connection in Boost.space Integrator:
- Log in to your Boost.space Integrator account, add a Google Docs module to your scenario, and click Create a connection.
- Optional: In the Connection name field, enter a name for the connection.
- Optional: Switch on the Show advanced settings toggle and enter your Google Cloud Platform project client credentials. For more information, see the Create and configure a Google Cloud Platform project for Google Docs section below.
- Click Sign in with Google.
- If prompted, authenticate your account and confirm access.
You have successfully established the connection. You can now edit your scenario and add more Google Docs modules. If your connection requires reauthorization at any point, follow the connection renewal steps here.
Create and configure a Google Cloud Platform project for Google Docs
To connect to Boost.space Integrator using your own client credentials, you can create and configure a project in the Google Cloud Platform.
Create a Google Cloud Platform project for Google Docs
To create a Google Cloud Platform project:
- Log in to the Google Cloud Platform using your Google credentials.
- On the welcome page, click Create or select a project > New project. If you already have a project, proceed to the step 5.
- Enter a Project name and select the Location for your project.
- Click Create.
- In the top menu, check if your new project is selected in the Select a project dropdown. If not, select the project you just created.
To create a new project or work in the existing one, you need to have the serviceusage.services.enable permission. If you don’t have this permission, ask the Google Cloud Platform Project Owner or Project IAM Admin to grant it to you.
Enable APIs for Google Docs
To enable the required APIs:
- Open the left navigation menu and go to APIs & Services > Library.
- Search for the following APIs: Google Docs API and Google Drive API.
- Click the relevant API, then click Enable. If you see the Manage button instead of the Enable button, you can proceed to the next step: the API is already enabled.
Configure your OAuth consent screen for Google Docs
To configure your OAuth consent screen:
-
In the left sidebar, click Google Auth Platform.
If you don’t see Google Auth Platform in the left sidebar, click View all products at the top of it, then pin Google Auth Platform to the sidebar.
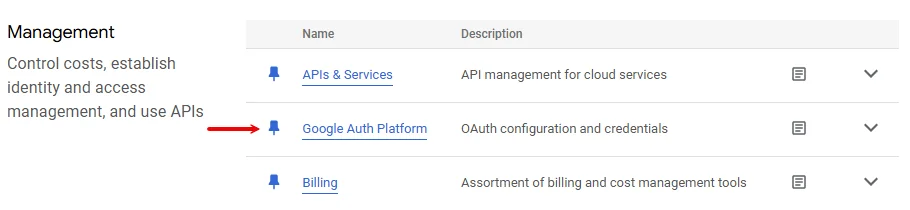2. Click Get Started. 3. In the Overview section, under App information, enter Make as the app name and provide your Gmail address. Click Next. 4. Under Audience, select External. Click Next.For more information regarding user types, refer to Google’s Exceptions to verification requirements documentation. 5. Under Contact Information, enter your Gmail address. Click Next. 6. Under Finish, agree to the Google User Data Policy. 7. Click Continue > Create. 8. Click Create OAuth Client.
9. In the Branding section, under Authorized domains, add
make.comandboost.space. Click Save. 10. Optional: In the Audience section, add your Gmail address on the Test users page, then click Save and continue if you want the project to remain in the Testing publishing status. Read the note below to learn more about the publishing status. 11. In the Data Access section, click Add or remove scopes, add the following scopes:* `https://www.googleapis.com/auth/userinfo.email` * `https://www.googleapis.com/auth/drive` * `https://www.googleapis.com/auth/documents` * `https://www.googleapis.com/auth/documents.readonly` You can add scopes using: * A table with filters: 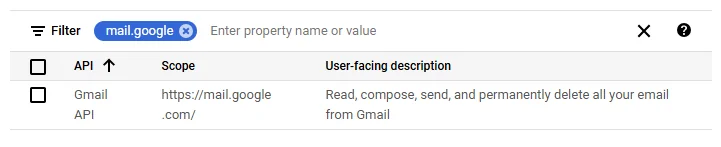 * A window to manually enter scopes: 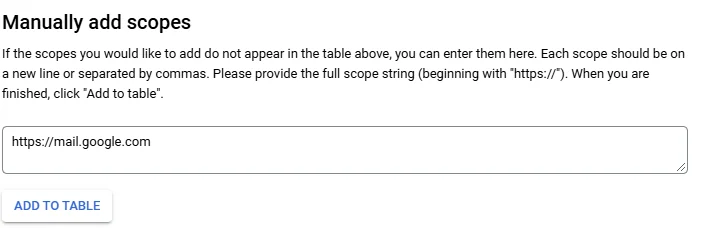 Click **Update**.12. Click Save.
Publishing Status
Testing: If you keep your project in the Testing status, you will be required to reauthorize your connection in Boost.space Integrator every week. To avoid weekly reauthorization, update the project status to In production.
In production: If you update your project to the In production status, you will not be required to reauthorize the connection weekly. To update your project’s status, go to the Google Auth Platform, the Audience section, and click Publish app. If you see the notice Needs verification, you can choose whether to go through the Google verification process for the app or to connect to your unverified app. Currently connecting to unverified apps works in Boost.space Integrator, but we cannot guarantee the Google will allow connections to unverified apps for an indefinite period.
For more information regarding the publishing status, refer to the Publishing status section of Google’s Setting up your OAuth consent screen help.
Create your Google Docs client credentials
To create your client credentials:
-
In Google Auth Platform, click Clients.
-
Click + Create Client.
-
In the Application type dropdown, select Web application.
-
Update the Name of your OAuth client. This will help you identify it in the platform.
-
In the Authorized redirect URIs section, click + Add URI and enter the following redirect URI:
https://integrator.boost.space/oauth/cb/google. -
Click Create.
-
Click the OAuth 2.0 Client you created, copy your Client ID and Client secret values, and store them in a safe place.
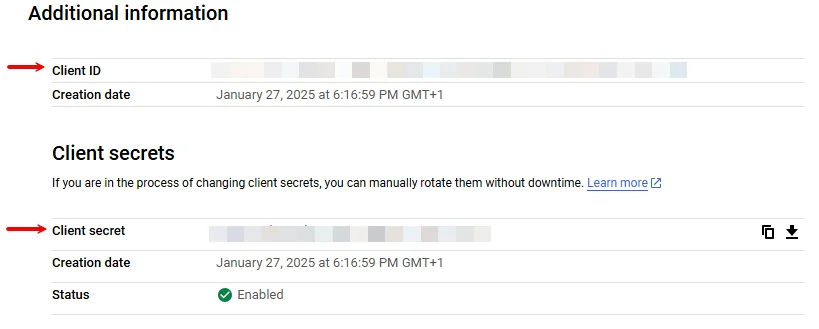
You will use these values in the Client ID and Client Secret fields in Boost.space Integrator.
NOTE: In some cases, for modules that use sensitive or restricted scopes, you may encounter issues with the privacy policy not being properly configured. This is affecting users who have an active workspace (admin console). You can change those permissions as instructed below.
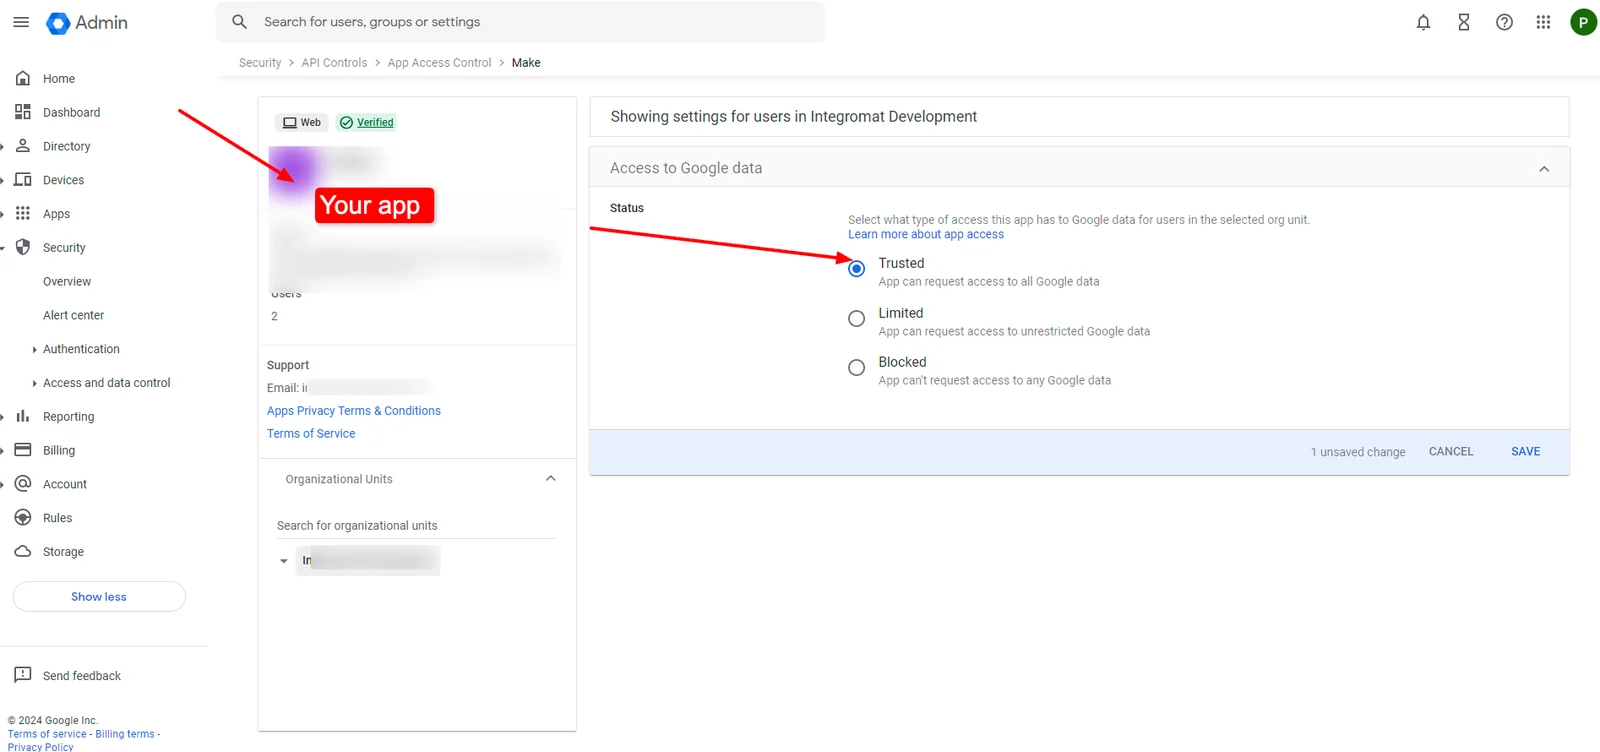
Build Google Docs Scenarios
After connecting the app, you can perform the following actions:
Document
Watch Documents
Triggers when a new document is created or modified in a specific folder.
Connection
Establish a connection to your Google Docs account.
Watch Documents
Select whether you want to watch created or modified documents.
Choose a Drive
Select the drive that contains the documents you want to watch.
The Google Shared Drive option is available only for Google Workspace users:
Use Domain Admin Access
Request the list of drives that require admin access.
Shared Drive
Select the drive.
Folder ID
Select the folder that contains the documents you want to watch.
Limit
Set the maximum number of documents Boost.space Integrator will return in one execution cycle.
List Documents
Retrieves a list of documents.
Connection
Establish a connection to your Google Docs account.
Choose a Drive
Select the drive that contains the documents you want to list.
The Google Shared Drive option is available only for Google Workspace users:
Use Domain Admin Access
Request the list of drives that require admin access.
Shared Drive
Select the drive.
Folder ID
Select the folder that contains the documents you want to list.
Limit
Set the maximum number of documents Boost.space Integrator will return in one execution cycle.
Get Content of a Document
Gets a content of a document.
Connection
Establish a connection to your Google Docs account.
Get Content of a Document
Select to map the ID of the document you want to get or select the document from the dropdown menu.
Choose a Drive
Select the drive that contains the documents whose content you want to get.
The Google Shared Drive option is available only for Google Workspace users:
Use Domain Admin Access
Request the list of drives that require admin access.
Shared Drive
Select the drive.
Document ID
Select or map the document you want to retrieve.
Include Tabs Content
Select if you want to include a content from documentation tabs.
Filter
Select the type of content you want to receive in the out
For further mapping of filter objects in next modules, use Inline Objects Array. The Inline Objects Array objects are sorted in the same order they appear in the document.
Create a Document
Creates a new Google document by adding the content in the HTML format.
Connection
Establish a connection to your Google Docs account.
Name
Enter the name of a document.
Content
Enter the content of a document. You can use HTML tags.
Choose a Drive
Select the drive where you want to put a created document into.
The Google Shared Drive option is available only for Google Workspace users:
Use Domain Admin Access
Request the list of drives that require admin access.
Shared Drive
Select the drive.
New Document’s Location
Select the folder where you want to save a document.
Insert a Header
Select whether you want to add a header to a document.
Insert a Footer
Select whether you want to add a footer to a document.
Create a Document from a Template
Creates a copy of an existing template document and replaces any tags, for example, {{!notfound:name}}. This module allows replacing images by new images with URLs.
Connection
Establish a connection to your Google Docs account.
Create a Document from a Template
Select to map the ID of the document you want to use as a template or select the document from the dropdown menu.
Choose a Drive
Select the drive where you want to put a created document into.
The Google Shared Drive option is available only for Google Workspace users:
Use Domain Admin Access
Request the list of drives that require admin access.
Shared Drive
Select the drive.
Document ID
Select or map the document you want to use as the template for the new document.
Values
Tags
Enter the tag associated with the documentation template. Do not use {{}}.
Replaced Value
Enter the value of the tag.
Images Replacement
You may add the alt text to an image.
Image Object ID
Enter the Image Object ID. To retrieve the ID, use the Get Content of a Document module. You can find the ID in Inline Object Array, in the module output.
Image URL
Enter the URL of the image that will replace the current image.
Title
Enter the name for a new document.
New Drive Location
Select the drive where you want to save the document.
New Document’s Location
Select the folder where you want to save a document.
Insert a Paragraph to a Document
Inserts or appends a new paragraph to an existing document.
Connection
Establish a connection to your Google Docs account.
Select a Document
Select to map the ID of the document for editing or select the document from the dropdown menu.
Choose a Drive
Select the drive that contains the documents you want to insert a paragraph into. In the Folder ID field, select the drive.
The Google Shared Drive option is available only for Google Workspace users:
Use Domain Admin Access
Request the list of drives that require admin access.
Shared Drive
Select the drive.
Document ID
Select or map the document you want to edit.
Insert a Paragraph
Select the way you want to insert a paragraph.
Select By appending to the body of the document to append the text to the current document body:
Appended Text
Enter the text you want to append. Boost.space Integrator copies the style of the new paragraph from the paragraph at the current insertion index, including lists and bullets.
Select By appending to the end of the segment to insert the text to the header or the footer:
Header ID
Enter the header ID that you want to inset the text to.
Insert Text
Enter the text you want to insert.
Footer ID
Enter the footer ID that you want to insert the text to.
Insert Text
Enter the text you want to insert.
Specify the location
If you selected By specification of location above, specify the location where you want to insert text.
By Index
Index
Enter the element index that you want to append the text to. To retrieve the ID, use the Get Content of a Document module. You can find the ID in the Body collection, in the module output.
Inserted Text
Enter the text you want to insert.
By Segment ID: Select the header and footer where you want to insert the text content to and enter the very text.
Insert an Image to a Document
Inserts a new image with a URL to a document.
Note: The maximum image size is 50 MB. The image resolution must not exceed 25 megapixels. Only PNG, JPEG, or GIF formats are supported.
Connection
Establish a connection to your Google Docs account.
Select a Document
Select to map the ID of the document for editing or select the document from the dropdown menu.
Choose a Drive
Select the drive that contains the documents you want to insert an image into. In the Folder ID field, select the drive.
The Google Shared Drive option is available only for Google Workspace users:
Use Domain Admin Access
Request the list of drives that require admin access.
Shared Drive
Select the drive.
Document ID
Select or map the document you want to edit.
Insert an Image
Select the way you want to insert an image.
Select By appending to the body of the document to append an image to the current document body:
Image URL
Enter the URL of the image you want to insert.
Select By appending to the end of the segment to insert an image to the header or the footer:
Header ID
Enter the header ID that you want to inset the text to.
Image URL
Enter the URL of the image you want to insert.
Height Magnitude in Points
Define the height of the inserted image. The new image will keep the aspect ratio.
Width Magnitude in Points
Define the width of the inserted image. The new image will keep the aspect ratio.
Footer ID
Enter the footer ID that you want to inset the text to.
Image URL
Enter the URL of the image you want to insert.
Height Magnitude in Points
Define the height of the inserted image. The new image will keep the aspect ratio.
Width Magnitude in Points
Define the width of the inserted image. The new image will keep the aspect ratio.
Specify the Location
If you selected By specification of location above, specify the location where you want to insert the text.
By Index
Index
Enter the element index that you want to append the text to. To retrieve the ID, use the Get Content of a Document module. You can find the ID in the Body collection, in the module output.
Image URL
Enter the URL of the image you want to insert.
By Segment ID: Select the header and footer where you want to insert the image to and enter the link to the image.
Replace an Image with a New Image
Replaces an existing image with a new image with a URL in the document. To fill the original image’s bounds, the new image may be scaled or cropped.
Connection
Establish a connection to your Google Docs account.
Replace an Image
Select to map the ID of the document for editing or select the document from the dropdown menu.
Choose a Drive
Select the drive that contains the documents with an image you want to replace. In the Folder ID field, select the drive.
The Google Shared Drive option is available only for Google Workspace users:
Use Domain Admin Access
Request the list of drives that require admin access.
Shared Drive
Select the drive.
Document ID
Select or map the document you want to edit.
Image URLs
Enter the URL of the new image that will replace the existing one. Boost.space Integrator displays image bodies as per images order in the document.
Images Replacement
Specify an image you want to replace alongside with a new image.
Image Object ID
Enter the Image Object ID. To retrieve the ID, use the Get Content of a Document module. You can find the ID in Inline Object Array, in the module output.
Image URL
Enter the URL of the image that will replace the current image.
Replace a Text in a Document
Replaces an old text by a new text in a document.
Connection
Establish a connection to your Google Docs account.
Choose a Drive
Select the drive that contains the documents with the text you want to replace. In the Folder ID field, select the drive.
The Google Shared Drive option is available only for Google Workspace users:
Use Domain Admin Access
Request the list of drives that require admin access.
Shared Drive
Select the drive.
Document ID
Select or map the document you want to edit.
Replace a Text
Specify the text you want to replace alongside with a new text.
Old text to be replaced
Enter the text you want to replace.
New text to be inserted
Enter a new text.
Download a Document
Downloads a document to a required format.
Connection
Establish a connection to your Google Docs account.
Choose a Drive
Select the drive that contains the documents you want to download. In the Folder ID field, select the drive.
The Google Shared Drive option is available only for Google Workspace users:
Use Domain Admin Access
Request the list of drives that require admin access.
Shared Drive
Select the drive.
Document ID
Select or map the document you want to download.
Type
Select the target file format of the downloaded document.
Delete a Document
Deletes a document.
Connection
Establish a connection to your Google Docs account.
Choose a Drive
Select the drive that contains the documents you want to delete. In the Folder ID field, select the drive.
The Google Shared Drive option is available only for Google Workspace users:
Use Domain Admin Access
Request the list of drives that require admin access.
Shared Drive
Select the drive.
Document ID
Select or map the document you want to delete.
Other
Make an API Call
Performs an arbitrary authorized API call.
Connection
Establish a connection to your Google Docs account.
URL
Enter a path relative to https://docs.googleapis.com/. For example, /v1/documents/{DocumentID}.
For the list of available endpoints, refer to the Google Docs API Documentation.
Method
Select the HTTP method you want to use:
- GET: To retrieve information for an entry.
- POST: To create a new entry.
- PUT: To update/replace an existing entry.
- PATCH: To make a partial entry update.
- DELETE: To delete an entry.
Headers
Enter the desired request headers. You don’t have to add authorization headers; we already did that for you.
Query String
Enter the request query string.
Body
Enter the body content for your API call.
Make All Links in a Document Clickable
Makes all links in a document clickable.
Connection
Establish a connection to your Google Docs account.
Make All Links in a Document
Select to map the ID of the document that contains links or select the document from the dropdown menu.
Choose a Drive
Select the drive that contains the documents with links.
The Google Shared Drive option is available only for Google Workspace users:
Use Domain Admin Access
Request the list of drives that require admin access.
Shared Drive
Select the drive.
Document ID
Select or map the document.
Legacy article, imported from the original Boost.space knowledge base (/knowledge-base/applications/file-and-document-management/google-docs/).

