Easyship

The Easyship modules allow you to watch, create, list, retrieve, and delete the shipments in your Easyship account.
Getting Started with Easyship
Prerequisites
- An Easyship account
In order to use Easyship with Boost.space Integrator, it is necessary to have an Easyship account. If you do not have one, you can create an Easyship account at easyship.com.
The module dialog fields that are displayed in bold (in the Boost.space Integrator scenario, not in this documentation article) are mandatory!
Connecting Easyship to Boost.space Integrator
-
Log in to your Easyship account.
-


From the Dashboard, click Create an API > Enter a name for the API >CONNECT.
-
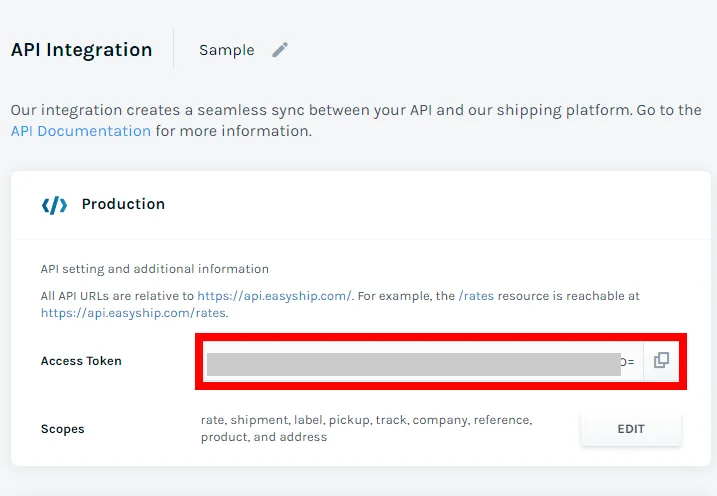
Copy the Access Token to your clipboard.
-
Go to Boost.space Integrator and open the Easyship module’s Create a connection dialog.
-
In the Connection name field, enter a name for the connection.
-
In the Access Token field, enter the Access Token copied in step 3 and click Continue.
The connection has been established.
Triggers

Watch Shipment Delivered
Triggers when a shipment is delivered to a recipient.
Webhook Name
Enter a name for the webhook.
Connection
Establish a connection to your Easyship account.
See the Connecting to Easyship Webhook using Boost.space Integrator to add the webhook to your Easyship account.
Watch Shipment In-Transit
Triggers when a shipment is handed over to a courier and is in transit.
Webhook Name
Enter a name for the webhook.
Connection
Establish a connection to your Easyship account.
See the Connecting to Easyship Webhook using Boost.space Integrator to add the webhook to your Easyship account.
Watch Shipment Updated
Triggers when a shipment status has changed as defined by the user.
Webhook Name
Enter a name for the webhook.
Connection
Establish a connection to your Easyship account.
See the Connecting to Easyship Webhook using Boost.space Integrator to add the webhook to your Easyship account.
Watch New Shipping Label
Triggers when a new shipping label is generated. Provides documentation and tracking information.
Webhook Name
Enter a name for the webhook.
Connection
Establish a connection to your Easyship account.
See the Connecting to Easyship Webhook using Boost.space Integrator to add the webhook to your Easyship account.
Actions
Create a Shipment
Creates a shipment and receive accurate shipping quotes.
Connection
Establish a connection to your Easyship account.
Shipment ID
Select the Shipment ID whose details you want to update.
Destination Country
Select the country to which the shipment should be sent. For example, For example, the United States.
Destination City
Enter the country to which the shipment should be sent. For example, in New York.
Destination Postal Code
Enter the area postal code where the shipment should be sent to.
Destination State
(Optional) Enter the state name to which the shipment should be sent to.
Destination Name
Enter the recipient’s name.
Destination Company Name
Enter the recipient’s company name.
Destination Address Line 1
Enter the recipient’s street name.
Destination Address Line 2
Enter the recipient’s street name.
Destination Phone Number
Enter the recipient’s phone number.
Destination Email Address
Enter the recipient’s email address.
Items
Add the shipment items:
Description
Enter the details of the item.
SKU
Enter the item’s SKU number.
Category
Select the item’s category.
Declared Currency
Select the currency applicable to the item. For example, USD.
Declared Customs Value
Enter the custom’s value of the item.
Quantity
Enter the item’s weight in kg.
Actual Weight
Enter the item’s actual weight when packing.
Height
Enter the item’s height in cm.
Width
Enter the item’s width in cm.
Length
Enter the item’s length in cm.
Platform Name
Enter the platform from which the shipment is being shipped. For example, Amazon. .
Platform Order Number
Enter the platform order number of the shipment.
Taxes & Duties Paid By
Select the option for paying the shipment’s taxes and duties:
-
Sender
-
Receiver
Is Insured
Select whether the shipment is insured.
Select Courier ID
(Optional) The courier will be selected by default.
Allow Courier Fallback
If you have provided _Selected Courier ID_but the courier cannot be selected, allow the shipment to be created and the next best rate to be selected.
Consignee Tax ID
Enter the shipment’s Consignee Tax ID.
Seller Notes
Enter the notes or comments provided by the seller for the shipment.
Buyer Notes
Enter the notes or comments provided by the buyer for the shipment.
Order Notes
Enter any additional information about the order.
Length
Enter the shipment’s length in cm.
Width
Enter the shipment’s width in cm.
Height
Enter the shipment’s height in cm.
Total Actual Weight
Enter the shipment’s total actual weight including the box weight. If you provide the total weight of the shipment, then the weight for items can be optional.
Get a Shipment
Returns a shipment by ID with current details.
Connection
Establish a connection to your Easyship account.
Easyship Shipment ID
Enter the Shipment ID whose details you want to retrieve.
Update a Shipment
Updates shipment by ID.
Connection
Establish a connection to your Easyship account.
Destination Country
Select the country to which the shipment should be sent. For example, For example, the United States.
Destination City
Enter the country to which the shipment should be sent. For example, in New York.
Destination Postal Code
Enter the area postal code where the shipment should be sent to.
Destination State
(Optional) Enter the state name to which the shipment should be sent.
Destination Name
Enter the recipient’s name.
Destination Company Name
Enter the recipient’s company name.
Destination Address Line 1
Enter the recipient’s street name.
Destination Address Line 2
Enter the recipient’s street name.
Destination Phone Number
Enter the recipient’s phone number.
Destination Email Address
Enter the recipient’s email address.
Items
Add the shipment items:
Description
Enter the details of the item.
SKU
Enter the item’s SKU number.
Category
Select the item’s category.
Declared Currency
Select the currency applicable to the item. For example, USD.
Declared Customs Value
Enter the custom’s value of the item.
Quantity
Enter the item’s weight in kg.
Actual Weight
Enter the item’s actual weight when packing.
Height
Enter the item’s height in cm.
Width
Enter the item’s width in cm.
Length
Enter the item’s length in cm.
Platform Name
Enter the platform from which the shipment is being shipped. For example, Amazon.
Platform Order Number
Enter the platform order number of the shipment.
Taxes & Duties Paid By
Select the option for paying the shipment’s taxes and duties:
-
Sender
-
Receiver
Is Insured
Select whether the shipment is insured.
Selected Courier ID
(Optional) The courier will be selected by default.
Allow Courier Fallback
If you have provided _Selected Courier ID_but the courier cannot be selected, allow the shipment to be created and the next best rate to be selected.
Consignee Tax ID
Enter the shipment’s Consignee Tax ID.
Delete a Shipment
Deletes shipment by ID.
Connection
Establish a connection to your Easyship account.
Easyship Shipment ID
Enter the Shipment ID you want to delete.
Make an API Call
Performs an arbitrary authorized API call.
Connection
Establish a connection to your Easyship account.
URL
Enter a path relative to https://api.easyship.com/. For example, shipment/v1/shipments
For the list of available endpoints, refer to the Easyship API Documentation.
Method
Select the HTTP method you want to use:
GET
to retrieve information for an entry.
POST
to create a new entry.
PUT
to update/replace an existing entry.
PATCH
to make a partial entry update.
DELETE
to delete an entry.
Headers
Enter the desired request headers. You don’t have to add authorization headers; we already did that for you.
Query String
Enter the request query string.
Body
Enter the body content for your API call.
Example of Use – List Shipments
The following API call returns all the shipments from your Easyship account:
URL:
/shipment/v1/shipments
Method:
GET
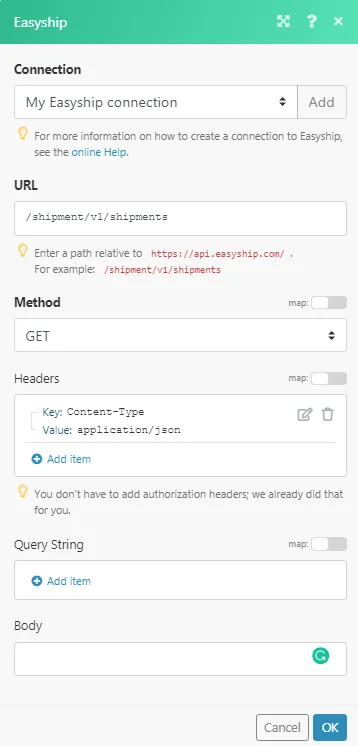
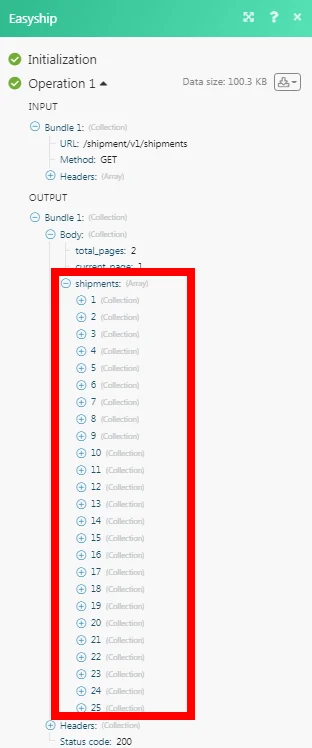
Matches of the search can be found in the module’s Output under Bundle > Body > shipments.
In our example, 25 shipments were returned:
Connecting to Easyship Webhook using Boost.space Integrator
-
Open any Watch module, establish a connection, click Save, and copy the URL field to your clipboard. Click OK and save the trigger.
-
Log in to your Easyship account.
-
From the Dashboard, click Create a Webhook > Add new webhook.
-
In the Webhook Endpoint URL field, enter the URL address copied in step 1, and select the events for which you want to receive the trigger.
-
Click Create.
-
Enable the webhook and click Save.
The webhook is added successfully.
Legacy article, imported from the original Boost.space knowledge base (/knowledge-base/applications/process-management/easyship/).

