Planyo
The Planyo modules allow you to watch, create, list, retrieve, and delete the users, vacations, reservations, and payments in your Planyo account.
Getting Started with Planyo
Prerequisites
- A Planyo account
In order to use Planyo with Boost.space Integrator, it is necessary to have a Planyo account. If you do not have one, you can create a Planyo account at planyo.com/login/signup.php.
Connecting Planyo to Boost.space Integrator
To connect your Planyo account to Boost.space Integrator you need to obtain the API Key from your Planyo account and insert it in the Create a connection dialog in the Boost.space Integrator module.
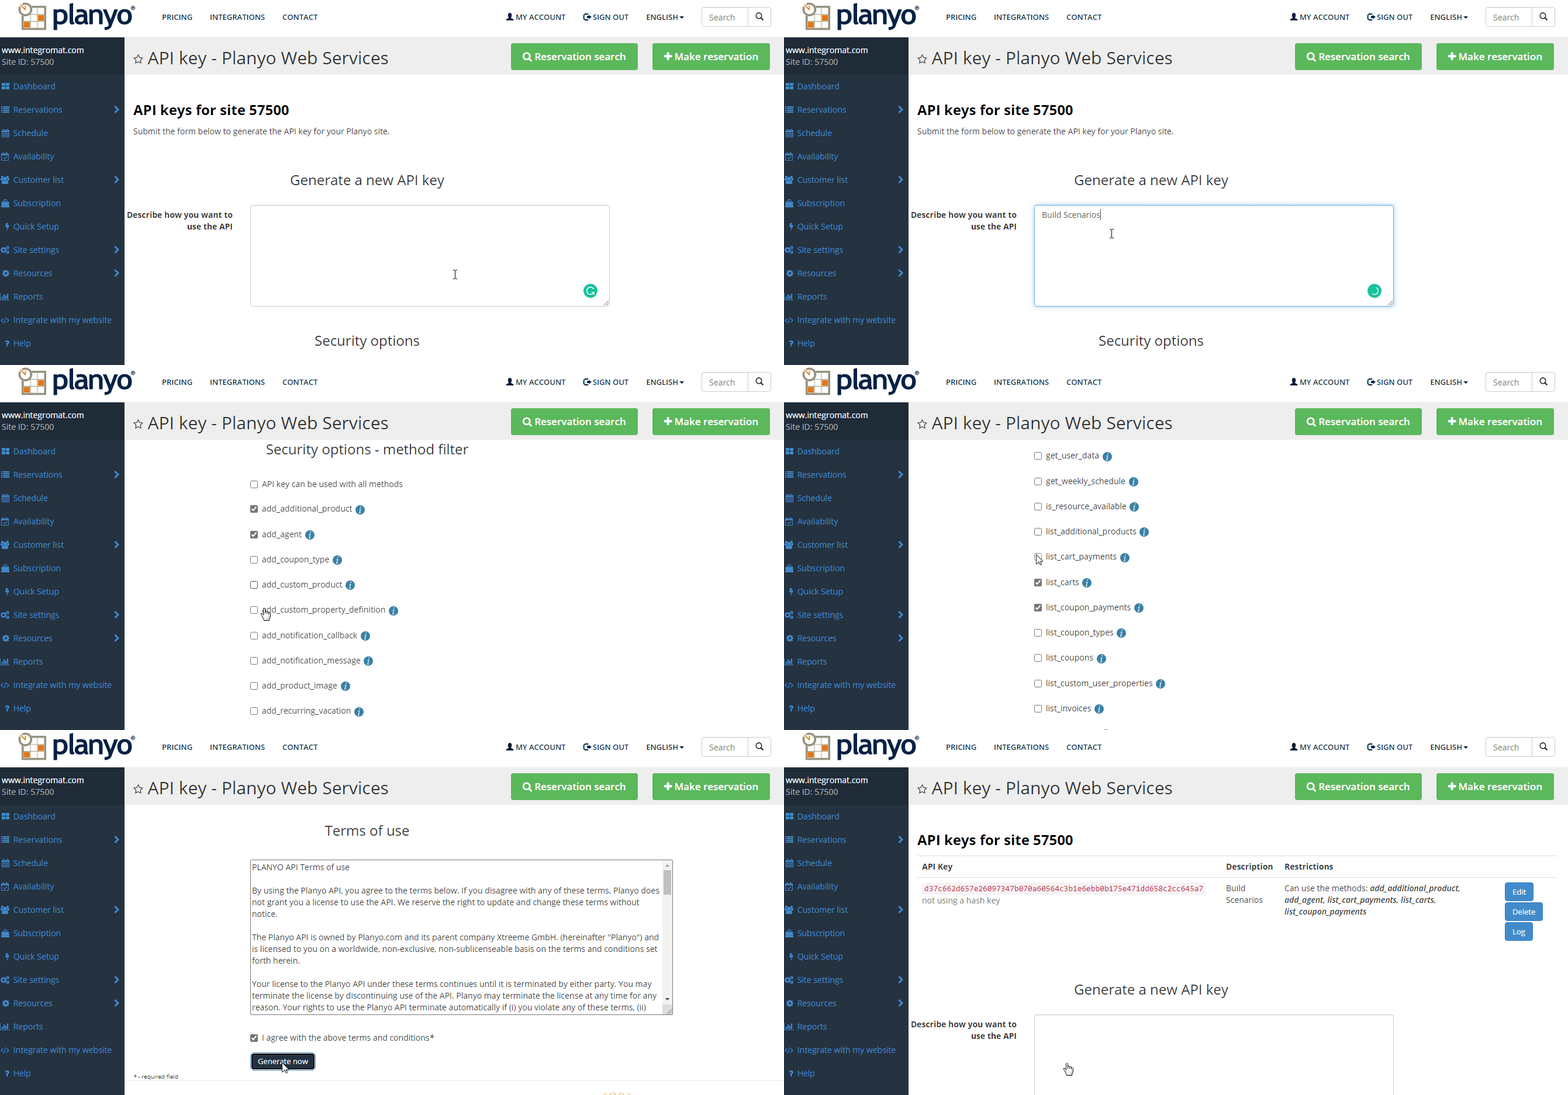
1. Go to the Planyo API website and log in to your account.
2. Enter the details for the API, select the permissions, accept the agreement, and click Generate Now.
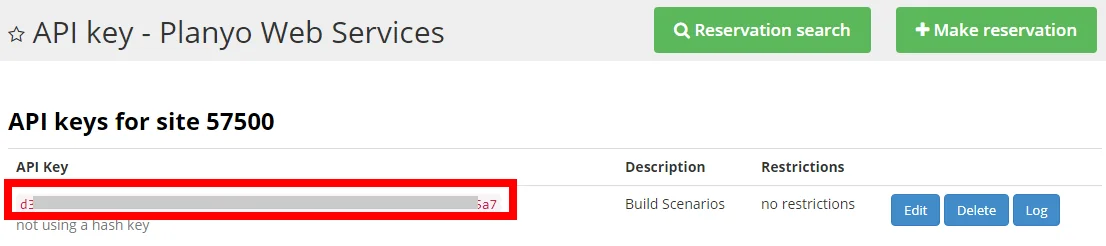
3. Copy the API Key to your clipboard.
4. Go to Boost.space Integrator and open the Planyo module’s Create a connection dialog.
5. In the Connection name field, enter a name for the connection.
6. In the API Key field, enter the API key details copied in step 3, select the preferred language, and click Continue.
The connection has been established.

Users
Add a User
Adds a new user (customer) associated with your Planyo site.
Connection
Establish a connection to your Planyo account.
Enter the email address of the user.
First Name
Enter the user’s first name.
Last Name
Enter the user’s last name.
User Login
Enter the user login details.
User Password
Enter the user’s password.
Country
Enter the user’s country name.
Address
Enter the user’s address details.
City
Enter the user’s city name.
Zip
Enter the user’s area zip code.
State
Enter the user’s state name.
Phone
Enter the user’s phone number without a country code.
Phone Country Code
Enter the user’s applicable country code.
Mobile Phone
Enter the user’s mobile phone number.
Mobile Phone Country Code
Enter the user’s applicable country code.
User Language
Select the user’s preferred language.
Custom Property Name
Add the custom properties for the user. For example, company.
Custom Property Value
Add the property value. For example, company name.
Admin User ID
Enter the admin’s user ID who added this new user.This should be used only in case it’s a resource admin who should be able to access the new user’s personal information.
List Users
Lists Users.
Connection
Establish a connection to your Planyo account.
Created by Admin
Select whether the user you want to search was created by the admin.
Detail Level
Select the details to include in the results:
-
User Information
-
Custom User Properties
Filter Name
Enter the customer property name to list only the users with the specified name.
Filter Value
Enter the customer property value to list only the users with the specified name.
First Name
Enter the user’s first name to list only the users with the specified first name.
Last Name
Enter the user’s last name to list only the users with the specified last name.
Enter the email address of the user to list only the users with the specified email address.
Country
Enter the user’s country name you want to list.
Address
Enter the user’s address you want to list.
City
Enter the user’s city name you want to list.
Zip
Enter the user’s zip code you want to list.
Phone
Enter the user’s phone number you want to list.
Phone Country Code
Enter the user’s country code you want to list.
Mobile Phone
Enter the user’s mobile phone number you want to list.
Mobile Phone Country Code
Enter the user’s country code you want to list.
Unconfirmed
Select whether the user status is unconfirmed.
Modified Since
Enter the date to list the users modified on or after the specified date.
Limit
Set the maximum number of users Boost.space Integrator should return during one scenario execution cycle.
Remove a User
Removes a user.
Connection
Establish a connection to your Planyo account.
User ID
Select the User ID you want to remove.
Get a User
Gets user data.
Connection
Establish a connection to your Planyo account.
User ID
Select the User ID whose details you want to retrieve.
Update a User
Modifies an existing user’s data.
Connection
Establish a connection to your Planyo account.
Search Criteria
Select the criteria to choose the user whose details you want to update:
-
Email
-
User ID
-
Login
Select the email address of the user.
User ID
Select the User ID whose details you want to update.
First Name
Enter the user’s first name.
Last Name
Enter the user’s last name.
New Email
Enter the user’s new email address.
Email Verified
Select whether the email address is verified.
Country
Enter the user’s country name.
Address
Enter the user’s address details.
City
Enter the user’s city name.
Zip
Enter the user’s area zip code.
State
Enter the user’s state name.
Phone
Enter the user’s phone number without a country code.
Phone Country Code
Enter the user’s applicable country code.
Mobile Phone
Enter the user’s mobile phone number.
Mobile Phone Country Code
Enter the user’s applicable country code.
User Language
Select the user’s preferred language.
Custom Property Name
Add the custom properties for the user. For example, company.
Custom Property Value
Add the property value. For example, company name.
Is Preapproved
Select whether the user is preapproved.
Is Banned
Select whether the user is banned.
Watch Users Updated
Triggers when a user has been updated.
Webhook Name
Enter a name for the webhook.
See the Connecting to Planyo Webhooks Using Boost.space Integratorto add the webhooks to your Planyo account.
Vacations
Add a Vacation
Adds a new one-time vacation for a given resource or the entire Planyo site.
Connection
Establish a connection to your Planyo account.
Start Time
Enter the date and time when the vacation begins. See the list of supported date and time formats.
End Time
Enter the date and time when the vacation ends. See the list of supported date and time formats.
Resource ID
Select the Resource ID for whom you are adding this vacation. If left blank, the vacation will be added for the whole site.
Quantity
Enter the number of resources to which the vacation will be marked.
Type
Select the vacation type:
-
Imported from a Google Calendar
-
No Special Type
Comment
Enter the information about the vacation.
Google Calendar ID
Enter the vacation’s Google Calendar ID.
Validate
Select whether you want to validate the vacation.
Unit Assignment
If vacations are assigned to a specific unit. Add the assignment units to which the vacations are assigned.
List Vacations
Lists all vacations within a specified time range.
Connection
Establish a connection to your Planyo account.
Start Time
Enter the start time to list the vacations that start with the specified time.
End Time
Enter the end time to list the vacations that end with the specified time.
Type
Select the vacation type you want to list. For example, All Vacations.
Limit
Set the maximum number of Planyo Boost.space Integrator should return during one scenario execution cycle.
Resource ID
Select the Resource ID whose vacations you want to list.
Assigned Unit Time
Enter unassigned to list only the vacations with no unit assignment.
Include Site Vacations
Select whether you want to list the whole site vacations.
Vacation Recurrence Type
Select the vacation recurrence type you want to list:
-
One-time
-
Recurring
-
All
Expand Recurring
Select whether you want to list recurring vacation details.
Remove a Vacation
Removes a specified vacation.
Connection
Establish a connection to your Planyo account.
Vacation ID
Select the Vacation ID you want to remove.
Reservation
Make a Reservation
Enters a new reservation into the system.
Connection
Establish a connection to your Planyo account.
Start Time
Enter the start time to list the vacations that start with the specified time.
End Time
Enter the end time to list the vacations that end with the specified time.
Quantity
Enter the number of reservations you want to make.
Is New User
Select if the reservation is for a new user.
Enter the user’s email address.
First Name
Enter the user’s first name.
Last Name
Enter the user’s last name.
Country
Enter the user’s country name.
Address
Enter the user’s address details.
City
Enter the user’s city name.
Zip
Enter the user’s area zip code.
State
Enter the user’s state name.
Phone
Enter the user’s phone number.
Phone Country code
Enter the user’s country code.
Mobile Phone
Enter the user’s mobile phone number.
Mobile Phone Country Code
Enter the user’s country code.
Admin Mode
Select whether the user is in admin mode. If yes, the reservation will be entered in the admin mode meaning that the required fields (as defined in the reservation form) will not be required, except for the first name and reservation dates/times. Also, other restrictions set in resource settings will not be checked and the email verification step (if used in the resource) will be skipped. The default value is false.
Send Notifications
Select whether you want to send notifications about the reservation.
Force Status
Select the reservation status. For example, completed.
Wants Share
Select the reservation sharing option:
-
Sharing not Allowed
-
Sharing Allowed
-
Sharing Forced
Rental Voucher
Enter the reservation voucher code.
Custom Price
Enter a custom price for the reservation. If not specified, Planyo will calculate the price for you using your pricing manager rules.
This custom price parameter cannot be used together with rental_prop_voucher.
User Notes
Enter the notes about the reservation.
Admin Notes
Enter the admin notes about the reservation.
Referer Code
Enter the referral code for the reservation. You can use it to track the original source of the booking. This value will be later visible in reservation details and available as the tag $(refcode).
Creation Date
Enter the date and time of the reservation.
Cart ID
This field is applicable only if your site works with the shopping carts. You can also enter an existing shopping cart ID. Otherwise, a new cart will be created.
Custom Property Name
Enter the reservation’s custom property name.
Custom Property Value
Enter the reservation’s custom property value.
Count Number of Assignment
Enter the number of assignment units applicable for the reservation.
Assignment Value
Enter the assignment value separated by a comma. For example, assignment2, assignment3, etc.
List Reservations
Lists all reservations that either start within a given time period or that were entered into the system within the given time period.
Connection
Establish a connection to your Planyo account.
Start Time
Enter the start time to list the reservations that start with the specified time.
End Time
Enter the end time to list the reservations that end with the specified time.
Limit
Set the maximum number of reservations Boost.space Integrator should return during one scenario execution cycle.
Resource IDs
Select the Resource IDs whose reservations you want to list.
Custom Property Name
Enter the custom property name to list the reservations with the specified property name.
Custom Property Value
Enter the custom property value to list the reservations with the specified property value.
List By Creation Date
Select whether you want to list the reservations by their created date.
Sort
Select the option to sort the reservations. For example, the user.
Sort Reverse
Select whether you want to list the reservations in the reverse order. For example, descending order.
Detail Level
Select the details to include the reservation results.
User ID
Select the User ID whose reservations you want to list.
User Email
Select the user’s email address whose reservations you want to list.
Search by Status
Select the status of the reservation you want to list.
Exclude Status
Select the status of the reservation you want do want to include in the list.
Modified Since
Enter the date to list the reservations that were modified on or after the specified date.
Delete a Reservation
Permanently removes a reservation.
Connection
Establish a connection to your Planyo account.
Reservation ID
Select the Reservation ID you want to delete.
Get a Reservation
Gets reservation details.
Connection
Establish a connection to your Planyo account.
Reservation ID
Select the Reservation ID whose details you want to retrieve.
Resource ID
Select the Resource ID of the reservation.
Start Time
Enter the start time of the reservation.
End Time
Enter the end time of reservation.
Custom Property Name
Enter the custom property name to list the reservations with the specified property name.
Custom Property Value
Enter the custom property value to list the reservations with the specified property value.
Count Number of Assignment
Enter the number of assignment units applicable for the reservation.
Assignment Value
Enter the assignment value separated by a comma. For example, assignment2, assignment3, etc.
User ID
Select the User ID to whom you want to assign the reservation.
Quantity
Enter the number of reservations you want to make.
Admin Mode
Select whether the user is in admin mode. If yes, the reservation will be entered in the admin mode meaning that the required fields (as defined in the reservation form) will not be required, except for the first name and reservation dates/times. Also, other restrictions set in resource settings will not be checked and the email verification step (if used in the resource) will be skipped. The default value is false.
Send Notifications
Select whether you want to send notifications about the reservation.
Comments
Enter any other additional information about the reservation.
Update a Reservation
Updates a reservation.
Connection
Establish a connection to your Planyo account.
Reservation ID
Select the Reservation ID whose details you want to update.

Watch New Reservations
Triggers when a new reservation has been added.
Webhook Name
Enter a name for the webhook.
See the Connecting to Planyo Webhooks Using Boost.space Integratorto add the webhooks to your Planyo account.
Watch Reservations Confirmed
Triggers when a reservation has been confirmed.
Webhook Name
Enter a name for the webhook.
See the Connecting to Planyo Webhooks Using Boost.space Integratorto add the webhooks to your Planyo account.
Watch Reservations Canceled by Admin
Triggers when a reservation has been canceled by admin.
Webhook Name
Enter a name for the webhook.
See the Connecting to Planyo Webhooks Using Boost.space Integratorto add the webhooks to your Planyo account.
Watch Reservations Modified by Admin
Triggers when a reservation has been modified by admin.
Webhook Name
Enter a name for the webhook.
See the Connecting to Planyo Webhooks Using Boost.space Integratorto add the webhooks to your Planyo account.
Watch Reservations Cancelled Automatically
Triggers when a reservation has been canceled automatically.
Webhook Name
Enter a name for the webhook.
See the Connecting to Planyo Webhooks Using Boost.space Integratorto add the webhooks to your Planyo account.
Watch Payments Received
Triggers when a new payment has been canceled.
Webhook Name
Enter a name for the webhook.
See the Connecting to Planyo Webhooks Using Boost.space Integratorto add the webhooks to your Planyo account.
Watch Reservations Updated by a Customer
Triggers when a reservation has been updated by a customer.
Webhook Name
Enter a name for the webhook.
See the Connecting to Planyo Webhooks Using Boost.space Integratorto add the webhooks to your Planyo account.
Watch Reservations Cancelled by a Customer
Triggers when a reservation has been canceled by a customer.
Webhook Name
Enter a name for the webhook.
See the Connecting to Planyo Webhooks Using Boost.space Integratorto add the webhooks to your Planyo account.
Other
Make an API Call
Performs an arbitrary authorized API call.
For the list of available endpoints, refer to the Planyo API Documentation.
Connection
Establish a connection to your Planyo account.
Method
Select the HTTP method you want to use:
GET to retrieve information for an entry.
POST to create a new entry.
Headers
Enter the desired request headers. You don’t have to add authorization headers; we already did that for you.
Query String
Enter the request query string.
Body
Enter the body content for your API call.
Example of Use – List Users
The following API call returns all the user from your Planyo account:
Method: GET
Query String:
Key: method
Value: list_users
Key: list_created_by_admin Value: true
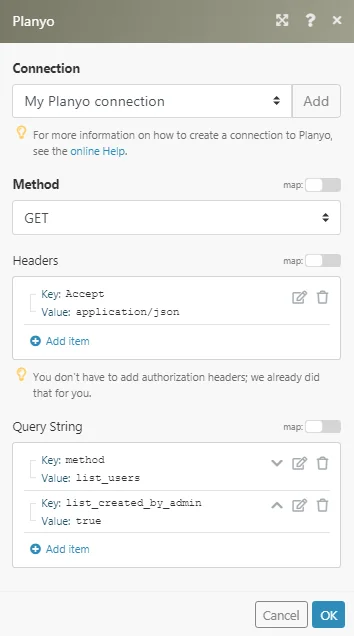
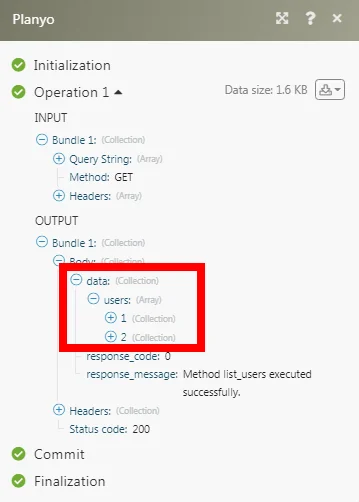
Matches of the search can be found in the module’s Output under Bundle > Body > data>_users._In our example, 2 users were returned:
Connecting to Planyo Webhooks Using Boost.space Integrator
1. Open any watch module, establish a connection, click Save, and copy the URL address to your clipboard. Click OK and save the trigger.
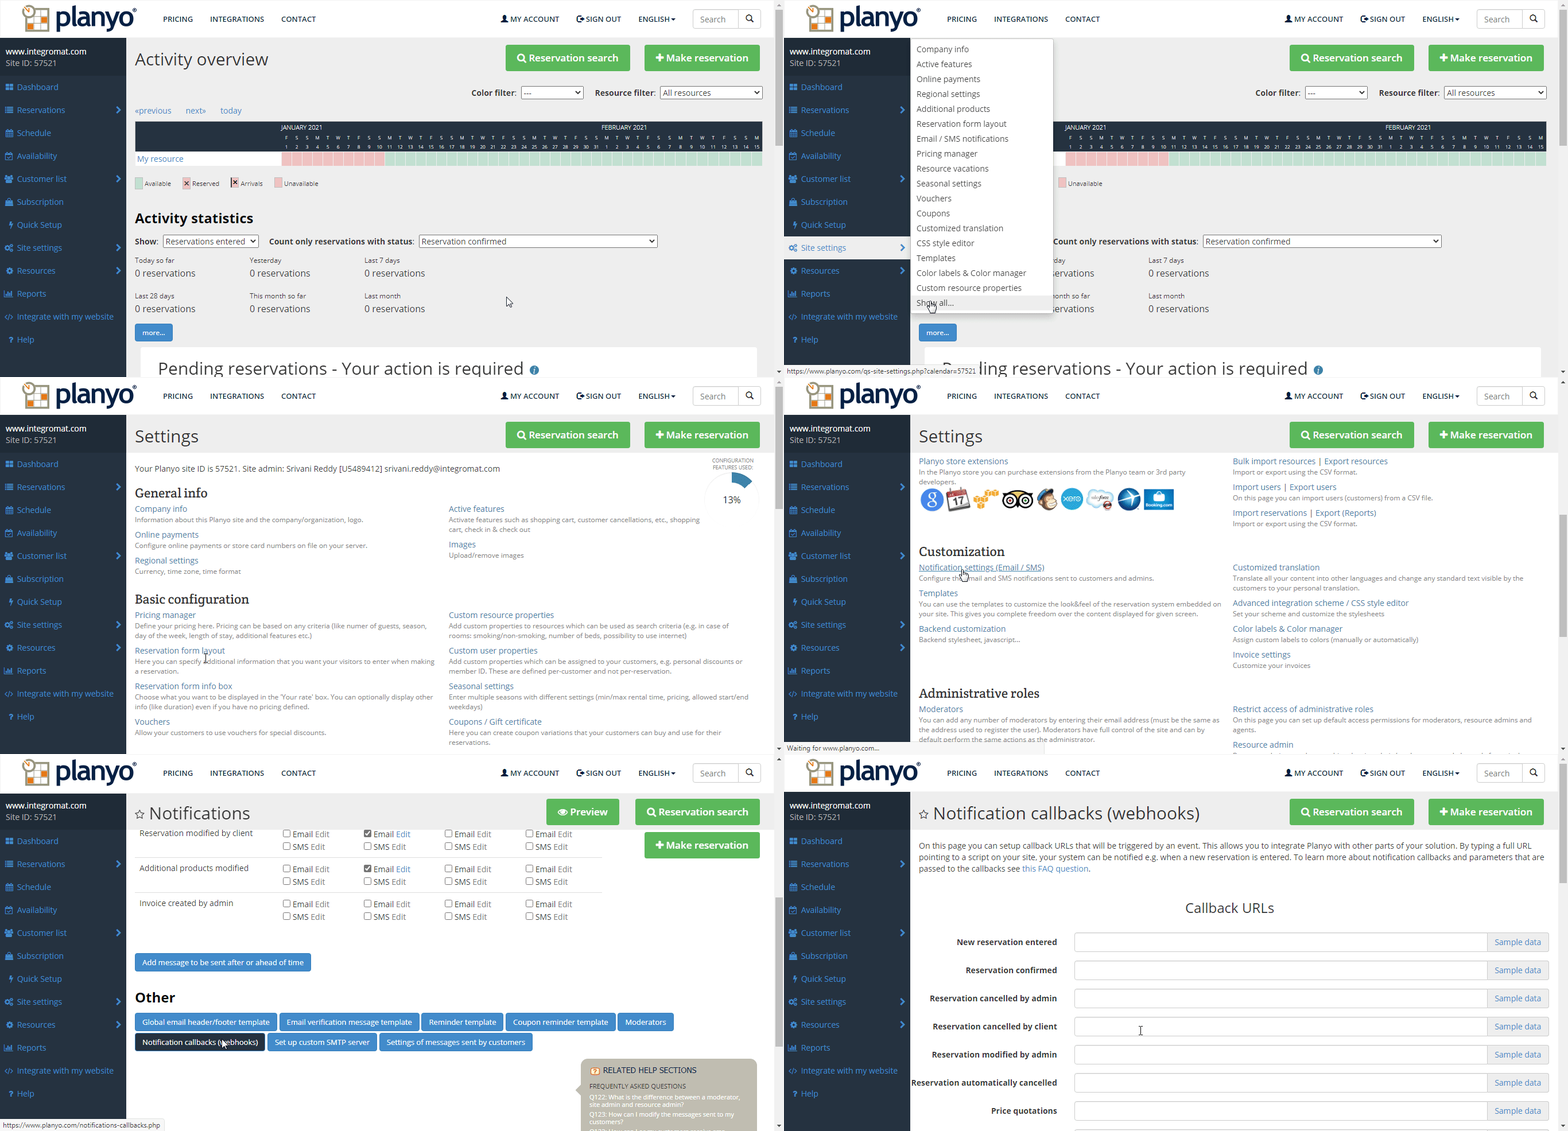
2. Log in to your Planyo account. Click Site Settings > Show all… > Notification Settings > Notification Callbacks.
3. Add the webhook URL address copied in step 1 against the notification you want to receive and click Update.

You have successfully added the webhook.
Legacy article, imported from the original Boost.space knowledge base (/knowledge-base/applications/productivity/planyo/).

